


If you think the secret to a wind-resistant boundary is simply how tightly you screw the wood together, you're looking at the wrong part of your garden. Many homeowners ask how to join fence panels together to stop them rattling, but true structural integrity comes from the post-panel interface. Screwing panels directly to one another without the correct support is a recipe for a collapsed fence during the next UK gale.
It's understandable why you might feel hesitant. Choosing between U-clips, wrap-around brackets, and various gauge screws is often confusing, and the fear of splitting your timber is real. With the average cost of a failed DIY project in the UK reaching £491.50 according to 2025 data, getting the installation right the first time is a financial necessity. You want a straight, sturdy line that doesn't buckle under pressure or look amateur.
This guide provides the professional methods used by installers to secure panels to posts and handle tricky corners. You'll learn exactly which ironmongery to use and how to avoid common timber damage. We'll walk through the step by step process to ensure your garden boundary remains secure, level, and professional in appearance for years to come.
Key Takeaways
- Understand why the UK post-and-panel system is superior to direct panel-to-panel joining for long-term wind resistance.
- Identify the correct ironmongery, such as U-clips and galvanised fixings, to learn how to join fence panels together without splitting the timber.
- Master the technique for marking centre lines on wooden posts to ensure a perfectly straight and level garden boundary.
- Learn professional methods for handling complex 90-degree corners and "staircasing" panels across sloped terrain.
- Discover how using gravel boards and post caps provides the essential foundation and protection for a durable, trade-grade finish.
The Fundamentals of Joining Fence Panels
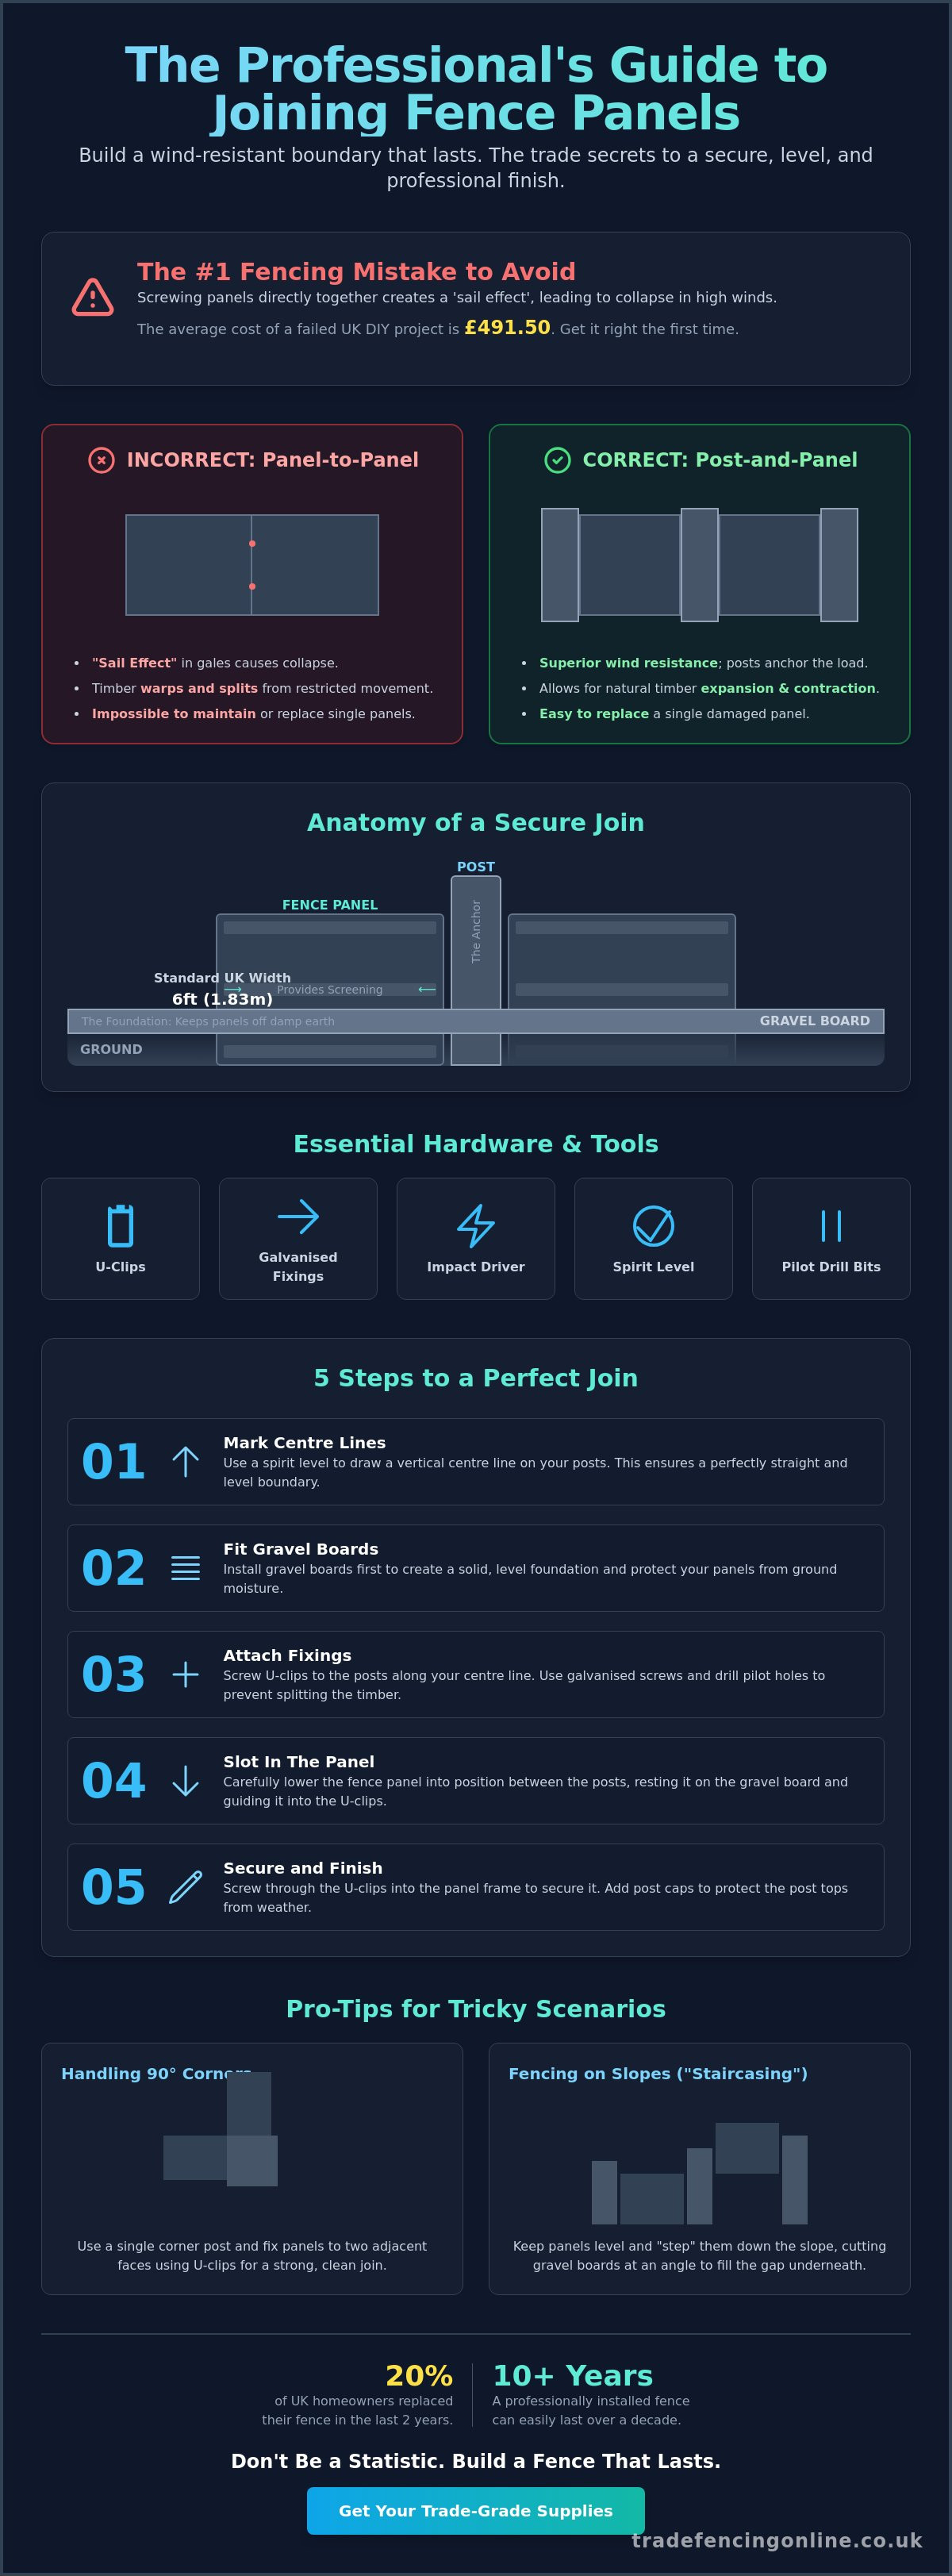
Success in garden fencing relies on a specific structural logic. In the UK, the industry standard is the post-and-panel system. While you might be looking for ways on how to join fence panels together, it's a common misconception that the panels connect directly to each other. They don't. Each panel acts as an independent unit, secured to a vertical post that provides the necessary lateral support. Standard UK fence panels are manufactured to a width of 6ft, which is approximately 1.83m. This consistency allows for predictable post spacing across your boundary line. For a deeper look at Fence fundamentals, it is clear that the post is the primary joining agent for any secure boundary.
Why You Should Never Screw Panels Directly Together
Directly screwing timber panels to one another is a major technical error. A long run of panels without intermediate post support creates what professionals call a "sail effect." During UK gales, the wind pressure against the flat surface area becomes immense. Without posts to transfer that load into the ground, the entire line will buckle or snap at the screw points. Timber is also a reactive material. It expands in the wet winter months and contracts during the summer. If panels are rigidly joined together, this movement leads to warping, splitting, and pulled fixings. Maintenance becomes a headache too. If a single panel is damaged, you'll find it nearly impossible to remove it without compromising the panels on either side.
The Anatomy of a Secure Fence Join
A professional join is a three-way relationship between the panel, the post, and the ground. The post acts as the anchor, while the panel provides the screen. To achieve a secure result, you must ensure the ground is level before you begin. This is where gravel boards become essential. They act as the foundation for the join, keeping the timber panels off the damp earth and providing a straight horizontal datum line.
When positioning your panels, identify the "face" and the "back." The face is the side that usually looks out toward the road or a neighbour, while the back shows the horizontal supporting rails. A secure join ensures these rails are firmly seated against or within the post structure. This setup provides the structural rigidity needed to survive the British climate. Knowing how to join fence panels together correctly means focusing on how each panel interacts with the post, rather than its neighbour.
Essential Hardware for Connecting Fence Panels
Selecting the right ironmongery is just as critical as the timber itself. When you look at how to join fence panels together, the choice of hardware dictates the lifespan of the entire boundary. For standard square timber posts, U-clips or Z-clips are the industry standard. These brackets allow the panel to sit securely against the post face while providing a small amount of "give" for natural timber movement. If you're building a feather edge fence from scratch, essential fencing supplies like arris rail brackets are mandatory to bridge the gap between the rails and the vertical supports.
Material quality matters. Always opt for galvanised or stainless steel fixings. Standard steel screws will rust within a single UK winter, leaving "black streaks" on your timber as tannins react with the corroding metal. Before you drive a single screw, verify that your project complies with UK planning permission for fences, especially regarding height. To get the job done efficiently, you'll need an impact driver, a 4ft spirit level, and pilot bits to prevent splitting the wood. With 20% of UK homeowners having replaced their fence in the last two years, using trade-grade hardware is the best way to ensure you aren't part of that statistic again in 2028.
Fencing Clips vs. Direct Nailing
U-brackets are the preferred choice for most modern garden fences. They allow for easy panel removal if you need to treat the wood or access a hidden area of the garden. You simply screw the bracket to the post and slide the panel in. Conversely, direct nailing using 100mm galvanised nails offers a more permanent, rigid fix. This is common in high-wind areas where "rattle" is a concern. To avoid splitting the panel frame, always drill a pilot hole first. This small step prevents the timber from cracking under the pressure of the nail or screw shank.
Fixings for Concrete vs. Timber Posts
Joining panels to concrete fence posts requires a different approach. Slotted concrete posts are the most straightforward. The panels simply slide into the pre-cast grooves, requiring no additional clips. However, if you're using solid concrete posts, you'll need "bolt-down" fixings or specialised masonry brackets. These require a hammer drill and masonry bits to secure the bracket to the concrete face. If you prefer the look of timber but want the longevity of concrete, ensure your brackets are compatible with both materials. You can find a full selection of compatible ironmongery to suit any post type in our inventory.
How to Join Fence Panels to Wooden Posts
Joining panels to timber posts requires precision and a steady hand. Start by marking a vertical centre line down the face of your 3x3 or 4x4 wooden posts. This line is your guide. It ensures each panel has exactly half the post surface for a secure connection. When you're figuring out how to join fence panels together, remember that the first panel is the most important. If it's misaligned, the rest of the fence will follow that error. Every millimetre of deviation at the start results in a visible lean by the end of the run.
Use small timber spacers to maintain a consistent 2mm to 5mm gap between the panel frame and the post. This isn't just for looks. It allows the wood to breathe and prevents moisture from being trapped in the join. Once the first panel is secured, bring the second panel to the other side of the centre line. This creates a continuous, professional run. A final check with a spirit level ensures the boundary is both plumb and true before you move to the next section.
Step 1: Positioning and Levelling
Precision is everything during the positioning phase. Use a 4ft spirit level to check the horizontal top edge and the vertical side rails. If the ground is uneven, you'll need to decide whether to follow the slope or step the panels. Use temporary timber braces to hold the panel in place while you make adjustments. To support the panel during a solo installation, wedge a timber prop under the bottom rail to maintain the correct height against the post. This keeps your hands free to handle the drill and fixings without the panel slipping.
Step 2: Fixing the Brackets or Nails
Don't drive all your fixings into the same vertical grain line. This is a common mistake that causes the post to split under pressure. Stagger your screws or nails slightly to distribute the load across the timber. For a standard 6ft panel, we recommend three clips or fixings on each side. Position them roughly 150mm from the top edge, 150mm from the bottom, and one in the dead centre. This six-point fixing system provides maximum resistance against UK gales. Always apply a quick dab of wood preservative to any pilot holes you drill. This protects the untreated inner core of the timber from moisture ingress and rot, ensuring the join remains solid for years.
Advanced Joins: Corners, Ends, and Slopes
Standard straight runs are straightforward. The real test of your fencing skill comes when you hit a boundary corner or a significant incline. Understanding how to join fence panels together at these points determines if your fence looks professional or like a DIY disaster. For a 90-degree turn, you don't need two posts side-by-side. A single 4x4 timber post is sufficient. You simply fix the first panel to one face and the second panel to the adjacent face. This creates a clean, structural corner that shares the same foundation and maintains a tidy footprint in your garden.
Ending a run against a house or garage wall requires wall plates. These are timber lengths screwed directly into the masonry using expansion bolts. You then join your final panel to this plate using the same U-clips discussed in previous sections. If you're left with an odd gap at the end of a run, you'll need to cut the panel to size. Always re-attach the vertical framing batten to the cut edge to maintain the panel's strength. Failure to re-frame the edge will cause the panel to sag, lose its tension, and eventually fall apart under its own weight.
Mastering the Corner Join
When positioning panels on adjacent faces of a 4x4 post, alignment is your priority. Ensure both panels sit at the same height to maintain a continuous top line across the corner. Gravel boards must also meet precisely at the base. You might need to mitre the ends of the gravel boards at a 45-degree angle for a flush fit. If your garden has non-standard angles, use adjustable angled brackets rather than forcing a square fit. This prevents unnecessary tension on the fixings and stops the timber from bowing over time. It's a small detail that prevents large-scale structural failure.
Joining Panels on Sloping Ground
Sloped gardens require the staircase method. Instead of trying to follow the ground's angle, keep every panel perfectly level. You "step" the height at each post, creating a tiered look. This leaves a triangular gap beneath the panel on the downhill side. You must fill this gap with a custom-cut gravel board or multiple stacked boards to prevent pets from escaping and to protect the bottom of the panel from damp soil. Always maintain a perfect vertical line for your posts to ensure the tiered effect looks intentional and professional. If you have a complex layout with multiple levels, you can hire our professional fencing installation team to ensure a perfectly level finish across your entire property.
Achieving a Professional Finish with Trade-Grade Supplies
A secure join is only as good as its protection. Once you've mastered how to join fence panels together, you must shield the connection points from the British weather. Post caps and finials are mandatory. They aren't just for decoration. They prevent rainwater from sitting on the flat top of a post and soaking into the end grain. This is the quickest way to rot a post from the inside out. Similarly, gravel boards act as the foundation for your join. They keep the bottom of your timber panels off the wet ground, preventing rising damp from compromising the structural integrity of your fixings.
Moisture traps occur wherever two surfaces meet. The gap between your panel and the post is a primary risk zone. Apply a high-quality wood preservative to these areas before final assembly. Conduct a final inspection once the run is complete. Walk the line and check for rattles. A loose panel will vibrate in the wind, eventually backing out screws or loosening nails. Tighten any fixings that aren't flush. A silent fence is a sign of a professional installation.
Adding the Finishing Touches
Enhance your boundary by installing trellis toppers to your joined panels. This adds height without the weight of a full panel. Secure these using the same U-clip method to maintain consistency. Apply a final coat of weather protection to all exposed hardware. If you live in a high-exposure area, use anti-rattle strips. These small plastic or rubber inserts sit between the panel and the post. They provide a tighter fit and eliminate the noise of timber hitting timber during gales.
Why Source from Romford Fencing Ltd?
Quality matters at the join. We supply trade-grade panels designed to resist warping and twisting, ensuring your connections stay tight for years. Our team provides expert local advice tailored to Essex and East London soil conditions, where heavy clay can often shift post foundations. We understand the specific challenges of the regional climate and stock the heavy-duty ironmongery required to combat it.
Don't let your project stall. We offer FAST LOCAL DELIVERY to get your fencing components delivered directly to your door. We remove the logistical friction so you can focus on the build. Our inventory includes everything from professional-grade postmix to specialist brackets. Browse our full range of professional fence panels and fixings today to secure your garden boundary with confidence. CALL US NOW for immediate stock availability and delivery slots.
Secure Your Garden Boundary Today
Building a fence that survives the British climate requires more than just standard timber. You've learned that structural strength is found at the post interface; joining panels directly to each other is a mistake that leads to failure. Using the correct ironmongery and maintaining level lines across slopes ensures your boundary remains straight and secure. These professional methods prevent the "sail effect" and protect your investment from the rot that often plagues poorly installed fences.
As established Romford experts, we provide trade prices directly to the public. We offer fast delivery across Essex and East London to ensure your project stays on schedule. Our inventory includes the high-quality panels, posts, and gravel boards needed for a trade-grade finish that won't warp. Learning how to join fence panels together correctly is the first step toward a permanent solution for your garden.
SHOP TRADE-QUALITY FENCE PANELS FOR FAST LOCAL DELIVERY
Take the next step and order your materials today. With the right supplies and professional techniques, you'll create a wind-resistant boundary that stands the test of time. It's time to build a fence you can trust.
Frequently Asked Questions
Can I join two fence panels together without a post?
No, you shouldn't join panels without a vertical post. Without a post to anchor the structure into the ground, the panels act like a large sail. Wind pressure will quickly cause the join to snap or the entire line to buckle. Posts are essential for transferring lateral loads into the soil. Always ensure every panel is secured to a dedicated support on both ends for maximum stability and a professional finish.
What size screws should I use for fence panels?
Use 35mm to 50mm galvanised screws for securing U-clips to timber posts. If you're nailing directly through the panel frame, opt for 80mm to 100mm fixings to ensure deep penetration into the post. Always choose stainless steel or hot-dipped galvanised materials. Standard steel screws will corrode and leave black streaks on your timber. Pre-drilling pilot holes is vital to prevent the wood from splitting during the installation process.
Do I need to use clips, or can I just nail through the frame?
You can use either method, but clips are the professional choice for modern installations. Clips allow for easier panel replacement and provide a cleaner finish without visible nail heads. Nailing directly through the frame is a traditional, permanent solution often used in high-wind areas. If you choose to nail, ensure you use galvanised ring-shank nails. These prevent the fixings from backing out over time as the timber naturally moves and breathes.
How do I join a new fence panel to an existing concrete post?
Slide the panel into the pre-cast slots if you're using standard slotted concrete posts. For solid concrete posts, you'll need specialised masonry brackets and expansion bolts. Drill into the concrete with a hammer drill and masonry bit before securing the bracket. This provides a firm anchor point for the timber. Ensure the panel is level and use timber packers if the concrete slot is wider than the new panel frame.
What is the best way to join fence panels on a corner?
Use a single 4x4 timber post and fix the panels to adjacent faces. This creates a sturdy 90-degree angle while sharing a single foundation. Mark your centre lines on both faces to ensure the panels meet flush at the corner edge. For non-standard angles, use adjustable angled brackets to prevent tension on the timber. This method is the most efficient way to learn how to join fence panels together at garden boundaries.
How many fixings do I need per fence panel join?
Use six fixings per panel, with three on each vertical side. Position your clips or nails roughly 150mm from the top, 150mm from the bottom, and one in the centre. This distribution provides the necessary resistance against lateral wind pressure. For taller 6ft panels, adding a fourth fixing can provide extra security. Stagger these fixings slightly to avoid hitting the same grain line in the post, which effectively prevents splitting.
Can I use a gate in the middle of two joined panels?
Yes, but you must install dedicated gate posts to support the weight and movement. Don't hang a gate directly from a standard fence panel frame. Secure the adjacent panels to the gate posts using the standard clip method. This ensures the gate has a solid foundation for its hinges and latch. Using heavy-duty posts for the gate section prevents the surrounding fence from sagging or pulling out of alignment over time.
Why are my joined fence panels rattling in the wind?
Rattling is usually caused by loose fixings or a gap between the panel and the post. Over time, timber shrinks, which can loosen nails or screws. Inspect your hardware and tighten any loose connections. If the rattle persists, install anti-rattle strips or small timber wedges to create a tighter fit. Learning how to join fence panels together correctly involves using these small adjustments to ensure a quiet boundary that survives the UK winter.