


Starting a fencing project only to realise you are missing a vital component is a common and costly frustration. An unexpected trip back to the supplier for a forgotten bracket or another bag of post mix wastes time and stops progress. To ensure an efficient job, getting your list of fencing supplies correct from the outset is essential. From major items like fence panels and posts to the specific fixings and ironmongery, overlooking a single part can disrupt your entire schedule.
This guide provides the solution. We have created a complete, itemised checklist that covers every material you will need for a professional finish. This resource eliminates guesswork, clarifies which items are essential, and helps you order the correct quantities with confidence. Use this checklist to ensure you have all the quality fencing materials on-site before you start. As your one-stop-shop for everything fencing, we make sure you get the job done right, the first time.
Key Takeaways
- A long-lasting fence starts with the right foundation. Learn how to select the correct posts, post-mix, and gravel boards for maximum stability.
- Understand the difference between using pre-made panels and building a fence from components to choose the best option for your project.
- Avoid repeat trips to the supplier with our complete checklist of essential fencing supplies, covering everything from major components to the last screw.
- Discover the essential gate ironmongery and protective treatments required to properly secure and finish your new fence.
Step 1: The Foundation - Posts, Fixings, and Gravel Boards
A fence is only as strong as its foundation. To ensure your fence stands firm for years, you must start with the correct posts and fixings. This initial stage is the most critical part of any fencing project, and getting it right means your structure will withstand harsh weather and the test of time. The principles of a solid base are universal, from simple garden dividers to large-scale Agricultural fencing. Here, we detail the essential fencing supplies needed to build a secure and durable base.
Essential Supplies for Fence Posts
Your fence posts are the primary structural support. Choosing the right type and securing them correctly is non-negotiable for a quality installation. Your main options are timber for a traditional look or concrete for maximum longevity and strength. Once you've chosen, you'll need the following to set them in place:
- Fence Posts: Choose between traditional Timber vs. Concrete posts based on your budget and desired lifespan.
- Postcrete/Post Mix: This is the fastest and most reliable way to set posts. A general rule is one 20kg bag per post for standard installations, ensuring a solid, permanent footing.
- Fence Post Spikes: An alternative to concrete for soil ground. They are faster to install but offer less stability, making them best suited for lower-height fences or temporary solutions.
- Post Caps: Essential for wooden posts. They prevent water from seeping into the end grain, which is the main cause of rot, while also providing a smart, decorative finish.
Securing Your Base with Gravel Boards
Gravel boards are a vital component for protecting your fence panels. They create a barrier between the bottom of your fence panel and the damp ground, preventing premature rot and decay. This simple addition significantly extends the life of your entire fence. Just like posts, you can select between Wooden vs. Concrete options to match your chosen style. To fit them, you will need the right fixings:
- Gravel Board Cleats/Brackets: These are small metal brackets used to attach wooden or concrete gravel boards directly to wooden fence posts.
- Two-Pin Cleats: Specifically designed for concrete slotted posts. These cleats hold the gravel board securely in the post's channel, creating a solid and seamless base for your panels.
Step 2: The Structure - Panels, Rails, and Fixings
With your posts in place, the next step is to build the main body of the fence. This structure provides the privacy and security for your property. You have two primary options: using quick-to-install pre-made panels or constructing a traditional fence from individual components. Your choice will determine the specific fencing supplies required for the job.
Each method offers a quality finish, but one may be better suited to your project's timeline and the landscape of your garden.
For Pre-Made Fence Panels
Using pre-made panels is the fastest way to erect a fence. They are delivered ready to be fixed directly between your posts. Ensure you have the correct ironmongery for your chosen post type to guarantee a secure fit.
- Fence Panels: Choose from popular, robust styles like our Heavy Duty Closeboard Panels or traditional Lap Panels for a cost-effective boundary. Both provide excellent privacy.
- U-Brackets/Fence Clips: These are the standard method for securely fixing wooden panels to timber posts. Use exterior-grade screws to attach them to both the post and the panel frame.
- Bolts and Nuts: If you are using slotted concrete posts, you will need the correct length bolts to pass through the post and secure the panel firmly in the slot.
- Screws: Always use exterior-grade, weather-resistant screws for any timber-to-timber fixings. This prevents rust and ensures a long-lasting, secure installation.
For Component-Built Fencing (Closeboard)
For a stronger, seamless fence, building with components is the superior choice. This method, often called feather edge fencing, allows for a continuous run without visible panel breaks and is excellent for navigating sloped ground.
- Arris Rails or Cant Rails: These are the horizontal timber rails that form the fence's backbone, running between the posts. Learn more about choosing the right rails for your project.
- Arris Rail Brackets: Use these galvanised metal brackets to fix wooden arris rails securely to your fence posts for a durable frame.
- Feather Edge Boards: These are the overlapping vertical timber boards that create the solid face of the fence, providing maximum privacy and strength.
- Galvanised Nails: It is essential to use galvanised nails when fixing feather edge boards. This prevents rust streaks from staining the timber and weakening the fixings over time.
Whatever method you choose, we are your one-stop-shop for all quality fencing supplies, delivered directly to your site.
Step 3: Gates and Finishing Touches
A fence is not complete without a secure point of access and a protective finish. Overlooking these final details can compromise the security and lifespan of your entire installation. This part of your checklist covers the essential ironmongery for your gate and the treatments needed to protect your investment from the elements.
Gate Hanging and Security Supplies
To hang and secure a garden gate correctly, you will need a specific set of hardware. These components ensure smooth operation and reliable security for your property. Our essential ironmongery checklist includes:
- Garden Gate: Select a gate that complements the style of your fence panels. We offer a range of styles, from classic closeboard gates to decorative picket designs.
- Tee Hinges: These are the standard choice for hanging wooden gates, providing strong support with a long strap that fixes to the gate's horizontal braces. A pair is required for most standard gates.
- Ring Latch or Brenton Bolt: For a simple and effective closing mechanism, a galvanised ring latch is ideal. For a more secure option that can be bolted from one side, a Brenton bolt is a quality choice.
- Hasp and Staple: If you require the ability to lock your gate, a hasp and staple allows for the use of a padlock, adding an extra layer of security.
Decorative and Protective Supplies
Beyond the basic structure, the right decorative and protective fencing supplies can significantly enhance your project's appearance and durability. Consider adding Trellis Panels/Fence Toppers to gain extra height and a decorative finish, perfect for supporting climbing plants.
Protecting the timber itself is crucial. While many fence panels are pressure-treated for longevity, any non-treated timber, such as sawn rails or certain gate posts, requires a quality wood treatment. Applying a fence treatment or paint not only adds colour but also provides a vital barrier against moisture, rot, and UV damage. Ensure you have the right tools for the job, such as brushes for detailed work or a sprayer for covering large areas quickly and efficiently.
For all the essential hardware and finishing products, you can browse our full range of ironmongery and accessories.
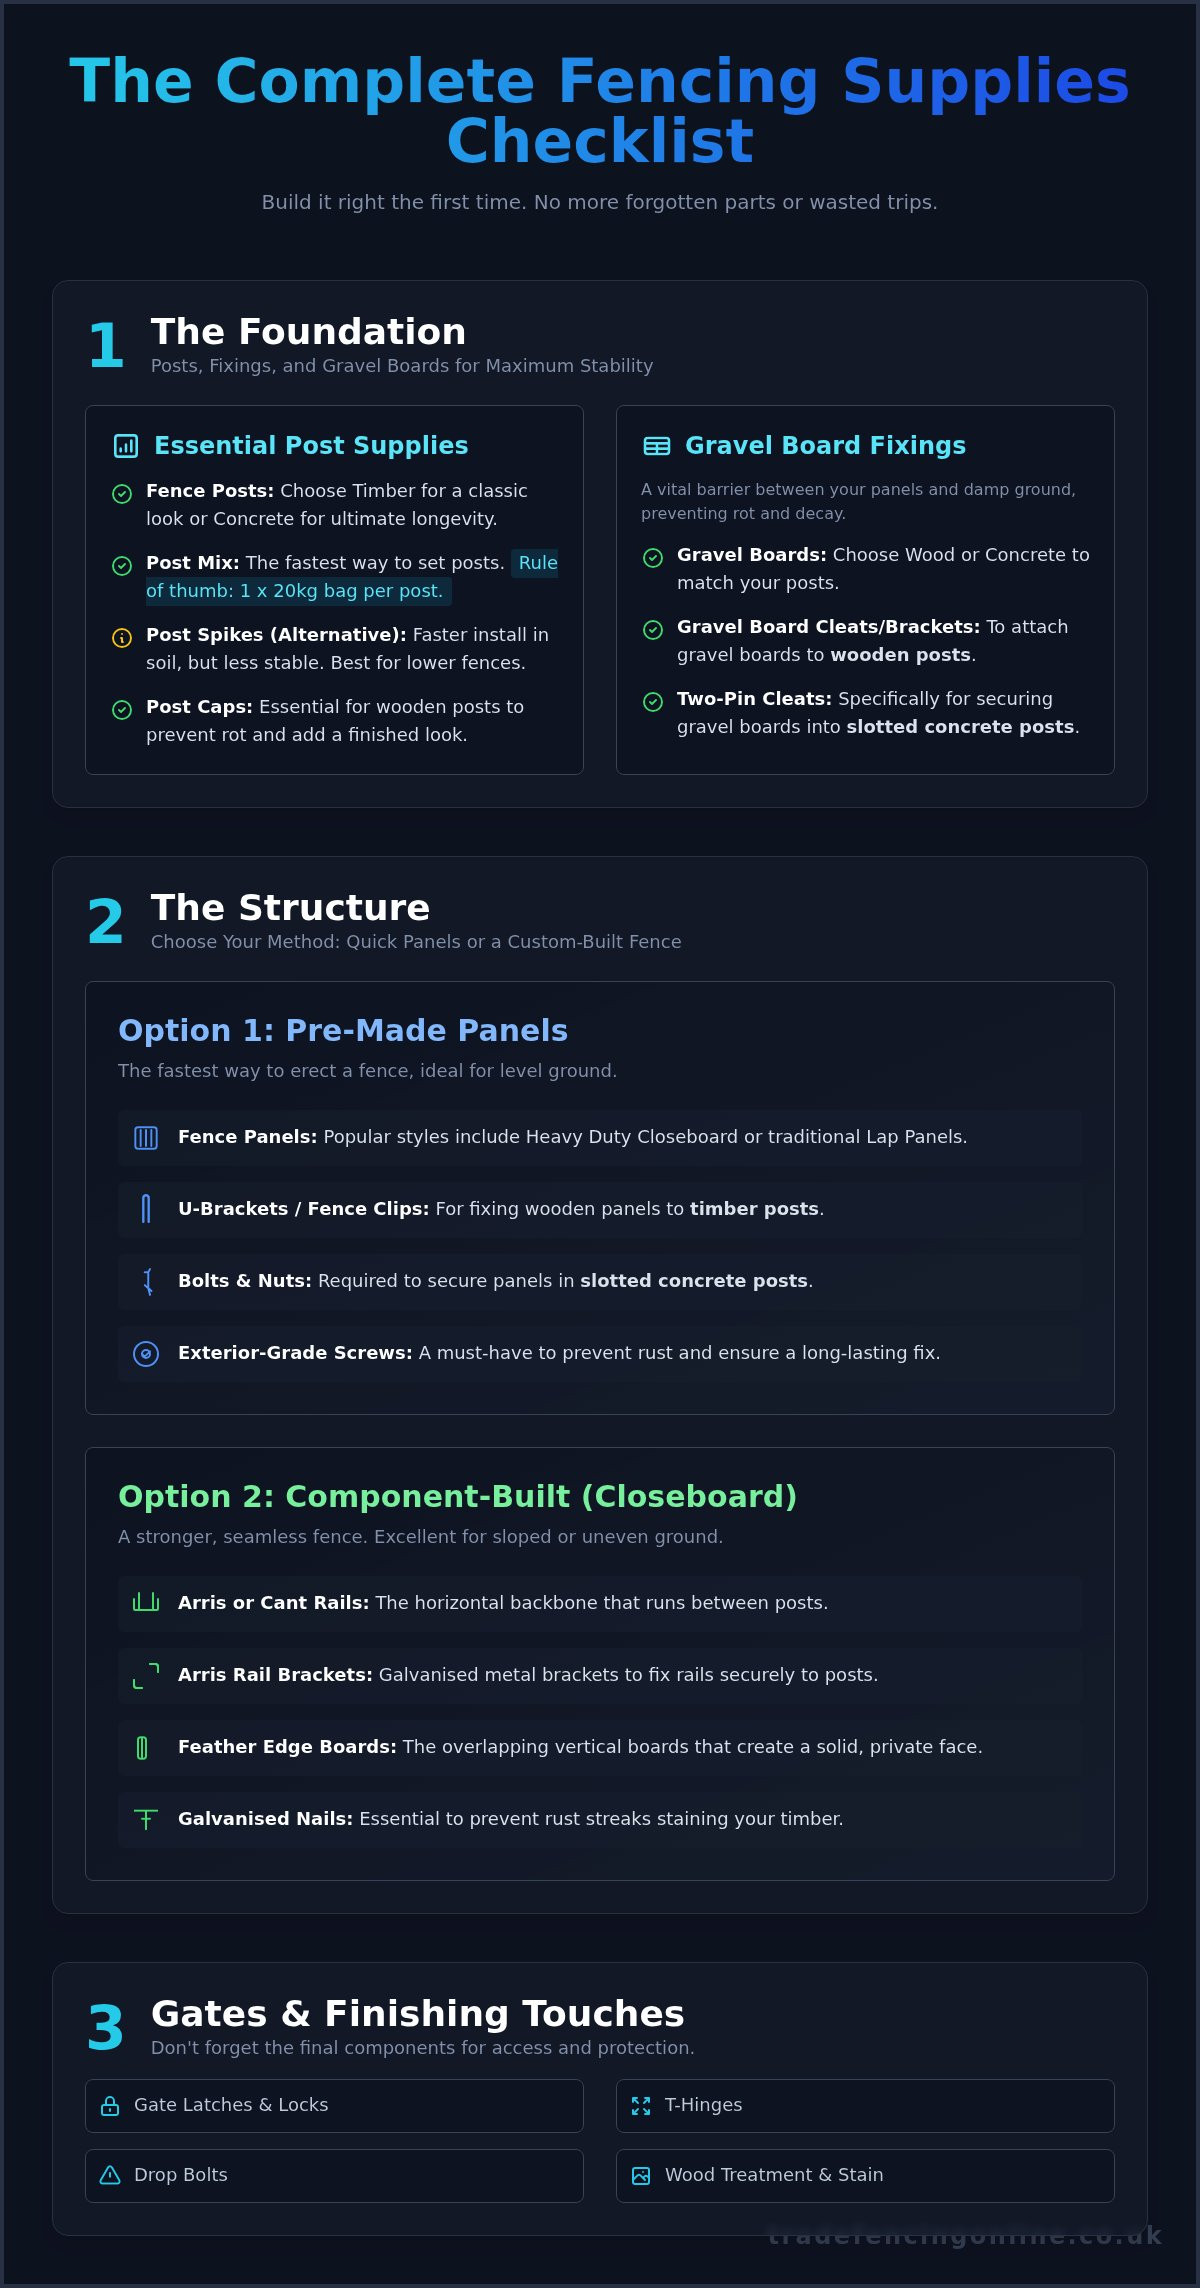
Your Complete Fencing Supplies Checklist
To ensure your project runs smoothly and without interruption, use these checklists to gather all the necessary materials. This guide covers the essentials for the two most common types of timber fencing, helping you order everything you need in one go. Proper planning prevents delays and unnecessary trips for forgotten items.
Checklist for a Standard Panel Fence Project
Panel fencing is a popular, straightforward option. Here are the core components you will need for the job:
- Fence Panels: The total number required to cover the boundary length, plus one spare for cuts or future repairs.
- Fence Posts: The number of panels plus one additional post to finish the run.
- Gravel Boards: One per panel, to protect the base of your fence from ground moisture and rot.
- Postcrete: A minimum of one bag per post for a secure, solid footing.
- U-Brackets/Fence Clips: Two to three per panel to fix the panel securely to the posts.
- Post Caps: One per post to provide a finished look and protect the end grain from weather.
- Screws: Ensure you have enough weather-resistant screws for all brackets and fixings.
Checklist for a Component Closeboard Fence Project
A closeboard fence is built from individual components for a strong, traditional finish. Your list of fencing supplies will include:
- Fence Posts: The number of bays plus one to finish the run.
- Arris Rails: Typically three per bay (top, middle, and bottom).
- Gravel Boards: One per bay, installed at the bottom.
- Feather Edge Boards: The vertical boards that create the solid screen.
- Arris Rail Brackets: Two per rail to fix them securely to the posts.
- Postcrete: At least one bag per post.
- Galvanised Nails: For fixing the feather edge boards to the arris rails.
- Centre Stump: A small support post used mid-bay to prevent the gravel board from sagging.
How to Calculate Quantities
Accurate measurements are essential to avoid waste and extra cost. Use these simple formulas to calculate your needs.
For panels, posts, and gravel boards, the calculation is straightforward:
Total Length of Fence (in metres) ÷ Width of Panel (e.g., 1.83m for a 6ft panel) = Number of Panels/Bays Needed. Always round up to the nearest whole number.
To calculate the number of feather edge boards, use this formula:
Total Length of Bay (in mm) ÷ (Board Width - Recommended Overlap) = Number of Boards per Bay. For a 100mm board with a 25mm overlap, each board covers 75mm. So, a 1.83m (1830mm) bay would require 1830 ÷ 75 = 25 boards.
Pro Tip: Always order approximately 10% extra material, especially for feather edge boards, to account for cuts, mistakes, or imperfections. For a complete range of quality fencing, visit Trade Fencing Online today.
Secure Everything You Need for Your Fencing Project
Building a durable, professional-looking fence comes down to careful planning. As our checklist demonstrates, a successful project depends on having every component ready before you begin. From the crucial foundation of posts and gravel boards to the main structure of panels and rails, getting the details right is essential. A complete list of fencing supplies not only saves you time but also prevents frustrating delays, ensuring a smooth and efficient build from start to finish.
When you're ready to purchase, choose a supplier you can depend on. Trade Fencing Online is the trusted choice for trade professionals and DIY enthusiasts across Essex and East London. We provide high-quality materials designed for performance and longevity. Combined with our fast local delivery service, getting everything you need for your project is simple and straightforward, allowing you to focus on the job at hand.
Ready to turn your plan into reality? Shop all your fencing supplies in one place and get your project underway with confidence.
Frequently Asked Questions About Fencing Supplies
How much Postcrete or Post Mix do I need for a fence post?
As a general rule, you will need one 20kg bag of Post Mix per standard fence post. For larger posts, such as 4x4 inch (100mm) timber or corner posts, using one and a half to two bags is recommended to ensure a solid foundation. This provides the stability required to support the fence structure against wind and ground movement. Always check the product instructions for specific guidance on water-to-mix ratios for the best results.
What is the difference between wooden and concrete gravel boards?
The primary difference is durability. Concrete gravel boards are immune to rot, moisture, and insect damage, offering the longest possible lifespan for your fence base. They are a fit-and-forget solution. Pressure-treated wooden gravel boards provide a more traditional, seamless appearance with timber fencing but will eventually degrade over time, even with treatment. Concrete offers superior longevity, while wood provides a specific aesthetic but requires future maintenance.
Are gravel boards necessary for a fence?
Yes, gravel boards are an essential component for any quality fence installation. They raise the fence panel off the ground, preventing direct contact with damp soil and surface water. This simple barrier is the most effective way to protect your timber panels from premature rot and decay. Installing a gravel board significantly extends the life of your fence, making it a crucial investment that saves money on future repairs and panel replacements.
What type and size of screws are best for fixing fence panels?
For fixing wooden fence panels to timber posts, use exterior-grade, weather-resistant screws. We recommend treated decking screws, typically 50mm in length (e.g., 4.0 x 50mm), as they are specifically designed to prevent rust and corrosion. Using the correct type of screw ensures a secure, long-lasting fixing that will not fail when exposed to the elements. Never use interior screws for outdoor projects as they will quickly rust and compromise the fence's integrity.
How do you attach fence panels to concrete posts?
You attach fence panels to slotted concrete posts using fence panel clips, often called U-clips. These metal brackets are first bolted securely onto the concrete post. The panel is then placed into position, resting on the clip, and a screw is driven through the clip's fixing hole into the side frame of the panel. Using a clip at the top and bottom of each side provides a robust and reliable fixing for the panel within the post.
What basic tools do I need to build a fence?
A successful fence installation requires a few essential tools. You will need a spade or post-hole digger, a spirit level, and a tape measure for setting your posts correctly. A hammer and a drill/driver are necessary for fixings. You should also have a taut string line and stakes to ensure a straight fence line. A saw may be needed for cutting panels or gravel boards to size. Having these basic fencing supplies on hand ensures an efficient and professional job.