


A new garden fence is a major investment in your property's privacy and security. But with countless panel styles, post materials, and UK planning rules to navigate, starting a fencing project can be the hardest part. How do you choose the right materials for a durable result? How do you know if your plans comply with the law? Getting these early decisions wrong is a costly and frustrating mistake.
This complete UK guide provides the clear, practical answers you need. We break down everything required for a successful installation, from understanding the pros and cons of timber versus concrete posts to explaining the key differences between closeboard and lap panels. You will learn how to calculate your materials accurately and ensure your project complies with UK height regulations. By the end, you will have a solid plan and the confidence to select a quality fence that adds value to your home.
Key Takeaways
- Start your project correctly by measuring your boundary and understanding UK rules to avoid costly mistakes.
- Learn the key differences between timber and concrete components to make the best choice for your budget and maintenance needs.
- Choose the right panel style for your property by balancing the need for privacy with the desire for natural light.
- Assess whether a DIY installation is feasible by understanding the essential tools and steps required for a quality fencing job.
Understanding the Basics: Key Fencing Components and Terms
Before starting any DIY project, understanding the fundamentals is key. Garden fencing serves several critical functions: it establishes clear property boundaries, enhances security, provides privacy from neighbours, and improves the overall aesthetic of your outdoor space. Unlike a hedge that requires regular trimming or a solid wall that can be costly, a well-chosen fence offers a practical and effective solution. Investing in quality materials from the outset is not a cost-it's an investment in a durable, long-lasting structure that will stand up to the UK weather for years to come.
The Main Parts of a Fence System
A successful installation depends on using the right components. Every fence system is built from a few core parts that work together to create a strong and stable barrier.
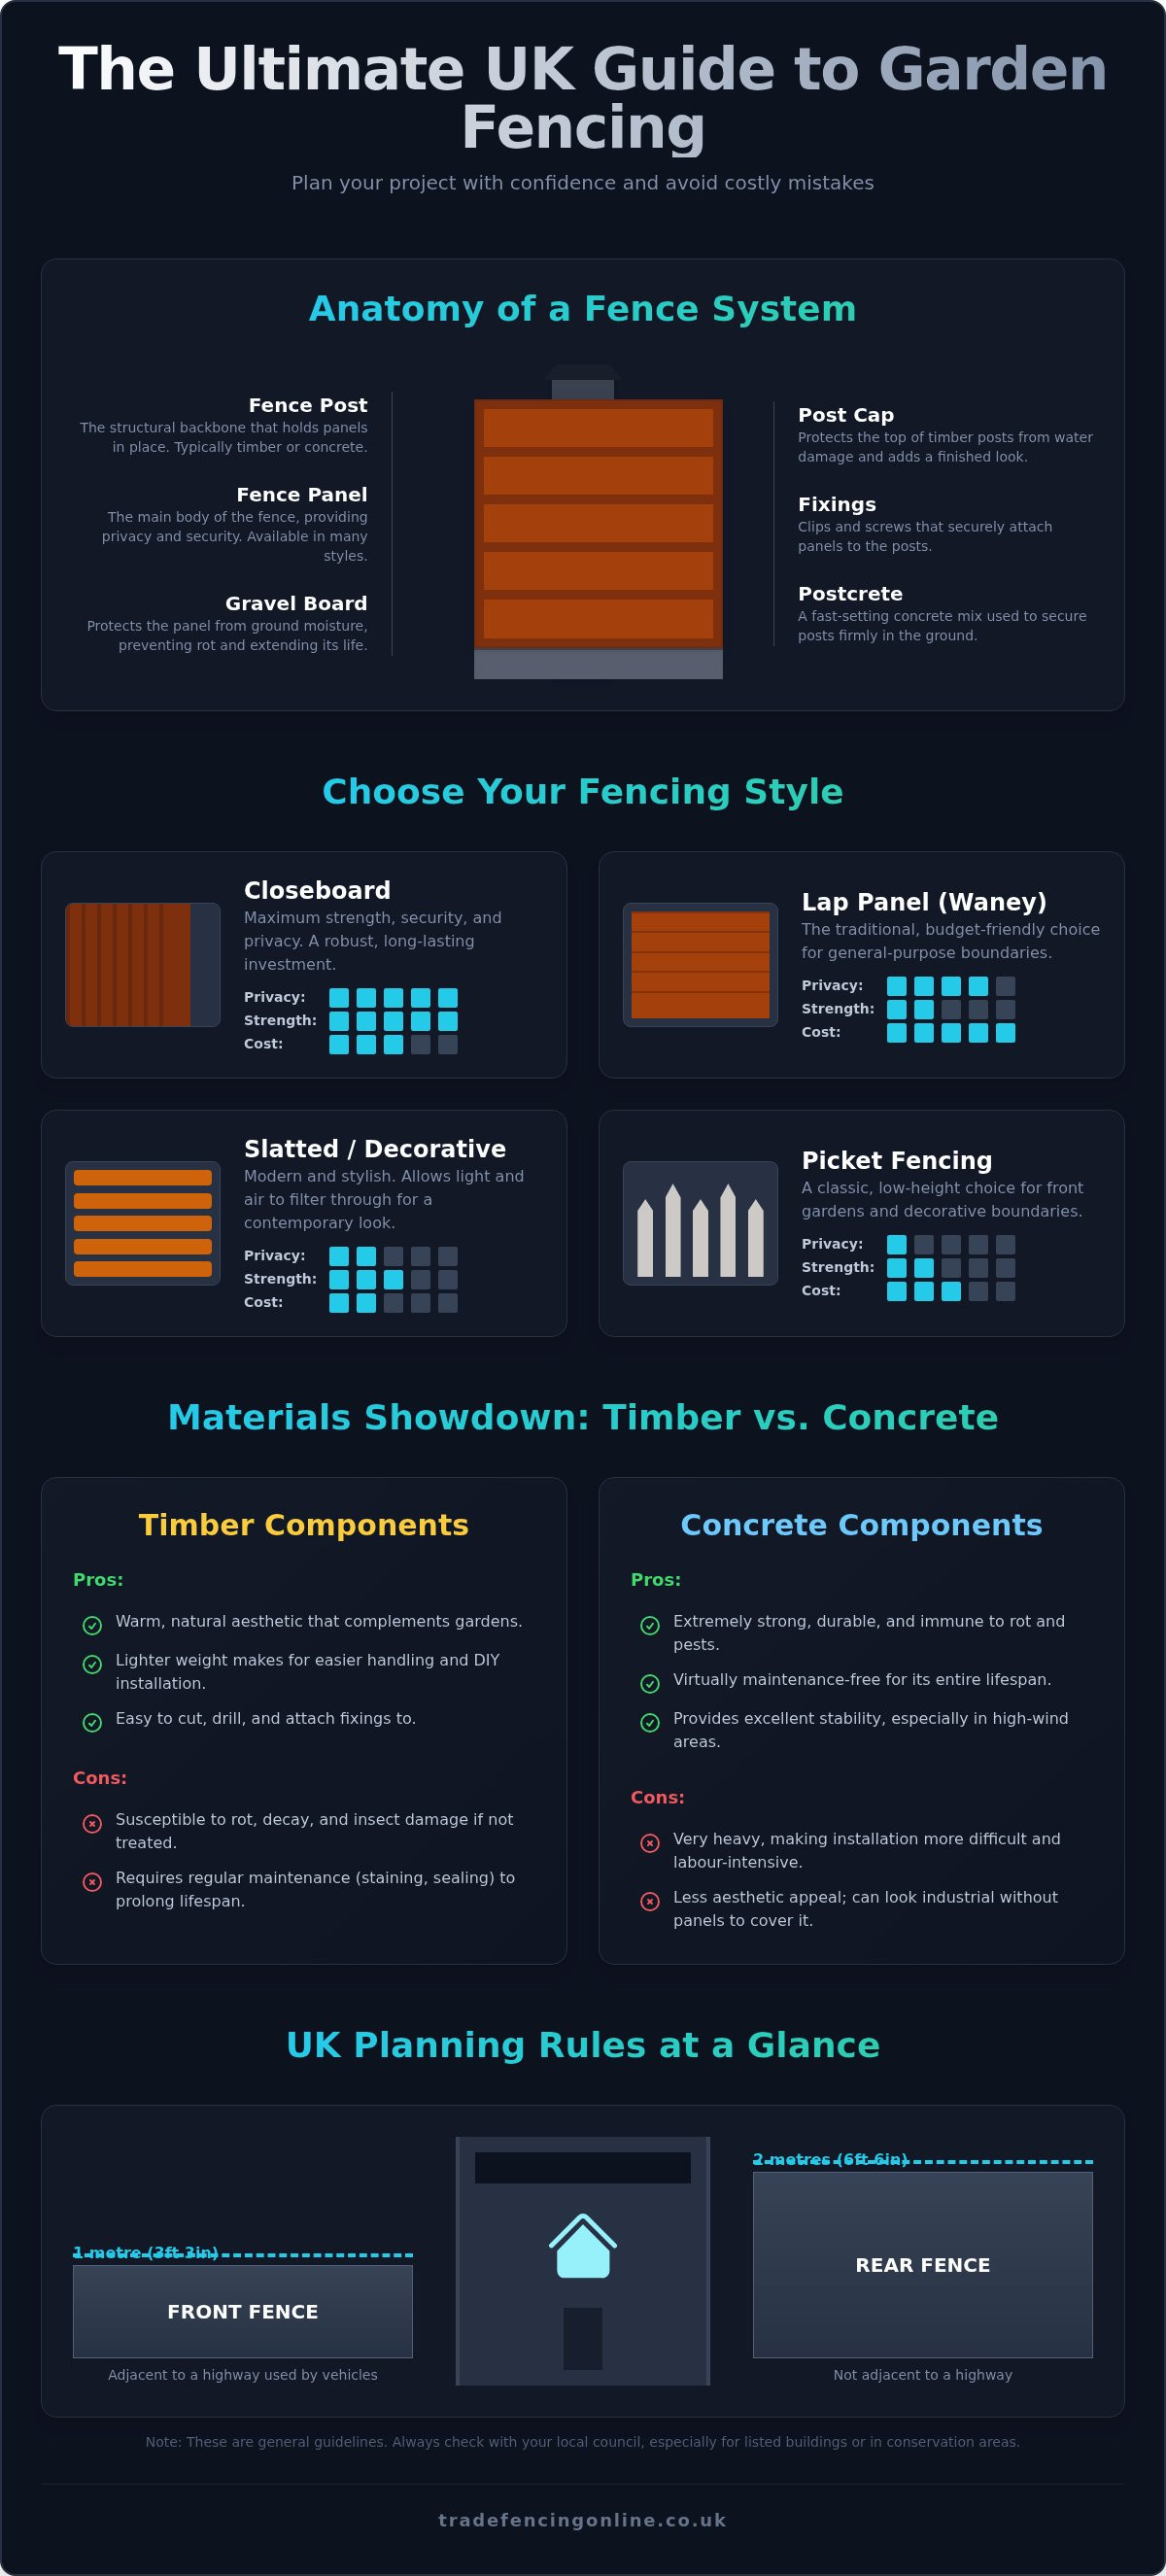
- Fence Panels: These form the main body of the fence, providing the visual screen for privacy and security. They are available in various styles to suit different budgets and tastes.
- Fence Posts: The structural backbone of your fence. Posts are set firmly into the ground and hold the panels securely in place. They can be made from timber, concrete, or metal.
- Gravel Boards: A timber or concrete board fitted along the bottom of the fence, between the posts. Its primary job is to keep the fence panel from touching the damp ground, preventing rot and extending its lifespan.
- Fixings & Finishings: This includes all essential items like panel clips, screws, and post caps. Post caps protect the top of timber posts from water damage, while the correct fixings ensure a secure assembly.
Essential Fencing Terminology for Beginners
Getting to grips with the language of fencing helps you choose the right products. While there are many terms, understanding the basics is straightforward. For a deeper dive, this Comprehensive guide to fencing offers further detail on technical aspects. Here are the key terms you will encounter:
- Closeboard/Featheredge: A robust and popular style built from overlapping vertical timber boards fixed to horizontal rails. It offers excellent strength and privacy.
- Lap Panel: A traditional and cost-effective option made from overlapping horizontal slats within a frame. Also known as Waney Lap panels.
- Trellis: A decorative lattice-work panel, often used on top of a solid panel to add height and a less imposing finish, or as a standalone screen for climbing plants.
- Postcrete: A fast-setting concrete mix designed specifically for securing fence posts in the ground. Simply add water in the hole-no pre-mixing required.
Choosing Your Fencing Style: A Guide to Common Types
Selecting the right fence style is a balance of function, aesthetics, and budget. Your choice should complement your property while meeting practical needs like privacy and security. Consider the trade-off between solid panels for total privacy and slatted designs that allow light and air to pass through-a key factor in high-wind areas. It is also vital to consider height restrictions; for detailed guidance, refer to the official advice on UK planning permission for fences before you buy. Fundamentally, your choice comes down to two installation methods: using pre-made fence panels for speed, or building a traditional fence from components for maximum strength.
Popular Fence Panel Styles
Pre-made panels offer a fast and cost-effective solution for most garden boundaries. Our range includes quality options for every requirement:
- Closeboard Panels: The best choice for strength, security, and total privacy. Their robust, overlapping vertical board construction makes them a durable, long-lasting investment.
- Lap Panels: A popular, budget-friendly option for general-purpose boundaries. Also known as Waney Lap, these are ideal for marking property lines without a heavy-duty security focus.
- Decorative & Slatted Panels: For a modern, stylish look. These panels provide partial screening, allowing light and air to filter through, which is perfect for contemporary garden designs.
- Picket Fencing: The classic, low-height choice for front gardens and decorative borders. Picket fencing defines a boundary without obstructing views.
Trellis and Fence Toppers
A trellis section is a versatile addition to any fencing project. Use it to add extra height to a fence run without blocking sunlight, making it an excellent compromise for overlooked gardens. A trellis is also ideal for supporting climbing plants and provides a decorative finish to solid panels, breaking up a long, imposing boundary.
Traditional 'Build-Your-Own' Fencing
For ultimate durability and flexibility, consider traditional closeboard fencing built from individual components. This method involves fixing featheredge boards (pales) to horizontal arris rails, which are in turn fitted to the posts. While more labour-intensive, it creates an exceptionally strong structure that can easily follow the contours of sloping ground. This is the method preferred by professional fencing contractors for its superior strength and adaptability.
Materials Matter: Wooden vs. Concrete Fencing Components
The structural backbone of your fence consists of two key components: posts and gravel boards. Choosing between timber and concrete for these elements is one of the most critical decisions in any fencing project. Your choice will directly impact the fence's longevity, overall cost, required maintenance, and final appearance. Before you begin, it is also wise to be aware of any local restrictions; you can consult the official government guidance on fencing rules to understand height limits that may affect your material choices.
The Pros and Cons of Wooden Fencing
Timber posts and gravel boards offer a classic, natural aesthetic that blends seamlessly into most garden environments. Wood is significantly lighter and easier to handle than concrete, making it a more manageable material for a DIY installation. However, its main drawback is vulnerability to the British climate. Untreated timber will quickly rot and decay when in contact with damp soil. To counter this, always choose pressure-treated timber, which forces preservatives deep into the wood for maximum protection. Look for products with a long anti-rot guarantee, often 10-15 years, for peace of mind.
The Unmatched Durability of Concrete Components
For a truly long-lasting solution, concrete is the professional's choice. Concrete posts and gravel boards are completely immune to rot, rust, and insect damage. Once installed, they require virtually zero maintenance and can easily outlive their timber counterparts by decades. This makes them a cost-effective investment over the long term. The primary disadvantage is their weight. Concrete components are heavy and cumbersome, making installation a more physically demanding job that may require an extra pair of hands.
The Best of Both Worlds: Hybrid Fencing
A hybrid approach offers an excellent compromise, combining the strengths of both materials. This popular setup uses sturdy concrete posts and concrete gravel boards with traditional wooden fence panels. The concrete gravel board sits at the base, lifting the timber panel clear of the damp ground and preventing the most common cause of rot. This system gives you the robust, maintenance-free foundation of concrete while retaining the warm, natural look of wooden panels. It is the ideal solution for a durable, attractive, and long-lasting boundary.
For a comprehensive selection of high-quality concrete and wooden posts, consider exploring the range available from Romford Fencing Ltd.
Planning Your Fencing Project: Measurement, Rules, and Budgeting
Careful planning is the most critical step for a successful DIY fencing project. Getting the details right before you start saves time, money, and prevents costly mistakes. A solid plan ensures you buy the correct amount of materials and comply with all UK regulations.
Before you purchase any materials, follow this essential planning checklist:
- Measure your boundary: Get an accurate total length for your new fence line.
- Talk to your neighbours: It is courteous and can prevent future disputes. Show them your plans, especially if the fence is on a shared boundary.
- Check for utilities: Before any digging, contact your local utility providers or use a line search service to check for hidden water pipes, gas lines, or electrical cables.
- Confirm the rules: Verify local planning rules and the exact location of your property boundary line.
How to Measure and Calculate Your Materials
Use a tape measure to determine the total length of your planned fence line in metres. Most standard UK fence panels are 1.83m (6ft) wide. To calculate the number of panels, divide the total length by the panel width. Always round up to the nearest whole number. The number of posts required is the number of panels plus one extra for the end of the run. Remember to add essential items like Postcrete, gravel boards for protection, and the correct screws and brackets for your chosen style.
UK Fencing Rules: Do You Need Planning Permission?
In the UK, you generally do not need planning permission for a new fence if you follow permitted development rights. Typically, a fence can be up to 2 metres high in a rear garden. If the fence fronts a highway used by vehicles, the limit is 1 metre. However, these rules can vary. We strongly advise you to check with your local council, especially if your property is a listed building or in a conservation area. Always confirm your exact boundary line by checking your property deeds to avoid disputes.
With your measurements and plans in place, you are ready to order quality materials. Find everything you need for your project at tradefencingonline.co.uk.
An Overview of Fencing Installation: DIY vs. Professional
Deciding whether to install your new fence yourself or hire a professional is a key part of your planning. A DIY installation can be a cost-effective and satisfying project, but it demands careful preparation, the right equipment, and a degree of physical effort. This overview will help you determine the best approach for your situation and ensure a successful result.
Essential Tools and Supplies
A successful installation depends on having the correct tools and materials. Before you begin, ensure you have everything required to complete the job efficiently. A basic kit includes:
- Digging Tools: A spade, shovel, and a post-hole digger for creating clean, deep holes.
- Measuring Tools: A spirit level, tape measure, and a builder's line to ensure your fence is straight and level.
- Fixing Tools: A reliable drill with screwdriver bits and a hammer for securing panels and fixings.
- Essential Supplies: Postcrete for rapid setting, quality screws, and temporary timber supports to hold posts while the concrete sets.
The Basic Installation Steps
While designs vary, the core process for most panel fencing remains the same. Always prioritise safety by wearing protective gloves and safety glasses throughout the job.
Step 1: Preparation. Clear the entire fence line of any obstructions. Use a builder's line and pegs to accurately mark out the precise positions for each fence post.
Step 2: Digging Holes. Dig your post holes to the correct depth and width. A good rule is that one-third of your post's length should be in the ground.
Step 3: Setting Posts. Place a post in its hole, use temporary supports to hold it, and check it is perfectly upright with a spirit level. Pour in Postcrete according to the manufacturer's instructions.
Step 4: Fixing Panels. Once all posts are set and secure, attach your gravel boards. Finally, fix the fence panels securely to the posts using durable screws or clips.
When to Call a Professional Fencing Installer
A DIY approach is not always the most practical solution. Consider hiring a professional if your project involves very long fence runs, steep slopes, or difficult ground conditions like heavy clay or rock. If you lack the time, specialist tools, or physical ability for the work, a professional installer is the sensible choice. They guarantee a fast, durable, and high-quality finish, saving you time and potential costly mistakes.
For a successful result, whether DIY or professionally installed, starting with the right materials is crucial. Get quality fencing supplies delivered for your project.
Your Next Step to Quality Garden Fencing
Choosing the right garden fence is a significant decision for your property's security and appearance. This guide has equipped you with the essential knowledge, from understanding different styles and materials to planning your project budget and measurements. The success of any fencing project depends on starting with the right foundations and high-quality components.
Now it’s time to turn your plan into reality. As a trusted local supplier for Essex and East London, Trade Fencing Online is your one-stop shop for everything you need. We welcome both trade and public customers, offering professional advice and a fast, reliable delivery service to get your project started without delay.
For everything from panels and posts to gravel boards and fixings, shop our full range of quality fencing supplies online.
Get the materials you need delivered and build a garden boundary that will stand the test of time.
Frequently Asked Questions
How much does a new garden fence cost in the UK?
The cost of a new garden fence in the UK varies based on materials and length. For a DIY project, expect to pay between £25 and £60 per metre for materials alone. Standard lap panels are the most cost-effective option, while premium closeboard panels and concrete posts will increase the total price. Always factor in the cost of essentials like post mix, screws, and tools when budgeting for your project. Get a clear quote for all components upfront.
What is the longest-lasting type of garden fencing?
For maximum durability, concrete posts and gravel boards offer the longest lifespan, as they are completely resistant to rot and moisture. When paired with high-quality, pressure-treated timber panels, this system provides exceptional longevity. Composite fencing is another excellent long-term solution that resists warping, fading, and insect damage with minimal maintenance. Investing in quality materials from the start ensures your fence stands strong for decades.
How far apart should fence posts be placed?
Fence post spacing is determined by the width of your fence panels. In the UK, the standard panel width is 6 feet (1.83 metres). Therefore, your fence posts should be set at 1.83m intervals, measured from the centre of one post to the centre of the next. Always double-check the exact dimensions of your chosen panels before digging any holes to ensure a secure and professional fit for your new fence installation.
Can I install a fence on sloping or uneven ground?
Yes, installing a fence on a slope is achievable. The most common DIY method is "stepping," where each panel is installed slightly higher or lower than the last, following the gradient of the ground. This creates a stepped appearance and works well with standard panels. For a smoother line on gentle slopes, a "raked" fence can be built, but this typically requires constructing the fence from individual components rather than using pre-made panels.
How do I protect my wooden fence from rotting?
The best defence against rot is to use quality materials from the start. Always choose pressure-treated timber for posts and panels. Installing concrete or timber gravel boards is essential, as they create a barrier between the wooden panels and damp ground. To extend the life of your wooden fencing, apply a high-quality wood preservative or fence treatment every one to two years. This maintains its protective layer and prevents moisture from penetrating the wood.
What is the easiest type of fencing to install for a DIY project?
For a straightforward DIY installation, a panel fencing system is the easiest to erect. Using pre-manufactured panels, such as lap panels or closeboard panels, significantly speeds up the process compared to building a fence from scratch. When combined with concrete or timber posts and a quick-setting post mix, you can install a secure and durable boundary with minimal specialist tools. This method offers a reliable, professional finish for any DIY project.