


Imagine you're three hours into a Saturday morning project in Romford, only to find your spade bouncing off heavy Essex clay because you don't have a heavy-duty digging bar. It's a common frustration that stalls projects and leads to wasted trips to the hire shop. You want a professional-grade finish, but realising a vital piece of kit is missing halfway through the job is a recipe for stress and unnecessary delays.
We know that having the right equipment is the difference between a fence that sags and one that lasts for decades. This guide provides the definitive list of tools needed for fence installation, from precision measuring gear to the specialised excavation machinery required for tough East London ground. We'll show you exactly what's required to get the job done efficiently. You'll gain a full shopping list and the confidence to start your project, knowing you have the right gear to handle everything from gravelboards to traditional closeboard panels.
Key Takeaways
- Master the planning phase with professional measuring gear to prevent creeping lines and ensure a perfectly straight fence run.
- Understand why standard garden spades are unsuitable for heavy UK clay or flint and which excavation tools are essential for secure post holes.
- Learn the 'plumb and level' rule to guarantee vertical accuracy and structural integrity against harsh British weather.
- Streamline your assembly with a definitive list of the ironmongery and tools needed for fence installation, from manual fixings to high-speed power tools.
- Ensure long-term durability by using the correct safety equipment and finishing tools for applying professional-grade preservatives.
Preparation and Planning: Measuring Tools for a Straight Line
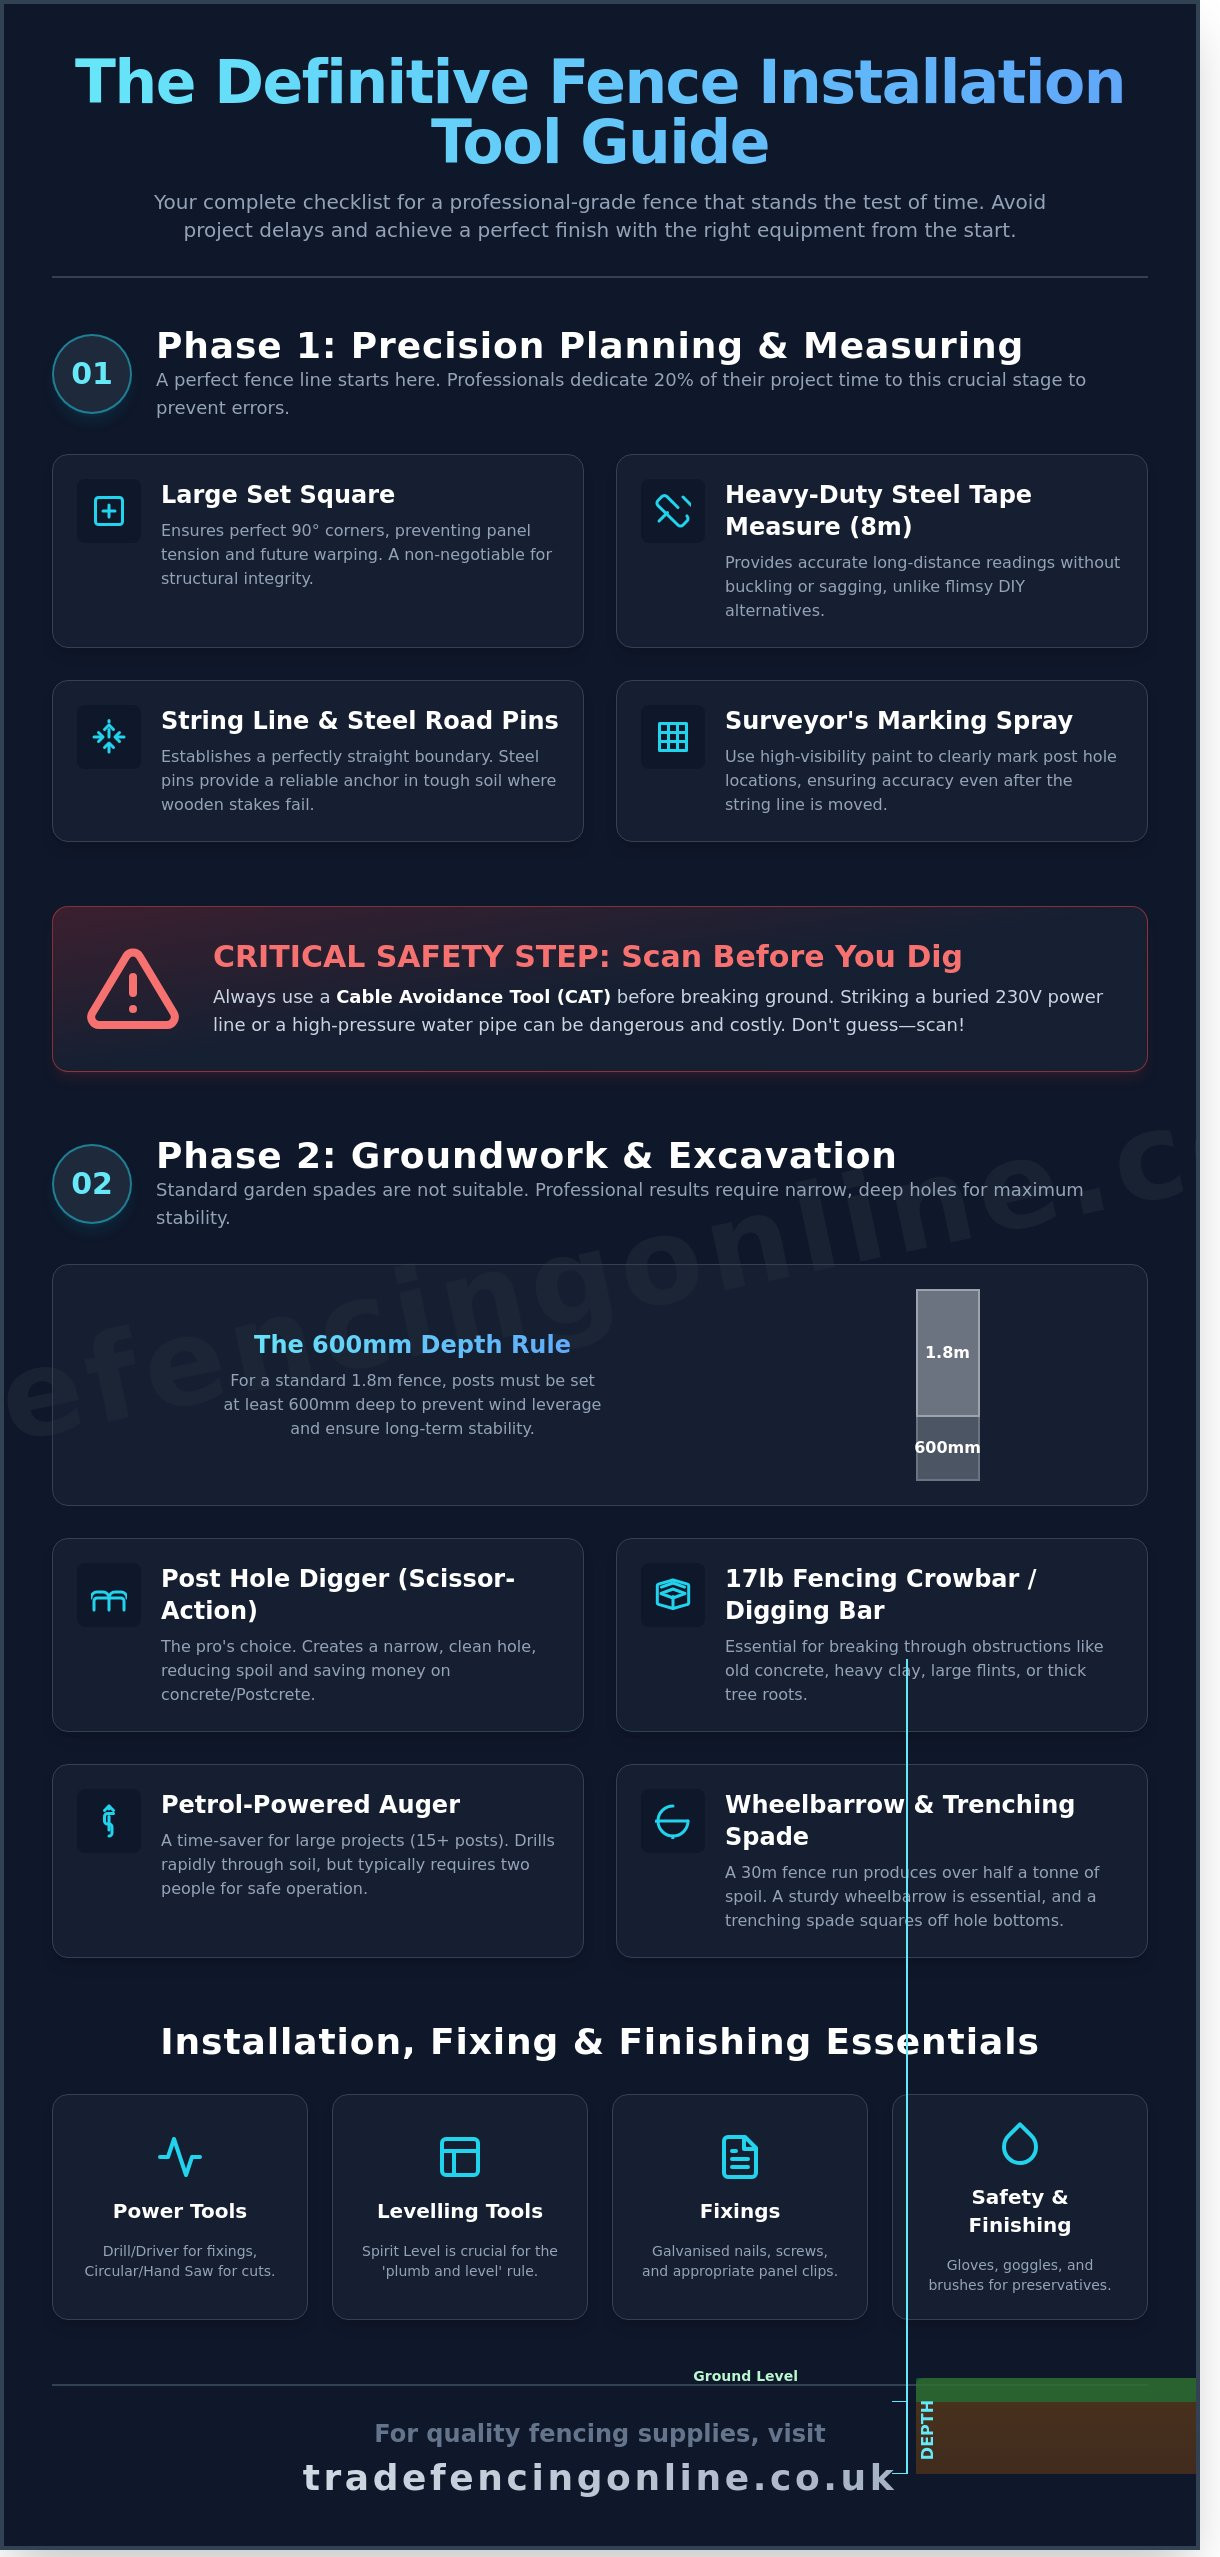
Success in fencing starts long before you dig your first hole. Precision during the planning stage is the difference between a professional finish and a "creeping" fence line. If your initial measurements are off by as little as 15mm, that error compounds over a 20-metre run. This leads to boundary disputes or panels that simply won't fit. Organising your kit before you start provides a massive psychological boost. You'll work faster and with more confidence when every tool is to hand, rather than stopping for mid-project trips to the shop.
The Measuring Essentials
Don't rely on flimsy DIY tape measures. A heavy-duty 8m steel tape measure is one of the most vital tools needed for fence installation. Cheap versions often buckle or sag, which causes inaccurate readings over long distances. You also need a high-visibility string line and a chalk line to establish your primary boundary. Secure these using steel road pins rather than wooden stakes. Steel pins are far more reliable in compacted UK soil and won't shift or snap when you're pulling the line taut over a 30-metre garden span.
Marking and Layout Tools
Clear communication with yourself is key. Use bright orange or yellow surveyor’s marking spray to highlight exactly where each post hole needs to be. This ensures accuracy even after you've moved the string line to begin digging. Keep a notepad and pencil nearby to record every measurement for your fence panels. It's also essential to use a large set square. This tool ensures your corners are exactly 90 degrees. Without it, your panels will be under constant tension, leading to warped timber or broken fixings within 12 months.
Professional installers spend roughly 20% of their total project time on this preparation phase. This includes identifying site-specific obstacles that require extra tools needed for fence installation. Look for old concrete footings from previous fences or large tree roots. If you spot these early, you can hire a breaker or purchase a root axe before you're halfway through the job. Being prepared for these 40kg concrete obstacles or 100mm thick roots prevents your project from grinding to a halt on day one. It's about being efficient and getting the job done right the first time.
Groundwork and Excavation: Breaking the Surface
Digging in the UK presents unique challenges depending on your local geography. You'll likely encounter heavy clay in the south, stubborn flint in the east, or loose loam in the north. A standard garden spade is the wrong tool for this job. It creates large, bell-shaped holes that waste expensive concrete and compromise the structural integrity of the fence. Using the correct tools needed for fence installation ensures your posts remain upright for years. Professional results require narrow, deep, and consistent excavations.
Structural stability depends on the 600mm depth rule. This measurement is the industry standard for a 1.8-metre fence. If you dig shallower, the wind acts as a lever, eventually rocking the post loose during winter storms. Safety is also a primary concern. Always use a Cable Avoidance Tool (CAT) before you start. Striking a buried 230V power line or a high-pressure water pipe causes immediate danger and leads to costly repair bills. Don't guess where the services are; scan the ground properly.
The Digging Powerhouse: Post Hole Diggers
Professional installers prefer the 'Shuv-it' or scissor-action digger. This tool uses two hinged blades to grab and lift soil vertically. It keeps the hole narrow and the sides clean, which reduces the amount of Postcrete required per hole. For larger jobs with 15 or more posts, a petrol-powered auger is a better choice. It drills through soil rapidly, though it requires two people for safe operation. If you hit stone or old concrete, use a 17lb fencing crowbar. Its heavy steel construction and chisel end break through obstructions that would ruin a standard spade. These bars are essential for prying out large flints or old footings.
Clearing the Path
Precision matters when you reach the bottom of the hole. Use a narrow trenching spade to square off the base and remove loose crumbs of soil. This provides a solid foundation for your quality fencing and ensures your gravelboards sit perfectly level. A hand trowel is handy for clearing debris around existing foundations or near delicate tree roots. Don't forget a sturdy wheelbarrow. One 600mm deep hole produces roughly 0.05 cubic metres of spoil. On a standard 30-metre run, you'll need to move over half a tonne of earth. Plan your spoil heap location before you start digging to avoid moving the earth twice.
Precision Installation: Levelling and Supporting Tools
A fence that leans after the first 50mph storm is a sign of poor installation. Stability depends entirely on precision during the initial set. You must follow the "plumb and level" rule to ensure a professional finish. Plumb refers to the vertical accuracy of your posts, while level refers to the horizontal alignment of your gravelboards and panel tops. If your posts aren't perfectly plumb, the weight of the panels will eventually pull the entire structure out of alignment. Using the correct tools needed for fence installation prevents these costly structural failures.
String lines are the backbone of a straight fence. Don't just use them for ground-level alignment. Set a string line at the desired finished height of your posts or panels. This acts as a visual datum line. It ensures the tops of your panels remain uniform across the entire run, even if the ground has slight undulations. Without this guide, your fence line will look jagged and amateurish.
Levelling Equipment
Accuracy requires more than just a quick glance. A magnetic post level is a specialized tool that "wraps" around the corner of a post. It features three vials, allowing you to check for plumb on two faces simultaneously without holding the level. For longer checks, a standard 1200mm spirit level is essential. Use it to verify that your fence posts and gravelboards are sitting correctly. To prevent the inevitable sag in a long string line, use a small clip-on line level. This lightweight tool ensures your horizontal guide stays true over distances exceeding five metres.
Support and Bracing
Holding everything in place while the concrete sets is the most overlooked part of the process. You'll need a heavy rubber mallet to "persuade" posts into the correct position. Unlike a metal hammer, a mallet won't split the timber or damage the treatment. Once the post is positioned, use timber stays made from scrap wood and G-clamps to brace it. This setup holds the post at the correct angle during the 20-minute window while the Postcrete cures. Finally, keep a sturdy mixing bucket or a large watering can nearby. These are vital for activating your fencing supplies and ensuring the dry-mix concrete receives the exact amount of water required for a rock-solid bond. Having these tools needed for fence installation on hand stops you from scrambling while the concrete is already hardening.
Fixing and Assembly: Ironmongery and Cutting Tools
Once your posts are set and level, you move from groundworks to the assembly phase. This stage defines the final look of your garden boundary. Speed and precision matter here. Using manual tools for a 10-panel run can take a full weekend; switching to professional power tools often reduces that time by 40%. Choosing the right tools needed for fence installation ensures your structure withstands UK weather conditions and remains secure for years.
Securing panels requires a choice between screws, nails, or specialised clips. Screws provide superior grip and allow for easy removal if a panel needs replacing later. Galvanised nails are traditional and cost-effective but can pull out over time as timber expands and contracts. Specialised U-brackets or clips are the fastest option for standard 6ft panels. They screw directly into the post, allowing the panel to slot in securely with minimal effort.
The 'last panel' problem occurs on almost every project. Your final gap rarely matches a standard 1.83m panel width. You'll need to cut down a panel to fit the remaining space. A bespoke fit looks professional and prevents gaps that compromise privacy or security. Having the correct cutting equipment on site prevents delays during this final, critical stage.
Cutting and Shaping
Trimming arris rails or capping requires a sharp cross-cut hand saw for clean, vertical lines. For rapid panel adjustments, use an 18V cordless circular saw with at least a 4.0Ah battery. This allows you to cut through multiple timber slats in a single pass. If you're using traditional timber posts, a 25mm chisel and a club hammer are essential for creating notches where rails sit flush against the post surface.
Fixing and Fastening
An impact driver is the most efficient tool for driving 75mm or 100mm screws into pressure-treated timber without stripping the heads. For traditional fencing methods, a 20oz claw hammer is necessary to drive galvanised nails into closeboard systems. If you're installing mesh or wire-tensioned security fences, keep a pair of high-leverage pliers and wire cutters on hand to manage tensioning and trimming tasks. These tools needed for fence installation ensure every component is fastened to trade standards.
Ensure you have the right hardware for the job. Shop our range of quality ironmongery and fixings to complete your project today.
Health, Safety, and Final Finishing Touches
Professional results depend on more than just the panels you choose. The final stage of any project involves protecting yourself and the timber. Neglecting safety or finishing can turn a high-quality job into a liability within 12 months. You must treat health and safety as a core part of the tools needed for fence installation, ensuring you don't suffer long-term injuries from heavy lifting or repetitive strain.Personal Protective Equipment (PPE)
Safety equipment is your first line of defence against the physical demands of fencing. Heavy-duty rigger gloves are essential for handling rough-sawn timber to prevent deep splinters and blisters from manual digging. You must wear steel-toe-capped boots; a standard concrete fence post weighs approximately 45kg, and dropping one on unprotected feet will cause serious injury. When using petrol-powered augers or circular saws, which often exceed 105dB, ear defenders and safety goggles are mandatory to prevent permanent hearing loss and eye trauma from high-speed wood shards.
Finishing and Maintenance
Weatherproofing is the difference between a fence that lasts 5 years and one that lasts 20. Use a 4-inch masonry brush to apply wood preservative specifically to cut ends where the factory treatment has been breached. If your design includes a trellis or decorative toppers, use a mastic gun to apply external-grade sealants to joint gaps. This prevents water ingress in vulnerable areas. A stiff broom is the final essential item in your kit. Use it to clear soil, concrete dust, and debris from the fence line to leave the garden in better condition than you found it.
Before you pack away the tools needed for fence installation and sign off the project, complete this final inspection checklist to ensure the work meets professional standards:
- Check Vertical Alignment: Use a spirit level on two sides of every post to ensure they're perfectly plumb.
- Fixing Security: Verify that all 75mm galvanised nails or screws are driven flush and haven't split the timber.
- Gravelboard Clearance: Ensure gravelboards are level and not buried in soil, which prevents premature rot.
- Structural Integrity: Give every panel a firm shake to confirm the Postcrete has fully cured and the structure is rigid.
- Debris Removal: Check for any dropped screws or offcuts in the grass that could damage lawnmowers or harm pets.
Following these steps ensures your installation is safe, durable, and visually professional. Taking an extra 30 minutes for a final sweep and inspection prevents call-backs and guarantees the longevity of your investment.
Build a Professional Fence That Lasts
Successful fencing depends on preparation and having the right kit on hand. You've seen that precise measurements and deep excavation are the foundations of any sturdy boundary. Without the correct tools needed for fence installation, you risk wasting time and materials on a wonky finish. From heavy-duty post hole diggers to the final piece of ironmongery, every item in your toolbox serves a specific purpose in creating a secure perimeter.
We're the home of quality garden fencing, supporting local tradespeople and DIYers with unmatched prices on bulk components. You don't have to wait weeks for your materials; we provide fast local delivery across Essex and East London to keep your project moving. Our 5-star trade reviews prove we're a trusted supplier that prioritises substance over style. Get your project off the ground today with reliable supplies from a local expert.
Shop our full range of high-quality fencing supplies for your next project
Grab your gear and start building your new garden boundary with confidence.
Frequently Asked Questions
Can I install a fence with just a spade and a hammer?
You can't install a professional-standard fence with just a spade and a hammer. While these tools might help with minor repairs, a full installation requires a post-hole digger to reach the necessary 600mm depth without creating oversized, unstable holes. You'll also need a spirit level to ensure your posts are perfectly vertical, as even a 2-degree lean will cause your panels to look crooked and fail in high winds.
What is a 'shuv-it' digger and do I really need one?
A 'shuv-it' digger is a scissor-action tool designed to extract soil vertically from deep, narrow holes. It's an essential part of the tools needed for fence installation because it keeps the hole diameter tight, which saves you money on Postcrete. Using a standard spade often results in holes that are twice as wide as necessary, which can increase your material costs by £15 to £20 per post.
Is it better to hire a petrol auger or dig by hand?
Hire a petrol auger if you're installing more than 10 posts or working with heavy clay soil. A one-man auger hire typically costs around £45 per day and reduces digging time by roughly 70% compared to manual methods. For smaller garden projects with fewer than five posts, manual tools like a digging bar and shuv-it digger are more cost-effective and provide better control around existing tree roots or pipes.
What size spirit level is best for fencing?
A 1200mm spirit level is the industry standard for checking the vertical alignment of 1.8m fence posts. This length provides a larger contact surface than a 600mm level, which significantly reduces the margin for error. You should also keep a smaller boat level in your pocket for checking the horizontal accuracy of gravelboards and arris rails in tighter spaces where a long level won't fit.
Do I need any special tools for concrete fence posts?
You need a 1.5m steel digging bar and a helper to safely manage the weight of concrete posts. Standard concrete intermediate posts weigh between 40kg and 55kg, making them dangerous to handle alone. The digging bar allows you to lever the post into the correct position within the hole once it's dropped in. Don't forget a sturdy bucket or wheelbarrow for mixing your concrete if you aren't using dry-pour Postcrete.
How do I know if there are cables before I start digging?
Use a Cable Avoidance Tool (CAT) and a signal generator to scan your digging line for live power cables and metal pipes. It's a critical safety step because hitting a 230V underground cable can be fatal and lead to expensive repair bills from utility companies. You can hire these scanners for about £35 per day. Always cross-reference your scan with local utility maps, especially when digging deeper than 300mm.
What are arris rail brackets and what tools do they require?
Arris rail brackets are galvanised steel connectors used to fix triangular rails to square timber posts. You'll need a cordless drill and 40mm exterior-grade galvanised screws to secure them properly. These brackets are a vital part of the tools needed for fence installation when building a traditional closeboard fence. They provide a much stronger joint than simple nailing and prevent the timber from twisting as it seasons in the garden.
Can I use a normal drill for fence screws?
You can use a standard 18V cordless drill, but an impact driver is much more efficient for driving 75mm or 100mm timber screws. Impact drivers provide higher torque, which stops the screw head from stripping and saves your wrists from strain. If you use a normal drill, make sure you have a high-quality Pozi or Torx bit and at least two 4.0Ah batteries to avoid stopping for a recharge every 30 minutes.