


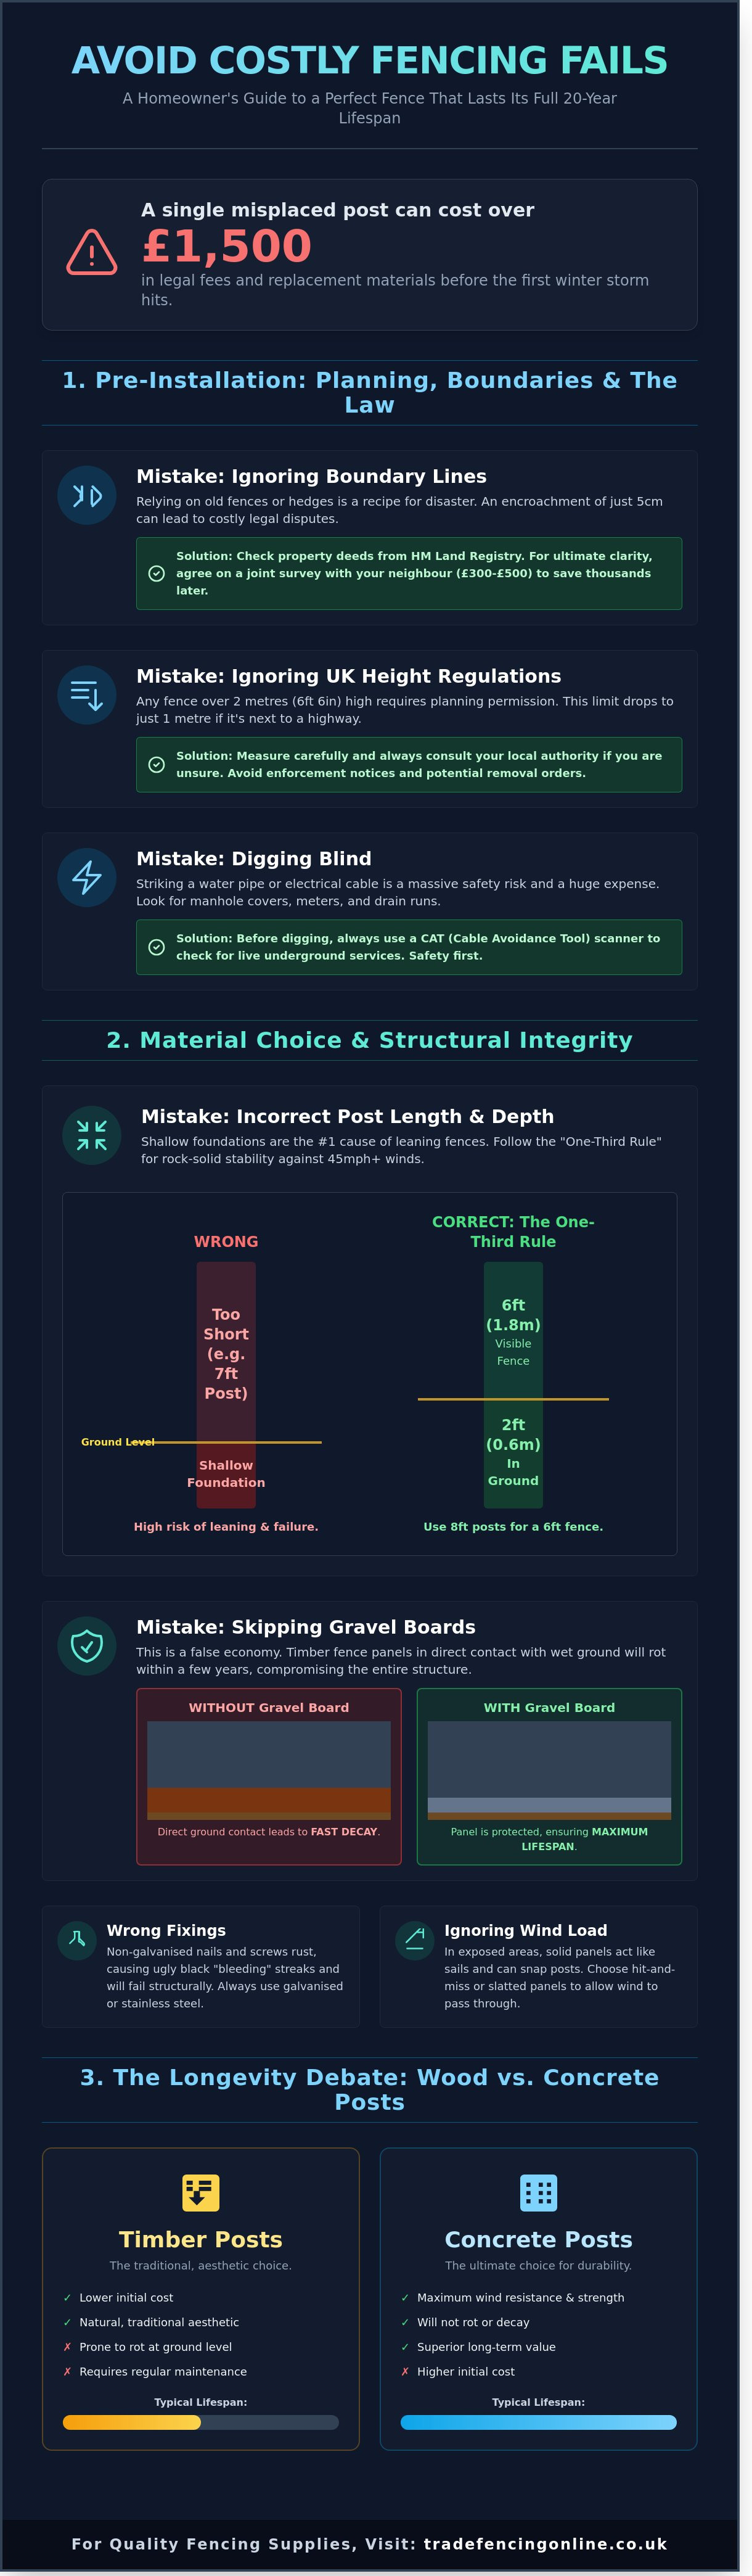
A single misplaced post can cost a UK homeowner over £1,500 in legal fees and replacement materials before the first winter storm hits. You want a boundary that provides security and looks professional. There's nothing worse than watching a brand new fence lean after a 45mph gust or receiving a solicitor's letter because a post sits 5cm over the property line.
Understanding the common fencing mistakes to avoid is essential for a successful garden project. You deserve a result that adds value to your property without the stress of constant repairs or wasted timber. This expert guide helps you sidestep expensive boundary disputes and structural failures. We've compiled a definitive 12-point checklist covering everything from UK planning laws to essential gravelboard installation. Follow these steps to ensure your fence remains straight, level, and rot-free for its full 20-year expected lifespan.
Key Takeaways
- Protect yourself from costly legal disputes by identifying exact boundary lines and scanning for underground utilities before breaking ground.
- Ensure long-term durability by selecting the correct post lengths and always installing gravel boards to prevent timber decay at ground level.
- Master the "one-third" depth rule to address common fencing mistakes to avoid, such as leaning panels and structural failures caused by shallow foundations.
- Discover professional layout techniques, including the essential use of string lines and specific methods for installing panels on sloping terrain.
- Maximise the lifespan of your installation by learning how to properly reseal pressure-treated timber and account for wind loading in exposed gardens.
Pre-Installation Pitfalls: Planning, Boundaries, and the Law
Many homeowners rush into a project and end up with a legal headache. Encroaching on a neighbour's land by even 50mm can lead to a court order to remove the entire structure. One of the most common fencing mistakes to avoid is failing to verify the boundary line, which often leads to expensive legal action. You must check your property deeds via the HM Land Registry, as boundary lines aren't always where the old fence stood. A discrepancy of a few inches can trigger a dispute that lasts years.
UK law is strict on height. Under the Town and Country Planning (General Permitted Development) Order 2015, any fence over 2 metres high requires local authority approval. If your fence is adjacent to a highway used by vehicles, this limit drops to 1 metre. Failing to check this results in costly enforcement notices and the potential removal of your new panels. Understanding these common fencing mistakes to avoid ensures your project stays on the right side of the law and avoids unnecessary council fines.
Always talk to your neighbours before the first post goes in. Clear communication prevents 90% of boundary disputes. The "Good Side" rule in the UK dictates that the flat, finished face of the fence should point away from your property to face your neighbour, leaving the posts and rails visible from your side. This is a standard courtesy that prevents friction and ensures a professional finish for the street scene.
Boundary Disputes and Legal Alignment
Confirm property lines using your title deeds before starting work. Don't rely on existing hedges or old posts, as these move over time. Run a high-tension string line between two known legal points to maintain a true boundary face. A joint survey with your neighbour costs roughly £300 to £500, but it saves thousands in legal fees if you both agree on the line before installation begins. This step is non-negotiable for professional results.
Underground Services and Safety
Striking a water pipe or electrical conduit is a major safety risk and a massive expense. Look for signs of shallow services, such as manhole covers, external meters, or drain runs. Always use a CAT (Cable Avoidance Tool) scanner to scan the site for live cables before digging. If you find a utility hotspot, adjust your post intervals to skip the area. This is vital when using different types of fencing materials like heavy concrete posts that require holes up to 600mm deep. Safety must always come before speed during the dig phase.
Material Specification Errors: Choosing the Wrong Components
Buying the cheapest materials often leads to the most expensive repairs. A frequent error involves under-specifying post length. For a standard 6ft (1.82m) fence, you must use 8ft (2.44m) posts to ensure 600mm is secured below ground. Anything less risks the structure leaning or collapsing during the first storm. Before ordering your materials, check UK planning permission for fences to ensure your height specifications meet local regulations, as anything over 2 metres usually requires consent.
Using non-galvanised fixings is a fatal mistake. Standard steel nails react with the tannins in timber, causing black "bleeding" streaks and eventual structural failure. Always insist on galvanised or stainless steel ironmongery to protect your investment. Choosing the wrong panel for your environment is one of the top common fencing mistakes to avoid. In exposed UK gardens, solid lap panels act like sails. High winds exert hundreds of kilograms of pressure, which can snap posts. Consider hit-and-miss or slatted styles for better airflow. For more detail, read our Complete Guide to Choosing Fence Panels.
Wood vs Concrete: The Longevity Debate
Prioritise concrete fence posts for maximum wind resistance. They don't rot and provide a rock-solid foundation for decades. Timber posts offer a traditional aesthetic and lower initial cost, but they require consistent maintenance to prevent ground-level decay. When comparing the total cost of ownership over 10 to 15 years, concrete is the superior value choice. It outlasts multiple timber panels, saving you the labour costs of digging out rotten wood every few years.
The Critical Role of Gravel Boards
Skipping gravel boards is another of the common fencing mistakes to avoid. These components prevent ground-level rot by keeping timber panels away from damp soil and wet grass. Concrete gravel boards are the "fit and forget" solution, while timber versions provide a uniform look for the entire fence. Ensure a correct installation height by setting the board 25mm into the soil to prevent gaps, while leaving enough clearance for natural garden drainage. You can find all the components you need in our range of quality fencing supplies.
Structural and Foundation Blunders: Digging and Setting
Foundation failures represent the most frequent common fencing mistakes to avoid. A fence is only as strong as its anchor. If you skimp on the digging, your panels will lean or collapse during the first 50mph wind gust. The "one-third" rule is non-negotiable for professional results. This means one-third of the total post length must be underground. For a standard 1.8m fence panel, your post hole must be at least 600mm deep.
Soil type changes everything. In Essex and East London, heavy clay is the norm. Clay soil is volatile; it expands when wet and contracts during dry spells. Shallow foundations in these areas lead to "post heave" where the ground literally pushes the concrete out. Always dig deeper in clay-heavy postcodes to reach stable subsoil. This prevents the fence line from becoming wavy after a single season of heavy rain.
Getting the Depth and Width Right
Precision matters when you pick up the spade. For 6ft panels, dig 600mm deep. For 4ft panels, 450mm is the minimum requirement. The hole width must be at least 300mm. A narrow hole doesn't allow enough Postcrete to surround the timber or concrete post. Use a "bell-bottom" technique. Make the base of the hole wider than the top. This creates a wedge shape that prevents the ground from lifting the post during a hard winter frost.
Drainage and Post Setting
Timber rot starts at the base. One major error is setting posts flush with the ground level. This traps water against the wood. Instead, create a "shingle shoe" by pouring 50mm of gravel into the bottom of the hole before the post goes in. This allows water to drain into the subsoil rather than sitting under the timber end grain. It is a simple step that adds years to the life of your installation.
When pouring Postcrete, don't guess the water ratio. Too much water kills the structural integrity of the mix. Finish the concrete with a haunch that slopes away from the post at a 45-degree angle. This sheds water instantly. Before you start digging, consult the official government guidance on fencing. This ensures your structural choices don't violate height limits or planning laws. Managing water runoff is vital on sloped gardens. Ensure your gravelboards don't act as a dam, which causes water to pool and rot the lower sections of your fence panels. These are the common fencing mistakes to avoid if you want a boundary that lasts 15 years or more.
Alignment and Technique Fails: Assembly and Layout
Precision defines a professional installation. Guessing the layout leads to the wobbly fence syndrome. Always use a high-visibility string line stretched taut between two pins at the start and end of your run. If your line deviates by just 10mm, the entire boundary looks amateur. This is one of the most common fencing mistakes to avoid for UK homeowners who want a straight, secure perimeter.
Panel-to-panel creep is a silent project killer. Standard UK panels are 1830mm wide. If you leave a 3mm measurement error at every post, a 15-panel run will be 45mm off by the finish. This makes the final panel impossible to fit without expensive trimming and waste. Measure twice for every single post hole. Use a spacer bar to maintain consistency between 75mm or 100mm posts throughout the entire length of the garden.
Setting all your posts before thinking about the gate is a recipe for disaster. Gate bays require exact clearances to function. If you're 5mm too narrow, the gate won't open. If you're 5mm too wide, the latch won't catch. Fix your gate posts first. Ensure they're perfectly plumb and braced before moving on to the rest of the run. This ensures the most complex part of the job is correct before the concrete sets.
Managing Slopes and Uneven Ground
UK gardens are rarely flat. You have two main choices for elevation changes. Use stepping panels to create a tiered, level look across a gradient. This works best with pre-made panels. If you prefer a continuous top line, choose closeboard fencing and rake the rails to follow the ground. For stepped designs, use 300mm extra-deep gravel boards to close the triangular gaps at the bottom. This prevents pets from escaping and stops soil erosion during heavy rain.
Planning for Gates and Access
Standard fence posts aren't enough for heavy gates. Use 100mm x 100mm or 125mm x 125mm heavy-duty posts for the hanging side to prevent sagging. Timber expands in the wet UK climate. Leave a 10mm expansion gap between the gate and the post to prevent sticking in winter. Use galvanised ironmongery to stop rust streaks from ruining your timber. Quality fittings ensure the gate stays functional for its 15-year lifespan. This attention to detail is essential for any common fencing mistakes to avoid list.
Finishing and Maintenance Oversights: The Long Game
Installation doesn't end when the last nail is driven. Skipping the final protection steps is one of the most common fencing mistakes to avoid if you want your boundary to last 15 years or more. Many homeowners assume that "treated" timber is invincible, but cutting a post or rail on-site changes the structural integrity of the wood immediately.
- End-grain treatment: Every time you saw a pressure-treated post, you expose the raw, untreated heartwood.
- Ironmongery checks: Rusting hinges or loose gate latches cause sagging, which pulls the entire gate post out of alignment over time.
- Rattle prevention: Loose panels in concrete channels cause friction damage and noise complaints during high winds.
Sealing and Treatment Protection
Seal every cut surface immediately. When you trim a post to height or cut a rail to fit, you break the chemical "envelope" created during the pressure-treatment process. Without a £15 tin of end-grain preservative, moisture will seep into the core. This leads to internal rot within 24 months, even if the outside looks fine. Don't mistake "Dip Treated" panels for "Pressure Treated" stock. Dip-treated timber only has a surface coating and requires a fresh application of wood stainer every 12 months. For pressure-treated timber, apply a UV-resistant oil every 3 years to prevent the wood from drying out and splitting in the summer sun.
Wind Resistance and Structural Checks
Romford gardens often face significant wind loads, especially in exposed or elevated positions. Solid 6ft panels act like sails during 60mph gusts, putting immense leverage on the post bases. You can mitigate this risk by using trellis toppers. These decorative sections allow air to pass through the top of the fence, reducing the total wind pressure by up to 30%. This simple addition can be the difference between a standing fence and a collapsed one after a winter storm.
If you've opted for concrete posts, check for "panel rattle." If the fence panel moves more than 5mm within the concrete slot, it'll vibrate during wind. This vibration acts like a hammer, gradually loosening the post in its concrete footing. Use timber wedges or metal fence clips to lock the panel into the slot. Finally, perform a "screwdriver test" every autumn. Push a flat-head screwdriver into the timber at the ground line. If the wood feels soft or the tool sinks in more than 10mm, rot has started. Catching this early allows you to install a repair spur before the post snaps. Avoiding these common fencing mistakes to avoid ensures your property remains secure and your investment remains intact.
For quality fencing components that stand the test of time, contact our team today. We provide the professional-grade materials you need for a reliable installation.
Build a Boundary That Lasts
A successful installation depends on precise planning and the right components. You must verify boundary lines and set your posts at a minimum depth of 600mm to ensure stability against high winds. Using premium grade pressure-treated timber and heavy-duty concrete posts stops ground rot before it starts. Understanding these common fencing mistakes to avoid helps you bypass the structural blunders that lead to expensive replacements later.
We're the home of quality garden fencing and a trusted Romford-based supplier with a consistent track record of 5-star trade reviews. Our team provides free local delivery options across Essex and East London, ensuring your materials arrive exactly when you need them. Whether you need gravelboards or traditional closeboard panels, we supply trade-standard products that stand the test of time. Don't risk your project with inferior timber when professional-grade supplies are just a click away.
Order High-Quality Fencing Supplies for Fast Essex & London Delivery
Take the first step toward a professional finish today. Your garden deserves a fence that stays straight and secure for years.
Frequently Asked Questions
Do I need planning permission for a 2-metre high garden fence in the UK?
You don't need planning permission for a 2-metre high fence if it's located in your rear garden and doesn't border a public highway. If the fence is adjacent to a road or a footpath used by vehicles, the legal height limit is 1 metre. Local councils in 15% of UK districts may have specific Article 4 directions, so always check your local authority website before you start.
Can my neighbour stop me from putting up a new fence on my side?
Your neighbour can't stop you from erecting a fence as long as the entire structure sits within your boundary line. This includes the underground concrete footings, which must not encroach on their land. Boundary disputes represent 20% of all civil litigation in the UK, so verify your Title Deeds to confirm exactly where your property ends before digging any holes.
How deep should a 6ft fence post be in the ground?
You must dig your post holes to a depth of 600mm for a standard 1.8-metre fence. This 2-foot depth provides the necessary leverage to keep the structure upright during 60mph wind gusts. Ensuring your posts are deep enough is the most effective way to prevent common fencing mistakes to avoid, such as leaning or complete structural collapse during winter storms.
Which side of the fence should face my neighbour?
The "good" side of the fence, where the panels are smooth and clear of rails, usually faces your neighbour. While no UK law dictates this orientation, it's the industry standard for professional installations. Choosing double-sided panels like our premium hit-and-miss range ensures both you and your neighbour get a high-quality finish without any awkward conversations about boundary aesthetics.
Is Postcrete better than mixing my own concrete for fence posts?
Postcrete is the superior choice for domestic projects because it sets in just 5 to 10 minutes. Mixing your own ballast and cement is cheaper for large-scale jobs involving over 30 posts, but it's labour-intensive and slow. One 20kg bag of Postcrete is designed to fix one standard post, providing a reliable, rock-hard foundation without the need for a mechanical mixer.
Should I use 3x3 or 4x4 wooden posts for a standard garden fence?
Use 4x4 (100mm x 100mm) wooden posts for any fence that stands 5ft or taller. While 3x3 (75mm x 75mm) posts cost roughly 30% less, they're prone to snapping at the ground line under heavy wind loads. Selecting the correct timber thickness helps you bypass common fencing mistakes to avoid and ensures your garden remains secure for the full 15-year lifespan of the wood.
How do I stop my fence panels from rattling in the wind?
Stop panels from rattling by inserting small timber wedges or specialised "fence clips" into the gaps between the panel and the post. You can also use 40mm galvanised screws to fix the panel directly to the post through the side framing. This simple 5-minute fix prevents the constant banging noise that leads to 10% of all garden-related neighbour complaints in the UK.
What is the best way to install a fence on a slope?
The stepping method is the most effective way to install a fence on a sloping garden. You keep the panels level and create a staggered, step-like profile as you move down the incline. Use 2.4m or 3.0m posts on the downhill side to ensure enough timber remains in the ground. Close the triangular gaps at the bottom with gravelboards to maintain a professional, secure finish.