


Why would you tear down twenty metres of perfectly good timber just because one 8ft post has snapped at the base? Many homeowners believe a single failure requires a total fence replacement, but that is a costly mistake when the average UK installation now reaches £1,500. You don't need a full crew or a massive budget to fix the problem. Success depends on "fence surgery," which means extracting the old base without damaging your adjacent panels.
We understand the frustration of staring at a heavy concrete plug stuck in the ground or worrying about timber splintering during the repair. This guide teaches you the most efficient way of replacing a single broken fence post while keeping your existing line perfectly straight. You'll learn how to remove old concrete, secure your panels safely, and install a new £20 to £40 timber post for a professional result. We will walk you through the tools you need, from a £7 bag of Postcrete to the right ironmongery, ensuring your fence stays upright and sturdy for years to come.
Key Takeaways
- Identify ground-line rot with a simple screwdriver probe to decide between a minor repair or a full post swap.
- Master the professional method for replacing a single broken fence post without dismantling your entire fence line or damaging existing panels.
- Prepare the right materials, including pressure-treated timber and the correct amount of rapid-set Postcrete for a rock-solid finish.
- Learn when to use a concrete repair spur as a faster, more cost-effective alternative for posts snapped at ground level.
- Protect your investment with post-installation maintenance tips, including the use of post caps and ground-line preservatives to prevent future rot.
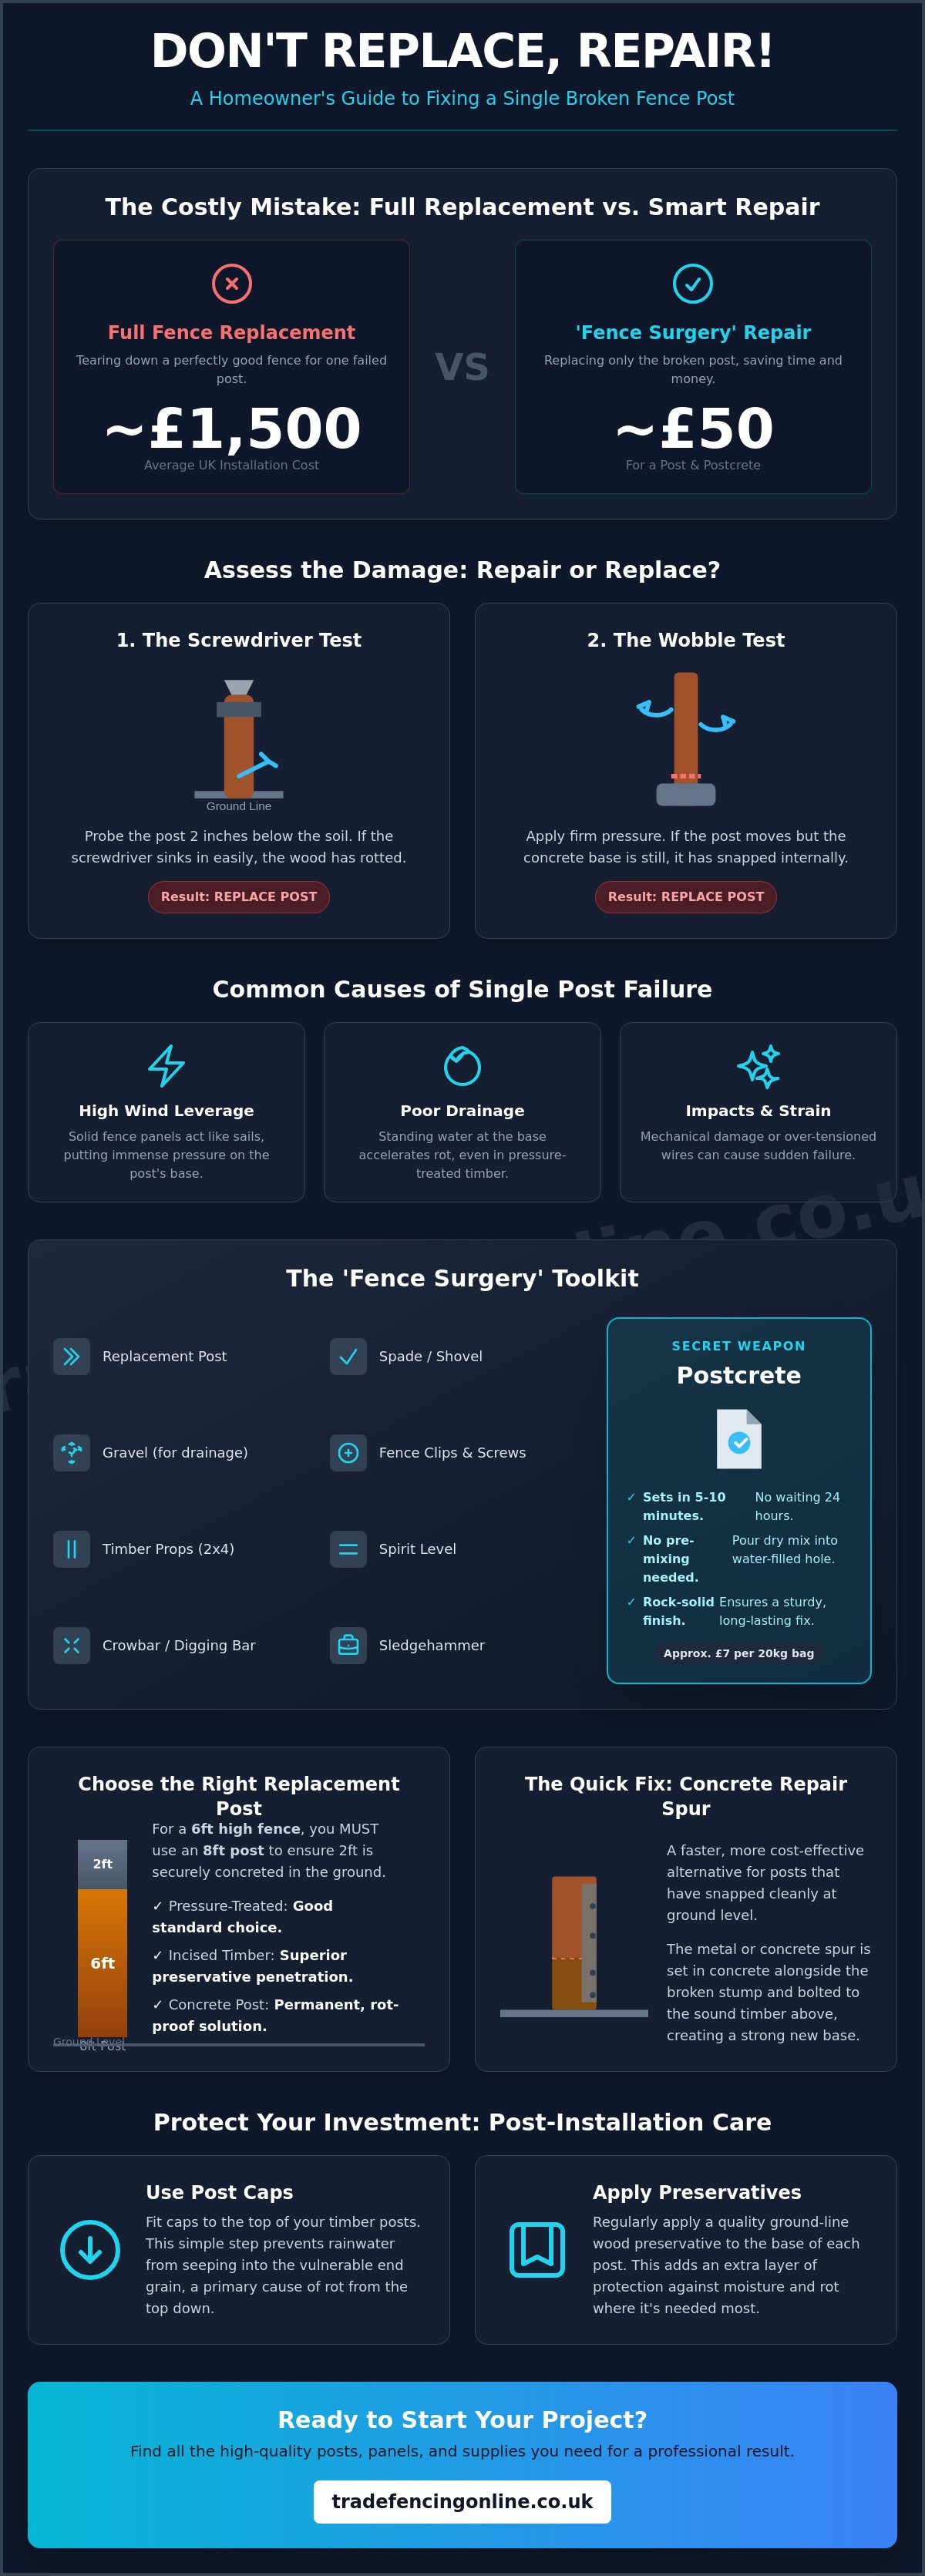
Assessing the Damage: Repair or Full Replacement?
Replacing a single broken fence post is a surgical procedure designed to restore structural integrity without the £1,500 average cost of a new boundary installation. This method involves swapping out one vertical support while keeping the surrounding panels and gravelboards perfectly intact. It's the most efficient way to handle isolated damage, but you must first determine if the post is actually beyond saving. A leaning fence doesn't always mean a snapped post; sometimes the ground has simply shifted.
Start with the "Screwdriver Test" to check for ground-line rot. Take a standard flat-head screwdriver and probe the timber two inches below the soil surface. If the wood feels soft or the tool sinks in without resistance, the structural core has failed. This rot is often invisible from above but accounts for most timber failures in the UK. You should also perform a "Wobble Test" by applying firm pressure to the top of the post. If the timber moves but the concrete base remains still, the post has snapped internally. If the entire concrete plug moves in the soil, the timber might still be sound, and you may only need to reset the base.
Safety is the primary factor when deciding between a repair and a full replacement. If a post has snapped anywhere below the top gravel board level, it cannot support the leverage of high winds. In these cases, replacing a single broken fence post is the only reliable solution. Attempting to patch a post that has failed at the base is a temporary fix that often leads to panel damage during the next storm.
Common Causes of Single Post Failure
Most failures occur because of high wind leverage. Solid panels act like sails, putting immense pressure on the post base. Poor drainage is another culprit; standing water at the base accelerates rot, even in pressure-treated timber. While Agricultural fencing often uses different post densities for open fields, residential garden posts face unique stresses from mechanical impacts or over-tensioned wires. Ensuring your ground is well-drained can double the lifespan of your timber supports.
The 'Surgery' Mindset: Why Precision Matters
You don't need to tear down the whole line to fix one problem. The goal is to keep your existing fence panels level and secure throughout the process. Precision prevents "fence creep," a common issue where the gap between posts changes during the repair. If you lose the standard 6ft spacing, your panels won't fit back into place. You must maintain the exact alignment of the original line to ensure a professional, sturdy result that lasts as long as the rest of the fence.
Tools and Materials for a Successful Fix
You cannot complete this job effectively with just a garden spade and a prayer. Replacing a single broken fence post requires a specific arsenal of tools designed to handle heavy concrete and wet soil. While some general guides suggest using a post-hole digger, UK ground conditions often require a heavy-duty crowbar or digging bar to break up the existing concrete plug. You will also need a sledgehammer to drive the bar into stubborn footings and temporary 2x4 timber props to keep your panels from sagging while the post is missing.
The "Secret Weapon" for any professional-looking repair is rapid-set Postcrete. A 20kg bag of Blue Circle Postcrete costs approximately £6.75 to £7.70 and sets in about 5 to 10 minutes. You should have at least two bags per post on hand. Unlike standard concrete, you don't need to pre-mix this in a barrow. You simply fill the hole halfway with water and pour the powder directly in. It is the fastest way to replace a fence post in concrete without waiting 24 hours for a cure. Adding a base layer of gravel before the Postcrete will also improve drainage and prevent future rot.
Choosing Your Replacement Post
Select a matching 3x3 or 4x4 pressure-treated fence post to maintain the look of your existing line. Incised timber is a superior choice because the small cuts in the wood allow the preservative to penetrate deeper into the core. Always account for the 2ft depth required in the ground. If you want a 6ft fence, you must buy an 8ft post. For areas prone to high moisture, consider switching to a concrete post for a permanent, rot-proof solution.
The Fencing Supplies Checklist
Don't start the job until you've checked your inventory of fencing supplies. You will likely need new fence clips and stainless steel screws to reattach the panels. It is also wise to have spare arris rail brackets on hand, as these often bend or snap during the extraction of the old post. Use a high-quality spirit level to check the vertical "plumb" on two adjacent sides of the post. A post that looks straight from the front but leans to the side will cause the entire fence line to buckle over time. If you find you are missing any essentials, you can order quality fencing supplies online for fast delivery.
Step-by-Step: Replacing a Snapped Timber Post
Preparation is the difference between a sturdy repair and a collapsing fence line. Before you touch the broken post, you must brace the adjacent panels. Use temporary 2x4 timber props on both sides of the fence to take the weight off the structure. Once the panels are stable, unscrew them from the damaged post. Do not use a hammer to pry the timber apart. Prying often splits the rails or damages the panel frame, turning a simple post fix into an expensive panel replacement.
After the panels are detached, you face the most difficult part of replacing a single broken fence post: removing the existing concrete footing. Some generic guides suggest digging a new hole next to the old one, but this is a mistake. Digging a fresh hole inches away creates a "soft spot" in the soil and weakens the entire line. You must use the original hole to maintain structural integrity. This stage is labor-intensive, but following a surgical approach will save you hours of frustration and manual labor.
Surgical Extraction: Removing the Old Concrete
You don't need a jackhammer to remove a 40kg concrete plug. Start by using the "Water Method." Pour a bucket of water around the base of the concrete and let it sit for ten minutes. This lubricates the soil and breaks the suction of heavy clay. Use a heavy-duty digging bar to shatter the concrete into manageable chunks while it's still in the hole. Wear eye protection during this process; shards of old concrete can fly up with significant force. Once the concrete is broken up, use a narrow spade or a post-hole digger to clear the debris from the original cavity. This is a critical step in learning how to repair a broken fence post properly.
Setting the New Post with Postcrete
Once the hole is clear to a depth of 2ft, add a 50mm layer of gravel at the bottom. This allows water to drain away from the base of the timber, preventing the ground-line rot discussed in earlier sections. Place your new post into the hole and use your spirit level to ensure it is perfectly "plumb" on two adjacent sides.
When the post is aligned, use the dry-pour Postcrete method. Fill the hole halfway with water, then pour the Postcrete powder directly in until it reaches just below the soil surface. This is much faster than pre-mixing and provides an almost instant hold. As the mixture begins to set, use a trowel to slope the top of the concrete away from the timber. This "weathering" effect ensures rain runs off into the soil rather than pooling against the wood, which is the leading cause of premature failure in garden fencing.
The Quick Fix: When to Use a Concrete Repair Spur
A concrete repair spur is a 4ft reinforcing pillar designed to provide a new, rot-proof foundation for a damaged fence. You bolt this pillar directly to the base of your existing timber post. This method is the "fast track" alternative to replacing a single broken fence post because it bypasses the most difficult stage of the job. You don't have to extract the original concrete plug or disturb the settled ground. If your timber post has snapped exactly at the ground line but the rest of the wood is sound and sturdy, a spur is a pragmatic solution.
Speed and efficiency are the main benefits here. You can complete a spur repair in roughly 45 minutes, which is significantly faster than a full swap. There are trade-offs to consider, however. A spur creates a visible concrete bolster on one side of the fence line. While this is rarely a concern for side or rear boundaries, it might look out of place in a front garden. You also need specialized ironmongery, specifically M10 coach bolts, to secure the timber to the concrete. Without these heavy-duty fixings, the repair will fail during the first high wind event.
How to Install a Repair Spur
Start by digging a narrow hole approximately 2ft deep immediately alongside the broken post. Position the concrete spur in the hole so it sits flush against the timber. Use a power drill with a long masonry bit to create two pilot holes through both the timber and the pre-cast holes in the spur. Drive M10 coach bolts through the assembly and tighten them until the timber and concrete are locked together. Once secured, fill the hole with Postcrete to create a rigid, permanent fix. This method provides the structural support of a new base without the labor of a full extraction.
Spur vs. Replacement: A Quick Comparison
A concrete spur repair typically costs between £80 and £150 per post when professionally fitted, whereas a standard 8ft timber post costs between £20 and £40 for the material alone. A full replacement "resets the clock" on the post's lifespan, giving you another 10 to 15 years of service. A spur is a structural patch. It is an excellent choice if your fence is mid-life and you want to extend its utility for another 5 years without a major overhaul. For a professional finish on any repair project, you can buy quality concrete spurs and ironmongery directly from our store.
Maintenance and Sourcing Quality Fencing in Essex
Completing the job of replacing a single broken fence post is only half the battle. To ensure your new 8ft timber post lasts another 15 years, you must prioritize post-installation care. The most vulnerable area is the ground line, where moisture and oxygen meet the wood. Apply a high-quality wood preservative to this specific zone immediately after the Postcrete has set. You should also install a post cap. These simple timber or metal covers prevent rain from soaking into the vertical grain, which is the primary cause of internal rot and splitting.
Logistics matter when you're handling heavy materials. A single concrete post or several bags of Postcrete are difficult to transport in a standard car. Reliable local delivery ensures your materials arrive without transit damage and saves you the physical strain of loading heavy timber. Trade Fencing Online provides the specific ironmongery and pressure-treated timber required for professional repairs, supporting DIYers across Romford and the wider Essex area with trade-grade supplies. Our service is built on dependability and efficiency, ensuring you get what you need without unnecessary fuss.
Preventing Future Post Rot
Install gravel boards to keep your panels off the damp soil. This simple addition prevents moisture from wicking up into the bottom of the fence panels, significantly extending their lifespan. You should also perform annual inspections every spring. Catching a slight lean early allows you to compact the soil or add a small amount of extra concrete before it becomes a structural failure. For maximum protection, consider using bitumen post-protector sleeves. These heat-shrink covers create a waterproof seal around the ground-line area, effectively weatherproofing the most sensitive part of the timber.
Fast Local Delivery for Fencing Projects
Finding a fencing supplier near me is about more than just convenience. It ensures you have access to local experts who understand the soil conditions and weather patterns in Romford and Essex. Romford Fencing Ltd offers trade prices for public DIY projects, ensuring you get the same quality materials used by professional contractors. Don't let a single broken post compromise your entire boundary. You can order your replacement posts and Postcrete today for fast, reliable delivery directly to your door. Our team is ready to provide the no-nonsense support you need to get your fence back in top condition.
Restore Your Boundary with Confidence
You don't need to spend £1,500 on a complete fence installation when only one support has failed. Success depends on surgical extraction and using the right materials to maintain your 6ft spacing. By following this guide, you can handle replacing a single broken fence post in a single afternoon. Remember to apply wood preservative to the ground line and use post caps to block internal rot from rain. These simple maintenance steps ensure your repair lasts for another 15 years without further issues.
Trade Fencing Online is a 5-star rated local supplier providing trade quality materials to the public. We offer free local delivery options throughout Essex and East London, ensuring your heavy 8ft posts and Postcrete arrive exactly when you need them for your project. Shop Quality Fence Posts and Postcrete for Fast Local Delivery today. Get your tools ready and restore your garden's security with a professional, long-lasting finish that stands up to the elements.
Frequently Asked Questions
How deep should a fence post be in the ground?
A standard fence post must be buried 2 feet (600mm) deep to remain stable. This depth provides enough leverage to support a 6ft panel against high winds. If your soil is particularly loose or sandy, you should increase this depth to ensure the foundation remains secure over time.
Can I replace a fence post without removing the concrete?
You can only avoid removing the concrete if you use a repair spur or a metal repair spike. These tools allow you to bypass the original footing by bolting to the existing timber. For a standard replacement, you must extract the old concrete plug to reuse the original hole and maintain the fence line's alignment.
How many bags of Postcrete do I need for one post?
You should use 2 bags of 20kg Postcrete for every standard fence post. This quantity ensures a solid, heavy base that can withstand the pressure of solid panels during a storm. Using only one bag often results in a weak footing that will cause the post to lean within a few months.
Is it better to use wood or concrete fence posts for a replacement?
Concrete posts are the best choice for longevity because they are immune to ground-line rot. They typically cost between £30 and £60 per post. Wooden posts are more affordable, costing between £20 and £40, and are easier to install for a DIYer. If you prefer the look of timber, choose incised, pressure-treated posts for a longer lifespan.
How do I remove a fence post stuck in concrete?
Use a heavy-duty digging bar and a sledgehammer to shatter the concrete plug while it is still in the ground. Pouring water around the base helps lubricate the soil and breaks the suction of heavy clay. Once the concrete is in smaller chunks, use a narrow spade or post-hole digger to clear the cavity.
Can I fix a leaning fence post without digging it up?
You can sometimes straighten a post by digging out the soil on the leaning side and packing it with fresh Postcrete. However, this only works if the timber is still structurally sound. If the post is leaning because it has snapped at the base, replacing a single broken fence post is the only permanent solution.
What is the cheapest way to fix a broken fence post?
The cheapest method is to install a concrete repair spur, which costs between £80 and £150 per post fitted. If you are doing the work yourself, a new timber post for £20 to £40 is the most cost-effective option. Doing the job DIY saves you the average £30 hourly rate charged by professional fencing contractors.
Should I use a 3x3 or 4x4 post for a standard 6ft fence?
You should always use a 4x4 (100mm) post for a standard 6ft fence. The larger surface area provides significantly more strength against wind leverage than a 3x3 post. When replacing a single broken fence post, upgrading to a 4x4 ensures the new support is the strongest point in your entire fence line.