


Last month, a homeowner in Romford ordered ten "6ft" panels for their existing concrete posts, only to find a 30mm overlap that made the entire delivery unusable. It's a frustrating mistake that costs people hundreds of pounds in return fees and project delays. Learning how to measure for fence panels with professional precision is the only way to avoid these common metric traps and wasted materials.
You likely understand that even a small calculation error leaves you with an awkward, narrow gap at the end of your garden. It's often confusing when you have to account for 1.83m widths versus 1.8m European sizes, or figure out how gravel boards impact your total height. We've designed this guide to remove the guesswork. You'll learn the exact methods our team uses to calculate post spacing and panel quantities for a perfect fit. We will walk you through the process of accounting for different post types and heights. By the end, you'll have a clear shopping list and the confidence that every item delivered to your door will fit your space exactly as planned.
Key Takeaways
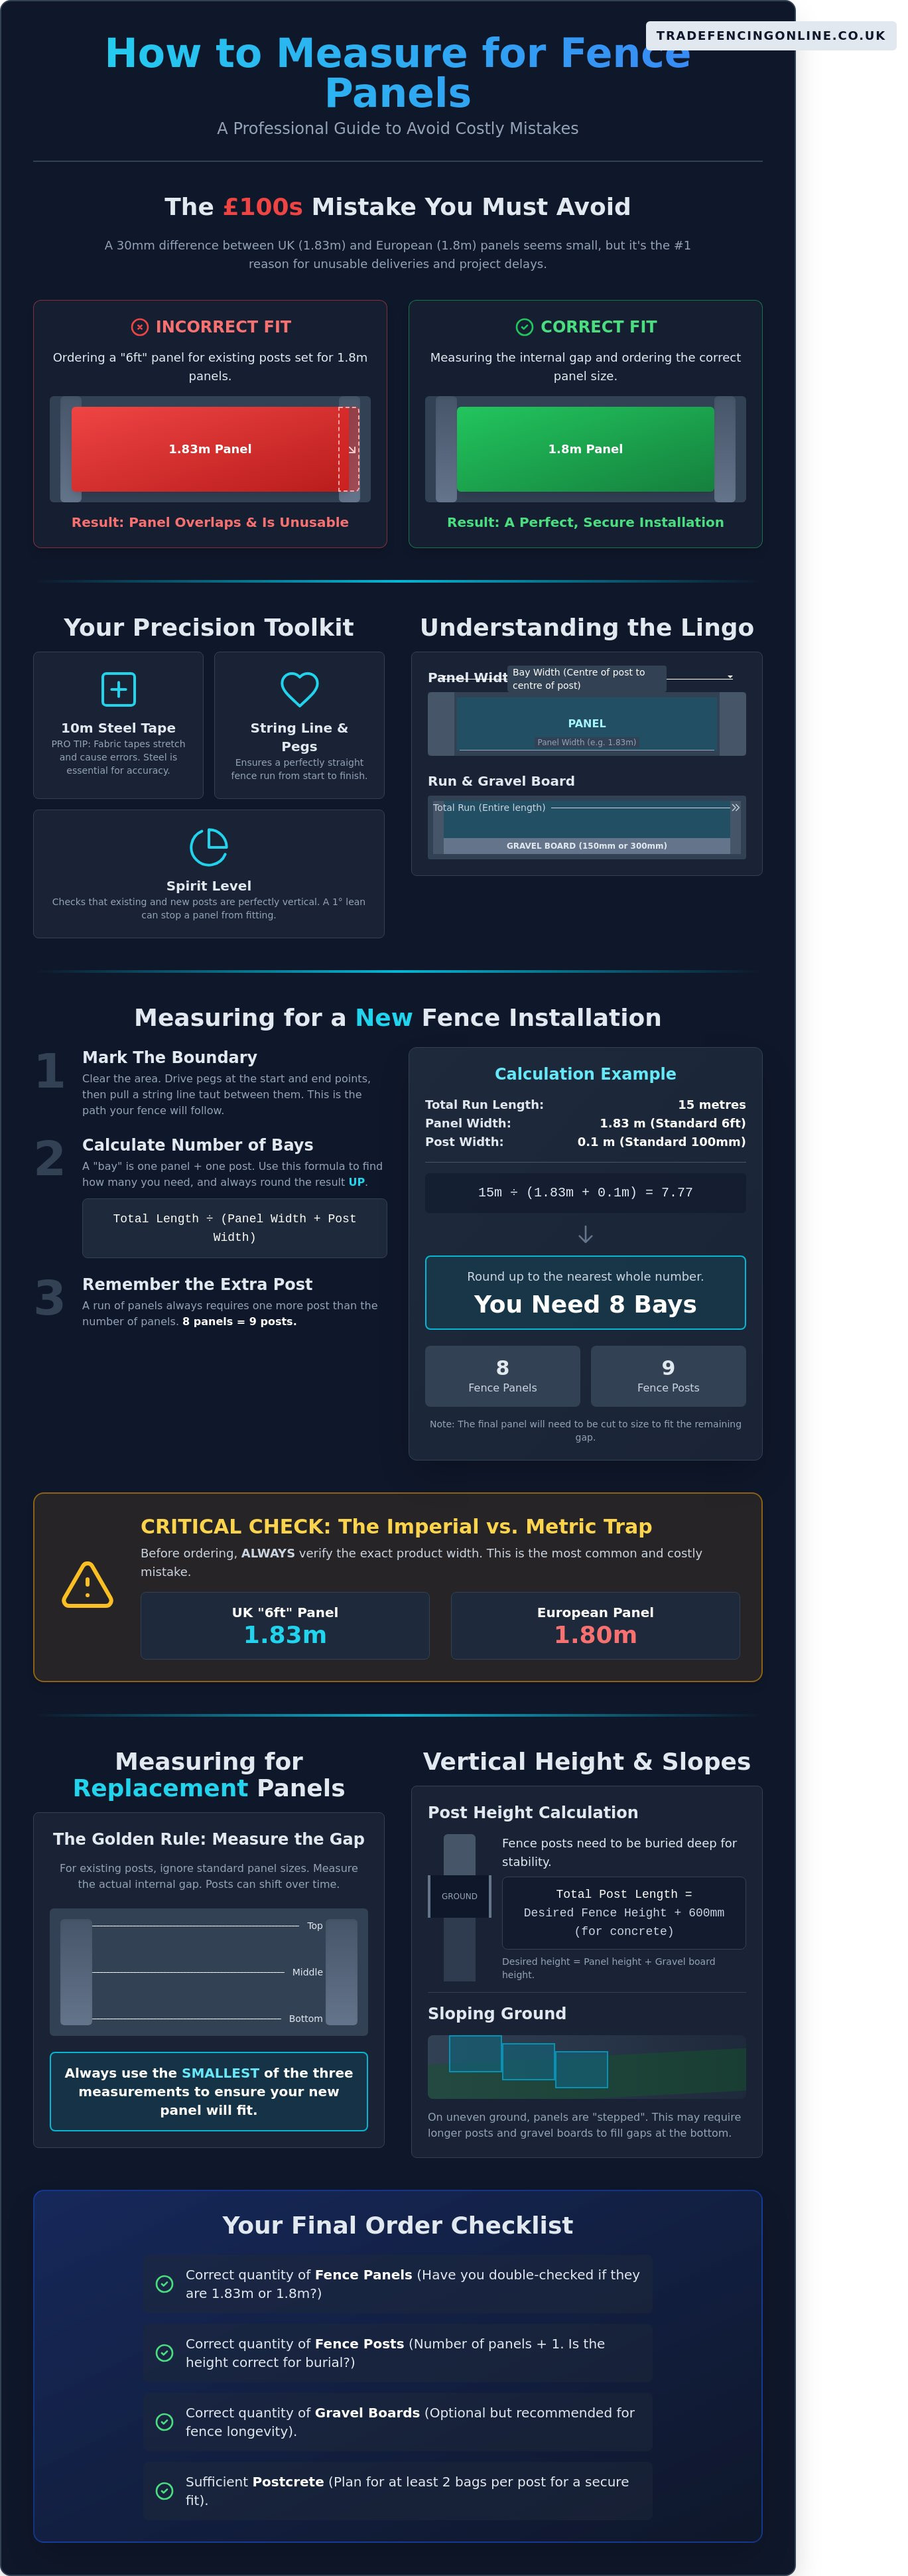
- Gather the essential trade kit, including a 10m steel tape and string line, to ensure professional accuracy before you start.
- Discover how to measure for fence panels by calculating the total boundary length and accounting for post widths to prevent wasted materials.
- Avoid costly mistakes on replacement jobs by measuring the exact internal gaps between existing posts rather than assuming standard sizes.
- Account for vertical height and sloping ground by correctly calculating gravel board requirements and planning for professional stepped installations.
- Use our final trade checklist to ensure your order includes the correct quantities of panels, posts, and postcrete for a seamless delivery.
Essential Preparation: Tools and Terminology for Measuring Fencing
Correct preparation prevents expensive errors. Before you order materials, you must understand exactly how to measure for fence panels to ensure a professional fit. Start by identifying your project type. Replacing panels between existing concrete posts requires different precision than planning a brand-new run across an open garden boundary. If you get the numbers wrong by even 10mm, you risk panels that rattle or, worse, won't fit between the posts at all.
The Basic Fencing Tool Kit
Precision requires the right equipment. You need a 10m steel tape measure. Don't use fabric tapes because they stretch over long distances, which leads to inaccuracies of 20mm or more. A string line is vital for keeping your fence run straight. Use marking pegs to define your start and end points clearly. A spirit level is another essential tool. Use it to check if existing posts are vertical. If a post leans by just 1 degree, a new panel will not slide into the grooves properly.
Key Fencing Terms You Must Know
Understanding industry language ensures you buy the correct quantities. The 'Run' refers to the total length of the area you intend to fence. When calculating this, you must distinguish between 'panel width' and 'bay width'. Panel width is the physical size of the timber. Bay width is the distance from the centre of one post to the centre of the next. Most standard UK panels are 1.83m wide, which is exactly 6ft.
- Gravel Boards: These are typically 150mm or 300mm high. You must factor these into your total height calculations to ensure your posts are long enough to be buried 600mm into the ground.
- Arris Rails and Pales: These components are used for traditional closeboard fencing. Unlike pre-made panels, you measure these as individual components for on-site assembly.
- Lap vs. Closeboard: Standard lap panels are fixed sizes. Closeboard panels can sometimes vary by 5-10mm depending on the manufacturer. Always check the exact specifications before digging holes.
Decide on your fencing style early in the process. If you're replacing panels in a 10-year-old fence, the original posts might have shifted. Measure the gap at the top, middle, and bottom. Use the smallest measurement to ensure the new panel fits. Knowing how to measure for fence panels correctly at this stage saves hours of adjustment during installation. If you're starting a fresh run, your measurements dictate where every post hole is dug. Total accuracy is the only way to ensure a straight, professional finish.
How to Measure for a New Fence Installation from Scratch
Measuring a fresh boundary requires precision to avoid wasted materials or mid-project delays. Always measure the total length of the run in metres. This provides the most accurate trade calculation and aligns with standard UK product specifications. Establishing a straight line is the first rule of how to measure for fence panels accurately.
Step 1: Marking the Boundary Line
Clear all debris, stones, and overgrown shrubs first. You need a clear line of sight to avoid measurement errors. Drive wooden pegs into the ground at the exact start and end points of the run. Pull a string line taut between these pegs. This string marks the precise path where your posts will sit. It ensures your fence remains on your property and stays perfectly straight over long distances.
Step 2: Calculating the Number of Bays
When learning how to measure for fence panels, you must understand the "bay" concept. A bay consists of one panel and one post. The standard UK panel width is 1.83m (6ft). You cannot simply divide your total length by 1.83m. You must add the width of your post to the panel width. Most standard timber or concrete posts are 100mm (0.1m) wide.
Use this formula for your calculation: Total length ÷ (Panel width + Post width) = Number of bays.
- Example: A 15m run using 100mm posts and 1.83m panels.
- Calculation: 15 ÷ 1.93 = 7.77 bays.
- Result: Always round up to the nearest whole number. You need 8 panels.
Don't forget to account for the "extra" starting post. A run of 8 bays requires 9 posts because you need a post at both the start and the end of the entire line. Plan for a "cut-down" panel at the least visible end of the garden. Most boundaries won't fit a perfect number of 1.83m panels, so you'll likely need to trim the final panel to fit the remaining gap.
Step 3: The Imperial vs Metric Trap
Check your product specifications twice before ordering. Many modern European panels are exactly 1.8m wide. Traditional UK panels are 1.83m. This 30mm difference seems small, but it ruins a run of pre-set concrete posts. If you've already set your posts at 1.83m intervals, a 1.8m panel will not reach the grooves. It leaves a 3cm gap that makes the fence impossible to secure.
Always verify the exact millimetre width with your fencing supplier before you start digging. Using the wrong measurement leads to expensive mistakes and structural instability. Once you've confirmed your dimensions, you can browse our range of quality fence panels to find the right style for your project.
Measuring for Replacement Fence Panels: Avoiding Common Pitfalls
Don't assume your existing panels are a standard size. This is the most frequent mistake homeowners make when ordering replacements. Even if your fence looks like it uses standard 6ft sections, variations in manufacturing and age can mean the difference between a perfect fit and a panel that won't slide into place. To understand how to measure for fence panels properly, you must treat every gap as a unique measurement.
Posts shift over time. Ground heave, wind pressure, and rot can cause timber or concrete supports to lean. Use a tape measure to check the internal gap between your existing posts at three specific points: the top, the middle, and the bottom. If the measurements differ by more than 10mm, your posts have moved. A gap that narrows at the bottom usually requires you to trim the new panel or reset the post entirely to avoid splitting the timber during installation.
Measuring the Gap Between Existing Posts
Measure the clear distance between the two inside faces of your posts. This is the most critical figure for your order. In the UK market, you will typically encounter two widths. Standard UK panels are 1.83m (6ft) wide. However, many European or "Continental" style panels are exactly 1.8m wide. That 30mm discrepancy is a common pitfall. If you buy a 1.8m panel for a 1.83m gap, it won't reach the fixings.
If you find your gap is slightly wider than the standard 1.83m due to post movement, don't panic. You can bridge small gaps up to 20mm by attaching timber strips or "cleats" to the inside of the posts. This provides a solid surface for the panel to butt against. If the gap exceeds 25mm, you may need to reconsider your post positions to maintain the structural integrity of the fence.
Checking Panel Thickness and Channel Depth
You must ensure your new panels are compatible with your existing setup, especially regarding thickness. Standard lap panels are usually thinner and lighter than heavy-duty closeboard fence panels. A typical lap panel might be 30mm thick, while a premium closeboard or decorative panel can reach 45mm or 50mm.
Check the slot width if you have concrete fence posts. Most standard concrete post channels are 50mm wide. If your new panel is too thick, it won't fit into the groove. If it's too thin, it will rattle and vibrate in high winds, which eventually leads to damage. You can solve a loose fit by inserting small wooden wedges or specialized "fence clips" into the channel to hold the panel firm. Knowing how to measure for fence panels includes checking these depths to ensure you don't buy a product that is physically impossible to install.
Accounting for Gravel Boards, Slopes, and Vertical Height
When you calculate how to measure for fence panels, your vertical height isn't just the height of the timber panel itself. You must account for the gravel board and the depth of the post in the ground. Standard UK gravel boards are 150mm (6 inches) high. If you're installing a 1.52m (5ft) panel on top of a standard board, your total finished height reaches 1.67m (5.5ft). This extra height is a critical measurement for your post selection and planning compliance.
Vertical Math: Panels + Gravel Boards
You can't skip gravel boards if you want a fence that lasts. They keep your timber panels off the damp soil, which prevents rot and can extend the life of your fence by 7 to 10 years. Using gravel boards is a vital step in learning how to measure for fence panels correctly. Remember that while your fencing supplies like postcrete won't change the width of your run, they're essential for the stability of this total vertical height.
Measuring for Slopes and Uneven Ground
Sloping ground requires a "stepped" installation to keep the top line level. To measure the "step" height, run a string line level from the top of the higher post to the next post position. Measure the vertical distance from that level string down to the ground. This measurement tells you exactly how much of a gap you'll have at the bottom. You'll often need longer posts for the downhill side to maintain a consistent 600mm burial depth while keeping the tops aligned.
Structural integrity depends entirely on how deep your posts sit. Every post needs at least 600mm (2ft) buried in the ground to resist wind loads and the weight of the panels. If you're building a 1.8m (6ft) high fence, you'll need 2.4m (8ft) posts. Don't compromise on this depth; a shallow post will lean within the first 12 months of installation.
Check local planning rules before you order materials. In the UK, you generally don't need planning permission for a fence under 2 metres high. However, this 2m limit includes the gravel board and any trellis toppers you add. If your fence faces a public highway or footpath, this limit often drops to 1 metre. Verify these details with your local council to avoid the cost of dismantling a new installation. For expert advice and the best rates, order your trade-quality fencing online today.
Finalising Your Fencing Order with Romford Fencing Ltd
Once you've mastered how to measure for fence panels, the final stage is converting those raw figures into a precise materials list. Accuracy at this point prevents expensive mid-project delays or the hassle of returning surplus stock. We always advise the "measure twice, cut once" rule. Even a 50mm error in your total run calculation can result in a panel that doesn't fit or a post that's out of alignment. Check your total distance against the width of your chosen panels one last time before you commit to the purchase.
Don't overlook the essential ironmongery that holds the structure together. Your measurements dictate the exact count of clips, brackets, and screws required for a professional finish. For a standard 6ft high panel, you generally need four U-brackets to secure the timber effectively. If you're installing gravel boards, ensure you've accounted for the additional height in your post measurements. Getting these details right ensures your fence stands strong against the unpredictable British weather.
Your Fencing Project Shopping List
Use this straightforward formula to ensure you don't run short on materials. For a straight run of fencing, you require one starting post, plus one intermediate post for every panel you install. For example, a 10-panel project requires 11 posts in total. We recommend using one 20kg bag of postcrete for every post when digging standard 600mm (2ft) deep holes. This provides the necessary stability in the varied soil types found across the South East.
- Panels: Total run length divided by panel width (usually 1.83m).
- Posts: (Number of panels x 1) + 1 starting post.
- Gravel Boards: One per panel to protect against ground moisture.
- Postcrete: Minimum of one bag per post.
- Decorative extras: Integrate trellis panels if you want to add height without blocking light.
Why Order from Romford Fencing?
We provide trade-quality materials to the general public at unmatched prices. Our team possesses specialist local knowledge of Essex ground conditions, particularly the heavy clay common in Romford and Ilford, which requires specific installation techniques. We don't just sell timber; we provide the reliable, no-nonsense service that local homeowners and contractors depend on. We organise fast local delivery across Essex and East London, ensuring your materials arrive exactly when you need them.
FOR QUALITY FENCING, CALL ROMFORD FENCING LTD TODAY OR EMAIL OUR TEAM.
Contact us now for a bespoke quote or place your order online for rapid delivery to your door. It's the simplest way to get your garden project moving without the fuss.
Get Your Garden Project Moving Today
Precision is the foundation of a professional fence installation. You now understand the importance of accounting for 150mm gravel boards and the nuances of measuring between existing posts versus starting a new run from scratch. Getting these details right ensures you don't waste money on incorrect sizes or unnecessary extra materials. Mastering how to measure for fence panels gives you the confidence to order the right products the first time without any fuss.
Romford Fencing Ltd is a trusted supplier with a consistent record of 5-star reviews from local homeowners and trade professionals. We provide unmatched prices on trade-quality materials that stand the test of time. Take advantage of our free local delivery options to get your supplies exactly when you need them. Our team focuses on efficiency and value, ensuring you get the best timber for your budget.
Shop our full range of Quality Fence Panels for fast Essex delivery
Grab your tape measure and confirm those final dimensions today. You're just one step away from a secure, high-quality boundary that transforms your outdoor space.
Frequently Asked Questions
What is the standard width of a UK garden fence panel?
The standard width for a UK garden fence panel is 6 feet, which equals 1.83 metres. This dimension remains consistent across most styles, including lap, closeboard, and decorative panels. You must account for this fixed width when calculating your total run, as it's the industry standard for almost all timber fencing manufactured in the UK.
How do I calculate how many fence posts I need for a 10-metre run?
You need 7 fence posts for a 10-metre run. Since each standard panel is 1.83 metres wide, a 10-metre distance requires 6 panels to cover the span. You always need one extra post to finish the end of the run, so 6 panels plus 1 finishing post equals 7 posts in total for a straight line.
Can I cut a fence panel down if my measurement isn't a perfect multiple of 6ft?
You can cut a fence panel down using a handsaw or circular saw to fit a specific gap. Simply trim the horizontal slats to your required width and reattach the vertical framing batten to the new edge to keep the panel secure. This is a common task when learning how to measure for fence panels for gardens with awkward dimensions.
How much extra height does a gravel board add to my fence?
A standard gravel board adds 150mm (6 inches) to the total height of your fence. If you install a 6ft panel on top of a standard gravel board, the total height from the ground will be approximately 1.98 metres. Using these boards is a pragmatic way to protect timber from ground moisture, potentially extending the fence life by 5 years.
Should I measure in feet or metres when ordering fencing?
Measure your total boundary length in metres for better accuracy, but check panel sizes in feet. Most UK suppliers sell panels in 6ft widths, though heights are often listed in both metric and imperial. Using a metric tape measure for the ground run reduces rounding errors, but you'll need to convert this to feet to know how many 6ft panels to buy.
How deep should I measure for my fence post holes?
You should measure your post holes to a depth of 600mm (2 feet) to ensure the structure is stable. For a standard 6ft fence, this requires using an 8ft post so that 2 feet are secured underground with Postcrete. This 600mm depth is essential for resisting wind pressure and prevents the fence from leaning or blowing over during storms.
What happens if my garden boundary is curved instead of a straight line?
Use shorter panels and more posts to follow a curved boundary accurately. Instead of using standard 1.83m panels, you can use 900mm widths to create a faceted curve that follows the line closely. This method prevents the fence from encroaching on neighbouring property and ensures there are no large, uneven gaps at the base of the panels.
Do I need to measure for a gate separately within my fence run?
You must measure for your gate separately and subtract its width from the total length of your fence run. A standard garden gate is usually 900mm wide, but you need to allow an extra 20mm for hinge and latch clearance. Accurate calculations while learning how to measure for fence panels ensure your final panel isn't cut too thin to be structurally sound.