


A standard timber fence panel can rot in less than five years if it sits directly on damp soil. You likely already know that ground moisture is the primary enemy of any garden boundary. It's frustrating to watch a professional investment decay simply because the wood makes contact with wet earth. Learning how to install concrete gravel boards is the most effective way to create a permanent, rot-proof barrier that keeps your fence panels dry and secure.
While these boards provide superior protection, their physical weight and the precision required for leveling often cause difficulties during a build. It's hard to manage heavy concrete while trying to maintain a perfectly straight, professional finish. This guide provides the professional methods for handling these components safely and ensures you get the alignment right the first time. You'll gain a clear understanding of the tools required and the correct fixings to use for different post types. We've simplified the process so you can achieve a durable, long-lasting boundary with total confidence.
Key Takeaways
- Learn how concrete gravel boards act as a permanent moisture barrier to prevent ground-level rot in timber fence panels.
- Identify the essential professional tools and safety equipment needed to handle heavy concrete materials safely.
- Master the professional sequence of how to install concrete gravel boards using slotted concrete posts for a secure boundary.
- Understand the specific bracket and cleat requirements for fixing concrete boards to timber fence posts.
- Discover the logistical advantages of sourcing trade-quality materials from a local specialist supplier.
Why Concrete Gravel Boards are Essential for UK Fences
Concrete gravel boards serve as the critical foundation for any high-quality boundary. They act as a physical moisture barrier between the damp soil and your timber panels. Without this barrier, wooden panels absorb ground moisture through capillary action, leading to rapid decay and structural failure at the base. While some suppliers suggest these are optional, professionals know a fence is only as strong as its ground contact point. Understanding how to install concrete gravel boards correctly ensures your investment remains rot-proof for years.
In high-wind areas like Essex, the structural benefits are undeniable. Concrete provides a heavy, low-centre-of-gravity anchor that timber cannot match. There are different types of fences, but those incorporating concrete components consistently outperform all-timber designs in harsh weather. A standard timber gravel board might last five to eight years before requiring replacement. In contrast, a concrete board has a lifespan exceeding 20 years. This longevity makes concrete the most cost-effective choice for long-term property maintenance.
PROTECT YOUR FENCE WITH PROFESSIONAL-GRADE CONCRETE GRAVEL BOARDS
SHOP NOWConcrete vs. Timber Gravel Boards
Concrete does not warp, rot, or split. It requires zero annual treatment or staining. Timber alternatives often bow under the weight of the fence or ground pressure, creating gaps where debris and moisture collect. You can choose between plain smooth finishes or recessed patterns to match your garden's aesthetic. The primary trade-off is weight. Concrete is significantly heavier than wood, but this mass is exactly what provides the superior durability and wind resistance required for a permanent boundary.
Standard Sizes and Specifications
Standard UK gravel boards are 6ft (1.83m) long to match the width of most fence panels. They typically come in two heights: 6-inch (150mm) or 12-inch (305mm). It is vital to match the board length exactly to your panel width to ensure a flush fit within the post channels. Most boards are approximately 45mm to 50mm thick. This thickness is designed for a secure, rattle-free fit inside standard slotted concrete posts. Always verify your post slot width before ordering to ensure compatibility.
Essential Tools and Preparation for Installation
Successful fencing depends on precision and the right equipment. Concrete components are unforgiving; if your spacing is off by even 10mm, the board will not fit. Before you begin learning how to install concrete gravel boards, gather these professional-grade tools:
- Spirit Level: A 1.2m level is best for checking both vertical plumb and horizontal alignment.
- Spade and Shovel: Required for digging post holes to a minimum depth of 600mm.
- String Line: Essential for maintaining a perfectly straight fence line over long distances.
- Tape Measure: Use a high-quality steel tape for exact measurements between post centres.
- Postmix and Water: For rapid setting of your concrete or timber posts.
Safety is a priority when handling heavy materials. Always wear steel-toe boots to protect against dropped boards and heavy-duty gloves to prevent abrasions from rough concrete surfaces. We recommend having a second person available to help lift and position the boards safely. You can find all necessary high-quality fence posts and accessories to start your project correctly.
GET TRADE-QUALITY TOOLS AND MATERIALS DELIVERED DIRECT
SHOP NOWSite Preparation and Marking Out
Clear all debris, old stumps, and vegetation from the installation path. Drive a stake into the ground at each end of the run and tension a string line between them. This line dictates the exact face of your fence. Check for underground utilities like pipes or cables before you dig. It is also wise to consult the UK government planning regulations for fences to ensure your project complies with height and boundary rules.
Calculating Your Materials
Measure the total length of your boundary in millimetres. Divide this by the length of your board (typically 1830mm) plus the width of one post. Always round up to ensure you have enough materials. Remember to account for corner posts and end-of-run posts, which require different configurations. For a full breakdown of what you need, refer to our essential fencing supplies checklist. Planning your material list accurately prevents costly mid-project delays.
Method 1: Installing Gravel Boards with Slotted Concrete Posts
This method is the industry standard for creating a permanent, low-maintenance boundary. Using slotted concrete posts removes the need for mechanical fixings, as the components rely on a precise friction fit. It's the most reliable way to ensure your fence stays straight and secure against the elements. Follow these steps to master the process:
- Set the first post: Dig your hole to 600mm and set the post using Postmix. Use a spirit level to check it's perfectly vertical on two adjacent sides.
- Slot the board: Once the first post is stable, slide the concrete board into the groove. For a detailed step-by-step guide to fitting concrete gravel boards, ensure the board reaches the bottom of the slot without forcing it.
- Position the second post: Place the second post into its hole. Guide the other end of the gravel board into the slot of this second post.
- Level and secure: Place your spirit level on top of the board. Adjust the second post until the board is perfectly horizontal, then secure the post with Postmix.
UPGRADE TO A ROT-PROOF FENCE WITH OUR SLOTTED CONCRETE POSTS
SHOP NOWManaging Slopes and Uneven Ground
If your garden has a gradient, use a "stepping" technique. Keep each board horizontal rather than following the slope. You'll likely need to partially bury the board at the higher end of the run to maintain a level top line for your panels. This prevents unsightly gaps and ensures the fence remains structurally sound. When learning how to install concrete gravel boards on a slope, always ensure the ground is well-drained to prevent boards from sitting in heavy standing water.
Ensuring a Tight Fit
Precision spacing is vital for a rattle-free fence. The gap between your concrete gravel boards and the post slots must be exact. If the gap is too wide, the board will move in the wind; too narrow, and it won't fit. Use temporary wooden shims to hold the board level and central within the slot while the concrete sets. Always check the "squareness" of the board relative to the posts to prevent the entire run from leaning.
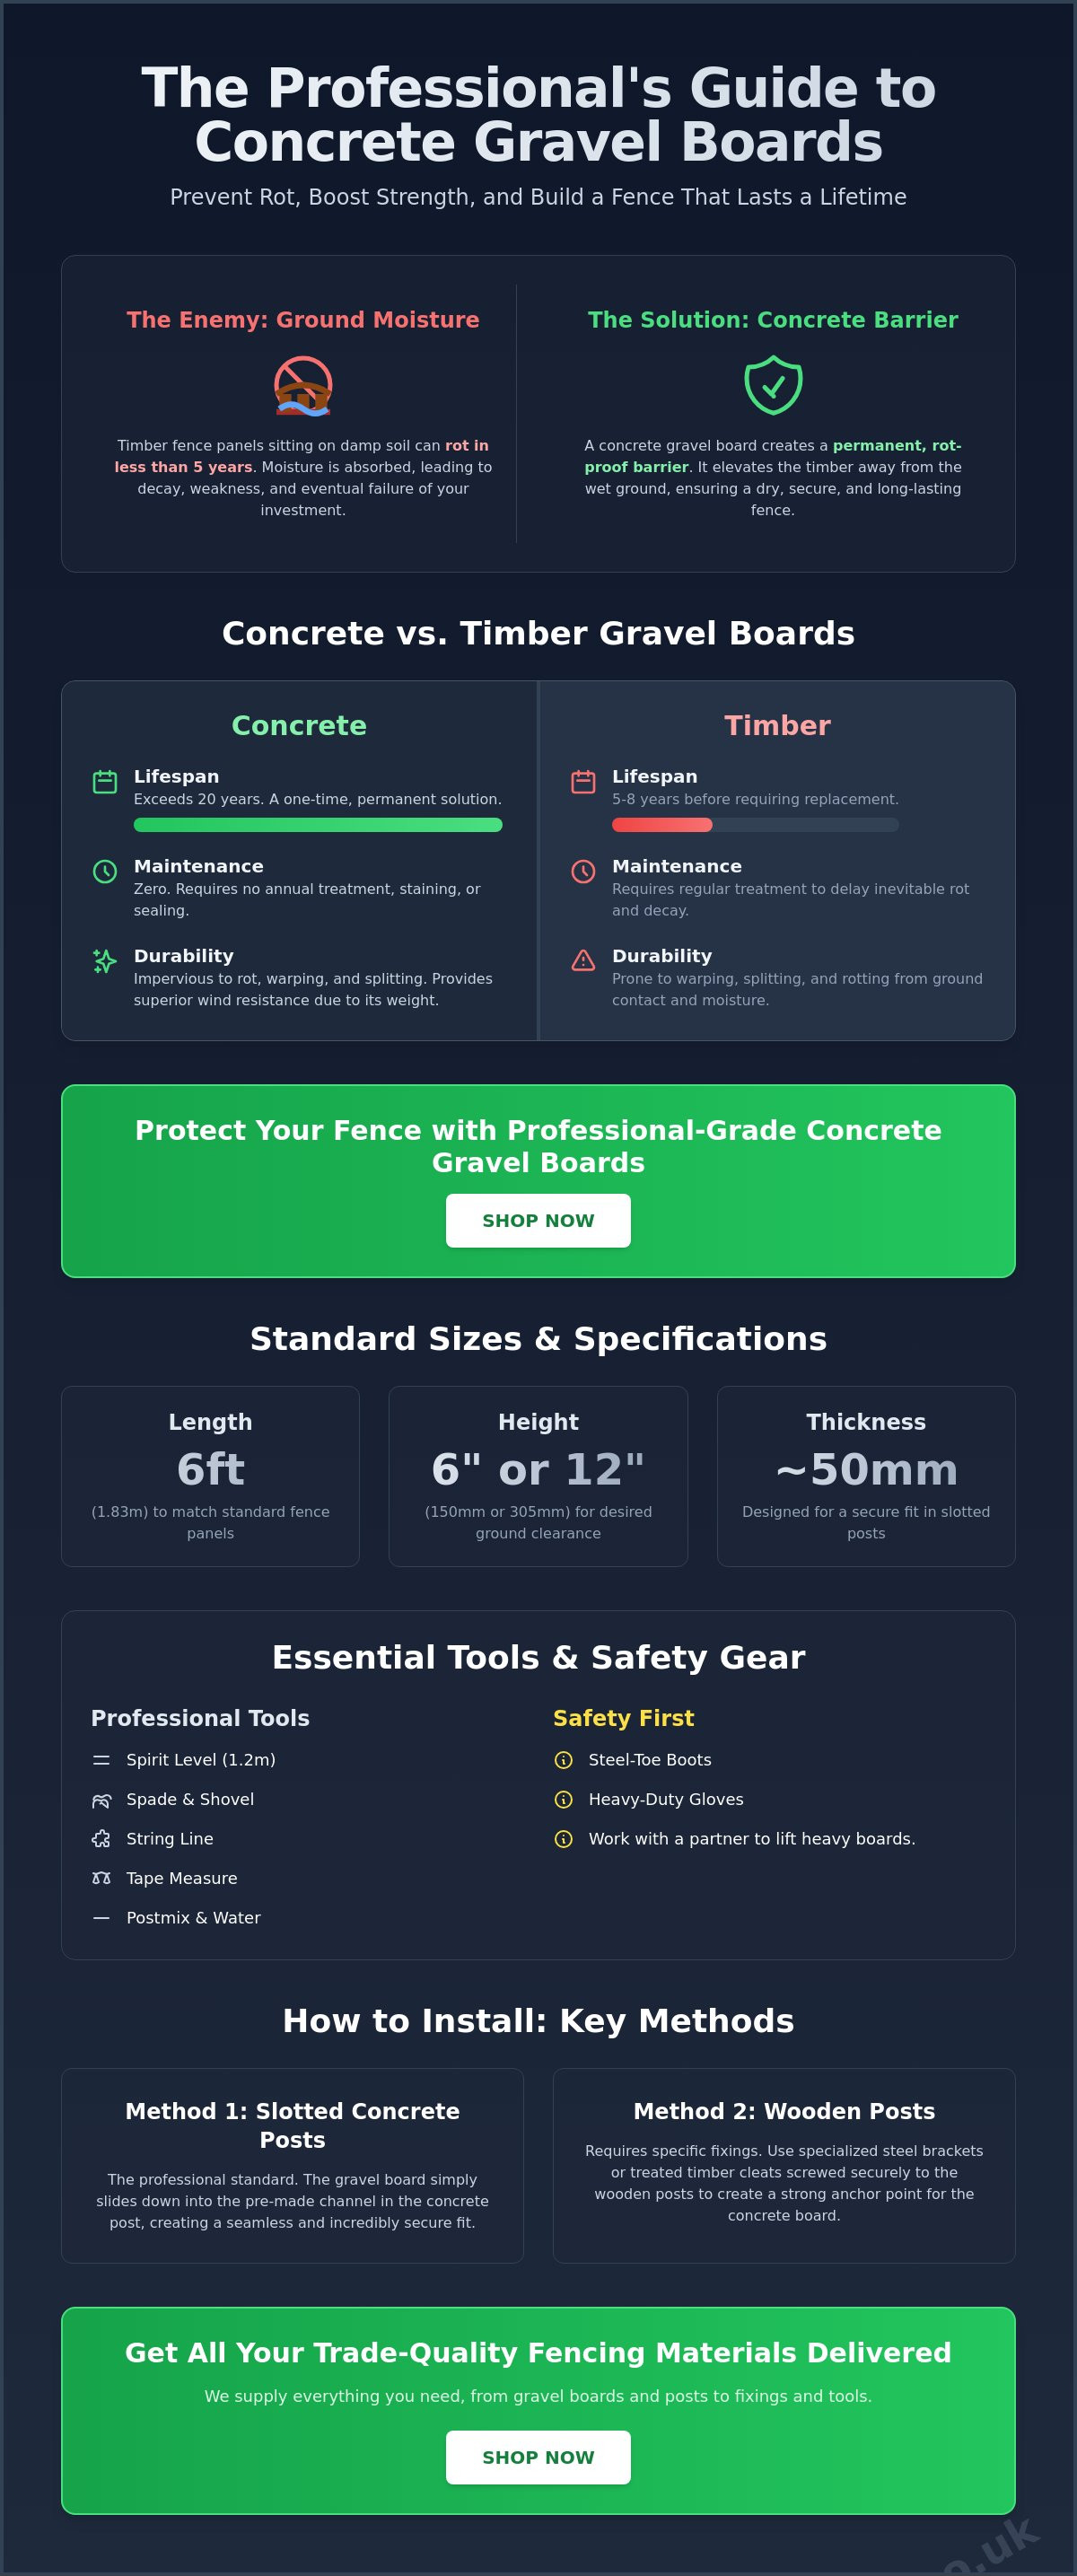
Method 2: Fixing Concrete Gravel Boards to Wooden Posts
This hybrid approach is common when retrofitting existing timber boundaries or when you prefer the aesthetic of natural wood posts. While concrete posts use slots, timber posts require mechanical fixings to hold the weight of the board. Learning how to install concrete gravel boards using this method requires specific timber fence posts that are pressure-treated to Class 4 standards. This ensures the wood survives ground contact for as long as the concrete board protects the panel above it.
STRENGTHEN YOUR TIMBER FENCE WITH CONCRETE GRAVEL BOARDS
SHOP NOWChoosing the Right Brackets and Fixings
You must use specialist gravel board brackets, often called cleats, designed specifically for concrete components. Two-pin brackets provide the most secure anchor point. Always select galvanized fixings to prevent unsightly rust streaks from running down the face of the board over time. For heavy-duty cleats, use 5.0mm or 6.0mm gauge stainless steel or galvanized screws to ensure the heavy board is fully supported. Pre-drilling is essential if you choose a bolt-through method to prevent the timber from splitting under the significant load.
Installation Steps for Timber Posts
Start by marking the desired height of the board on the face of the timber post using a tape measure and pencil. Secure the brackets to the post first; it's much easier to fasten the hardware before the heavy board is in position. Once the brackets are level across the run, lift the board into the cradle. Safety tip: Always have a second person hold the board while you fasten the final screws. This prevents the board from slipping and causing injury or damaging the post surface. Ready to start? Buy heavy-duty gravel boards today for a professional finish.
Sourcing and Delivery for Your Fencing Project in Essex
Logistics matter when handling heavy fencing components. Concrete gravel boards are dense and difficult to transport without the right equipment. Sourcing these items locally is the most efficient way to keep your project on track. We provide trade-quality materials at competitive rates across Romford, Essex, and East London. By choosing a local supplier, you reduce the risk of transport damage and avoid the high costs of national haulage. Knowing how to install concrete gravel boards is only half the battle; getting them to your site safely is the other half.
The Romford Fencing Advantage
Our location at 178 Crow Lane makes local collections simple for trade professionals and DIY homeowners. We take a no-nonsense approach to supply. We stock high-tier fence panels, posts, and gravel boards that meet professional standards. If you're unsure about the right style for your property, refer to our guide on choosing fence panels for a perfect match. We focus on substance and reliability, ensuring you get exactly what you need without unnecessary fuss.
Next Steps for Your Garden Renovation
Use our online shop to calculate delivery rates for your specific postcode. Our system provides clear, upfront costs so you can budget accurately. For complex boundary layouts or large-scale trade orders, our expert team is available to provide direct technical advice. We recommend ordering your full kit, including panels, slotted concrete posts, and Postmix, in a single transaction to streamline your delivery. BROWSE OUR RANGE OF CONCRETE GRAVEL BOARDS now to secure your materials.
Secure Your Boundary with Professional Materials
Installing concrete gravel boards is the most reliable way to eliminate ground-level rot and extend the life of your timber fence panels. You now have the technical knowledge regarding how to install concrete gravel boards using either permanent slotted concrete posts or hybrid timber supports. These professional methods ensure your garden boundary remains level, secure, and resilient against harsh weather conditions. Choosing the right foundation today prevents costly replacements in the future.
We are an established Romford supplier offering trade prices directly to the public. Our team provides fast local delivery across Essex and East London to keep your project moving without logistical friction. We stock a full range of boards, panels, and postmix to complete your renovation in one order. Our commitment to quality ensures you receive durable materials that meet trade standards every time.
ORDER YOUR CONCRETE GRAVEL BOARDS FOR LOCAL ESSEX DELIVERY
Frequently Asked Questions
Do I really need gravel boards for my new fence?
You need them to prevent the bottom of your timber panels from sitting in damp soil. Without a board, moisture wicks into the wood, causing rot within a few years. A concrete board acts as a permanent barrier that preserves the structural integrity of your panels and saves you money on replacements.
Can I cut a concrete gravel board to size?
You can cut these boards using an angle grinder fitted with a high-quality diamond blade. Mark your line clearly on both sides before cutting to ensure a clean break. Always wear a dust mask, goggles, and ear protection, as the process creates significant debris and noise during a garden project.
How deep should a concrete gravel board be buried?
Bury the board approximately 25mm to 50mm into the soil. This depth prevents light from passing underneath and stops pests from digging under your boundary. If your ground is uneven, you might need to bury one end deeper to keep the top edge perfectly level for your fence panels.
What is the best way to clean concrete gravel boards?
Use a stiff brush and warm soapy water to remove surface dirt or algae. For tougher stains, a low-pressure power wash is effective. Avoid using harsh acidic cleaners that can degrade the concrete surface or damage nearby plants and timber panels over time.
SHOP TRADE-QUALITY GRAVEL BOARDS AND FENCING SUPPLIES
SHOP NOWAre concrete gravel boards better than wooden ones?
Concrete is superior for longevity and maintenance. While wooden boards are cheaper initially, they rot at the same rate as your panels. Concrete boards last over 20 years and don't warp or split. They provide a much stronger foundation for those learning how to install concrete gravel boards for a permanent fix.
How many bags of Postmix do I need per fence post?
You generally need 1.5 to 2 bags of Postmix for a standard 600mm deep hole. This ensures the post is fully encased and stable enough to support the weight of concrete boards. Always follow the manufacturer's instructions regarding water ratios to ensure the concrete sets to its maximum strength.
Can I install concrete gravel boards on my own?
Installing these components is a two-person job. While you can research how to install concrete gravel boards online, the physical weight makes it a safety risk for one person. Having a second person helps guide the board into the slots without damaging the posts or causing personal strain.
Do concrete gravel boards come in different colours?
Most boards come in a standard natural grey finish. However, you can find recessed or textured versions that add visual interest to your boundary. If you want a specific look, you can paint them using high-quality masonry paint to match your garden's colour scheme once the concrete is fully cured.
GET EVERYTHING YOU NEED FOR A PROFESSIONAL FENCE INSTALLATION
SHOP NOW