


You've spent £450 on premium pressure-treated timber and six hours digging out, only to find your final fence panel won't fit because the line drifted by 60mm. It's a frustrating mistake that wastes both time and expensive materials. Learning how to get fence posts perfectly straight is the difference between a boundary that stands for 20 years and one that leans after the first winter gale. Most installers rely on a basic spirit level, but trade experts know that tools alone won't fix a poor setup.
We agree that nothing ruins a property's kerb appeal faster than a wonky fence line or posts that shift while the concrete is wet. This guide teaches you the exact string-line and bracing methods used by UK fencing contractors to ensure laser-straight results every time. You'll master the "clear of the line" technique and learn how to secure your timber so it stays plumb until the Postcrete is rock hard. We'll cover the essential kit and the three-step alignment process used on professional sites to eliminate cumulative errors.
Key Takeaways
- Learn the professional 25mm offset method to avoid the common 'string line trap' and ensure a laser-straight run.
- Discover how to get fence posts perfectly straight by using two-way bracing to lock timber or concrete posts in position while they set.
- Master the correct spacing for standard 1.83m panels and why bell-bottomed holes are essential for long-term stability.
- Understand why you must never rely on wet Postcrete to hold a post and how to use scrap timber for vertical precision.
- Identify the best materials to prevent warping, from high-quality kiln-dried timber to durable concrete posts for high-wind areas.
The Foundation of a Straight Fence: Why Alignment Fails
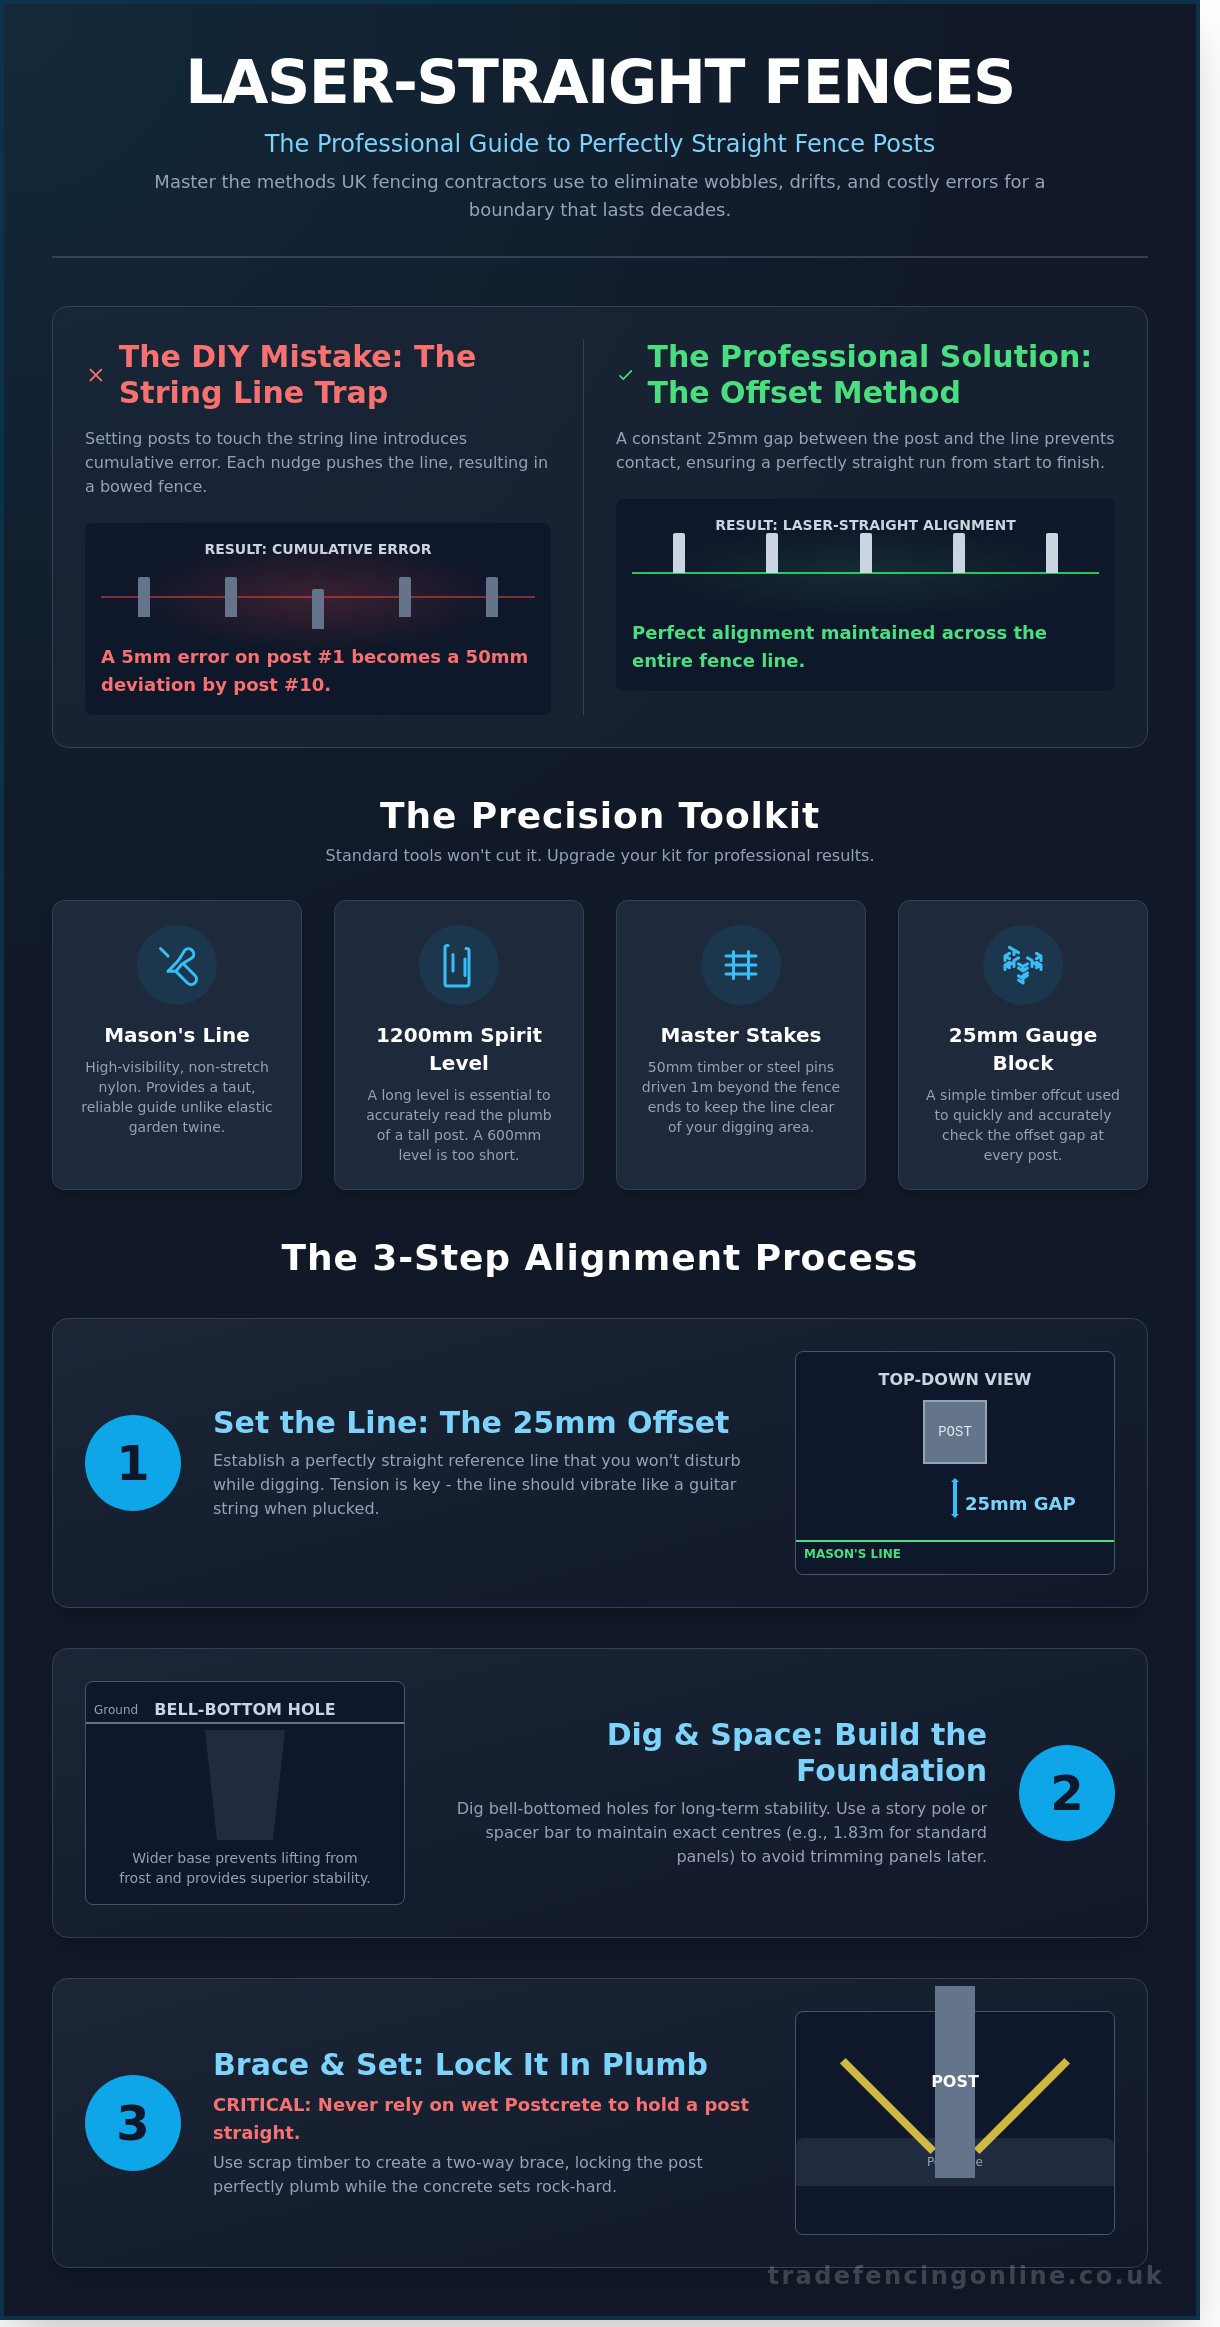
Getting fence posts perfectly straight involves two distinct planes of accuracy. You need horizontal alignment, which is the straight line from start to finish, and vertical precision, known as being plumb. Most DIY projects fail because the installer relies on their eyes rather than physical guides. Eyeballing a run might look acceptable for the first two metres, but minor deviations compound quickly. A 5mm error on your first post often results in a 50mm deviation by post ten. This cumulative error creates a visible wave that ruins the professional finish of your boundary.
Ground conditions in the UK play a massive role in stability. If you're working with heavy Essex clay, the soil expands and contracts based on moisture levels. Soft topsoil offers little resistance, meaning a post can lean as the Postcrete sets if it isn't braced correctly. You aren't just fighting your own measurements; you're fighting the shifting nature of the earth itself. Learning how to get fence posts perfectly straight starts with understanding that the ground is rarely your friend during the installation process.
Essential British Fencing Tools for Precision
Standard garden twine is too elastic for a 30-metre run. It sags in the middle and stretches in the wind. Use a high-visibility mason’s line instead. This stays taut and provides a reliable reference point. For vertical checks, a 600mm level is too short for a standard 1.8m post. Use a 1200mm spirit level to capture the full lean of the timber. You should also build a story pole or a fixed spacer bar. This ensures your centres remain consistent to the millimetre, so your panels fit perfectly without trimming or gapping.
Planning Your Run: The Master Stakes
Establish your boundary with absolute certainty before digging. Boundary disputes often arise from a few centimetres of encroachment. Drive your terminal stakes at least 1 metre beyond the actual start and end points of the fence. This keeps the mason's line clear of the post holes. It allows you to dig without knocking your guide out of place. Verify your line against permanent structures like brick walls or existing kerbs. Ensure you have all your essential fencing supplies ready before the first spade hits the dirt. This preparation prevents mid-project delays that lead to rushed, crooked work. Knowing how to get fence posts perfectly straight is 90% preparation and 10% installation.
Setting the Line: The Professional String Line and Offset Method
The biggest mistake in fencing is the 'String Line Trap'. Many people try to set their posts so they just touch the guide line. This is a recipe for a crooked fence. Every time a post nudges the string, it pushes the line slightly outward. By the time you reach the tenth post, that tiny 2mm nudge has turned into a 20mm bow. You won't notice it from the hole you're digging, but you'll certainly see it when you look down the finished line. Knowing how to get fence posts perfectly straight starts with keeping your distance from the string.
Professional installers use a 25mm offset to solve this. Instead of the line marking the edge of the post, it sits exactly 25mm away from the post face. This gap allows you to work freely without ever bumping the line. You maintain a clear visual reference that remains perfectly true from start to finish. This is the most reliable method for how to get fence posts perfectly straight on any terrain, from small gardens to 50m boundaries.
Line tension is equally critical. A sagging line is worse than no line at all because it gives you a false sense of security. Use a high-visibility nylon mason's line and pull it until it's as tight as a guitar string. Secure it to 50mm timber stakes or steel road pins driven at least 300mm into the ground to resist the pull. If the line vibrates when plucked, it's ready.
The 25mm Offset Technique Step-by-Step
- Set your terminal points: Drive your stakes 1m beyond the first and last post positions. This gives you room to dig the end holes without disturbing the stakes.
- Establish the offset: Measure exactly 25mm out from your intended post face at both ends and secure the line.
- Use a gauge: Keep a 25mm timber offcut in your pocket. Use it at every post to verify the gap. If the block slides in with a hair's breadth of clearance, your alignment is spot on.
Squaring the Corners
A straight line is useless if your corners aren't square. Use the 3-4-5 triangle method to guarantee a 90-degree angle. Measure 3m down one line and 4m down the perpendicular line. The diagonal distance between those two marks must be exactly 5m. If it isn't, adjust your stakes until it hits the mark. Always double-check your measurements against permanent features like the house wall or existing quality garden fencing. If you're working on a slope, keep the line level. Use steps in the line that correspond to your gravelboard heights. This ensures the fence remains horizontally straight even as the ground level changes.
Digging and Spacing: Calculating Centres for Perfect Panels
Straightness starts in the ground. If your spacing is out by even 10mm, your fence line will eventually buckle or lean. Most UK contractors use 1.83m (6ft) panels as the industry standard. To understand how to get fence posts perfectly straight, you must account for the exact width of these panels plus the post thickness. A common error is digging holes as you go. Instead, use a 'Dry Run' strategy. Mark every post centre along your string line with spray paint before you pick up a spade. This ensures the entire 15m or 30m run is uniform before any concrete sets.
When digging, don't create straight-sided holes. Dig 'bell-bottomed' holes that are wider at the base than the top. For a standard 100mm post, your hole should be 300mm wide at the surface and 400mm wide at the base. This shape creates a concrete 'plug' that the ground cannot easily push upwards or sideways. It provides 35% more stability than a standard cylindrical hole, keeping your posts upright during high winds. Proper hole geometry is just as important as the post material you choose, whether you prefer timber or concrete fence posts.
Setting Post Centres for 6ft Panels
Precision is vital when installing 6ft fence panels. Tape measures often sag over 1.83m, leading to 5mm errors that accumulate over a long run. Use a pre-cut 'spacer batten' instead. Cut a length of scrap timber to exactly 1830mm. When you set your second post, place this batten between the posts to lock in the distance. This method is the most reliable way how to get fence posts perfectly straight because it physically prevents the posts from creeping closer together. If you use slotted concrete posts, measure from the inside of the rebates to ensure the panel slides in without resistance.
Aligning with Gravel Boards
Gravel boards serve as a secondary horizontal check. A level gravel board ensures your posts aren't 'leaning' into the wind. If the board is slanted, the vertical post will naturally follow that angle during the backfilling process. Concrete gravel boards often weigh over 40kg. This weight can easily pull a fresh post out of plumb. Support the boards with temporary blocks or bricks until the Postcrete has fully hardened. Check the level every 2 minutes during the first 10 minutes of the pour to catch any shifting early. This prevents the weight of the board from dragging the post off your string line.
The Setting Phase: Bracing, Plumbing, and Using Postcrete
Don't trust wet concrete to hold your timber in place. It's a common site error to assume the weight of the mix provides enough stability. Wet concrete is a fluid medium. Gravity and the natural weight of the timber will cause the post to shift or lean before the chemical reaction completes. Learning how to get fence posts perfectly straight requires rigid mechanical support during this critical 10-minute window. Without bracing, even a slight breeze can ruin a full day of digging and alignment.
The two-way brace is the industry standard for securing a post. You must check for verticality on two perpendicular faces simultaneously. If the post is plumb from the front but leaning to the left, the entire run will look crooked. Using scrap timber to create a tripod effect ensures the post stays exactly where you put it. It's a simple step that separates a DIY job from a professional installation.
The Two-Way Bracing Process
Drive two 50mm x 50mm wooden stakes into the ground at a 45-degree angle from the post. These should be positioned roughly 600mm away from the hole. Use a spirit level to find the perfect vertical on the front face, then screw a timber stay from the post to the first stake. Repeat this for the side face. Always maintain a 25mm offset from your primary string line. This gap ensures you aren't accidentally pushing the line out of position, which would cause every subsequent post to be misaligned.
Pouring and Tamping Postcrete
Postcrete is the most efficient choice for UK fencing projects because it sets in just 5 to 10 minutes. For a rock-solid finish, fill the hole one-third full with clean water first. Pour the Postcrete powder steadily around the post until it reaches just below the ground surface. You'll see the water absorb into the mix almost immediately. Use a metal rod or a spare piece of wood to tamp the mix. This action removes trapped air pockets that can weaken the foundation and lead to future leaning.
Finish by shaping the top of the concrete. Use a trowel to create a slight slope away from the timber. This prevents water from pooling at the base of the post. Standing water is the primary cause of ground-level rot in 75% of domestic fences. By shedding water away from the grain, you extend the life of your installation by several years.
Long-Term Alignment: Selecting Materials That Won’t Warp
Your efforts to learn how to get fence posts perfectly straight are wasted if the materials fail after six months. Cheap, wet timber often contains 25% or higher moisture content when sold. As this moisture evaporates, the wood fibres contract unevenly. This leads to twisting, bowing, and "corkscrewing" that can pull a whole line of fencing out of alignment. If the post itself changes shape, no amount of precise installation can keep your garden looking professional.
Choosing the right materials from a quality fencing supplier is the first step to a straight fence. In high-wind areas across coastal Essex, material weight and density are critical factors. A post that stays straight in February must withstand the drying heat of July without snapping its fixings or pulling away from the concrete base.
Concrete vs. Timber: Which Stays Straighter?
Concrete posts provide a permanent solution because they are immune to the warping and twisting common in low-grade timber. They don't absorb water or dry out in the sun. If you prefer the look of wood, look for "Incised" timber posts. These have small laser-cut slits that allow pressure treatment to penetrate deeper into the core. This process helps the post maintain its structural integrity over a 15-year lifespan.
- Post Thickness: Use 4x4 inch (100mm) posts for any fence over 4 feet tall.
- Stability: The 3x3 inch (75mm) posts are only suitable for low-level decorative borders.
- Weight: Heavier posts resist the lateral pressure of wind far better than thinner alternatives.
Sourcing Trade-Quality Materials in Romford and Essex
There is a massive difference between DIY-store "economy" posts and trade-grade fencing supplies. Economy posts are often fast-grown and poorly seasoned. Romford Fencing Ltd ensures all timber is properly air-dried and stored flat to prevent bowing before it reaches your site. This reduces the risk of installing a post that looks straight today but curves within a month. It's much easier to learn how to get fence posts perfectly straight when you aren't fighting a pre-existing bend in the wood.
Maintaining your alignment requires a 10-minute annual check. Inspect your galvanised fixings and ensure your gravel boards aren't cracked or shifting. A loose gravel board allows the base of the panel to move, which eventually puts pressure on the post. Keep everything tight to ensure your fence remains a straight line for years. For the best results, always start with professional-grade components.
Browse our range of straight and sturdy fence posts today and get your project started with the right foundations.
Build a Professional Fence That Lasts
Achieving a professional finish depends on precision and the right materials. Use a professional string line and calculate your centres carefully to ensure your panels fit exactly. Learning how to get fence posts perfectly straight requires bracing them properly while the Postcrete sets to prevent any movement. Selecting high-quality timber is also essential to ensure your line doesn't warp or twist after the job is done.
Romford Fencing Ltd has been a trusted Essex supplier for over 20 years. We've earned 5-star reviews from local tradespeople by providing reliable products that stand the test of time. Our stock includes everything from heavy-duty posts to traditional closeboard panels, all designed for a straightforward installation. Don't settle for inferior materials that make the job harder than it needs to be.
Order Professional-Grade Fence Posts and Panels for Fast Essex Delivery today. We offer free local delivery on qualifying orders to help you get your project moving quickly. Get your tools ready and start building with confidence.
Frequently Asked Questions
How do I keep my fence line straight on a slope or uneven ground?
Use a stepping method to keep a fence line straight on a gradient. Set each post vertically using a spirit level while allowing the panels to drop in height at each interval. For a 1 in 10 slope, a 150mm step per 1.8m panel is standard. Always measure from the highest point of the ground to ensure the gravelboard sits correctly and stays level.
Should I set all the fence posts before adding the panels?
Set your posts and panels one at a time to ensure a tight fit. If you set all posts first, a 5mm measurement error can stop a standard 1.83m panel from fitting between them. Professional installers use the panel itself as a spacer. This is the most reliable way to learn how to get fence posts perfectly straight without leaving awkward gaps.
How deep should a fence post be in the ground to stay straight?
Dig your post holes to a minimum depth of 600mm for a standard 1.8m fence. A general rule is that 33% of the total post length should be underground. For a 2.4m post, 600mm goes into the ground while 1.8m stays above. This depth provides enough leverage against 40mph wind loads to keep the line from leaning over time.
Can I use a laser level instead of a string line for fencing?
Use a high-visibility string line for the best results in outdoor daylight. Laser levels often fail to show up in bright sun beyond 5 metres, making them difficult to use for garden boundaries. A 1.5mm nylon line pulled taut between two pins provides a constant physical reference. It doesn't run out of battery and stays accurate over a 30m run.
Why did my fence post move after I poured the Postcrete?
Posts move after pouring Postcrete if they aren't braced for the full 10 minute initial set time. The chemical reaction generates heat which can cause slight shifts if the soil is loose or wet. Ensure you've cleared all 50mm of loose topsoil from the hole before you pour. Check the post with a spirit level three times during the curing process to catch movement early.
How do I make sure my fence is exactly on the boundary line?
Set your string line 50mm inside the actual boundary to avoid encroaching on neighbouring land. Check your Title Plan from the Land Registry to confirm exact dimensions before you dig. If the boundary is 20m long, measure from a fixed point like a house corner at both ends. Keeping the post faces 10mm away from the string prevents the line from bowing.
What is the best way to brace a fence post while it sets?
Brace your post using two timber props fixed at 45 degree angles. Screw these into the post 1.2m from the ground and anchor them with stakes driven 300mm into the earth. This tripod setup prevents movement in four directions. It's the most effective method for anyone wondering how to get fence posts perfectly straight in high-wind areas or soft clay soil.
Is it better to use wooden or concrete posts for a long, straight run?
Choose concrete posts for a long run because they don't warp, twist, or rot over time. A 100mm x 100mm concrete post is reinforced with 4 steel rods, making it impervious to ground moisture. While wooden posts are cheaper, 15% of timber posts can develop a slight bow within 24 months. Concrete stays true for 20 years or more without maintenance.