


A garden gate is only as reliable as the posts supporting it. If you focus on the gate before the foundation, the entire installation will fail. Most homeowners want an entrance that swings smoothly for years. However, many end up frustrated by sagging timber and misaligned latches after just one season. You need a solution that prioritises stability and professional alignment from the start.
Fitting a garden gate in a fence line requires specific technical steps to ensure a seamless finish. This guide provides a clear, pragmatic approach to integrating durable gates into your existing or new fencing. You'll learn how to select the correct post sizes for heavy timber and how to install ironmongery with precision. We cover essential requirements, such as the 2-metre height limit for UK permitted development as of May 2026, and how to create a cost-effective material list. Follow these steps to build a sturdy, professional gate that adds value and security to your property without the usual DIY headaches.
Key Takeaways
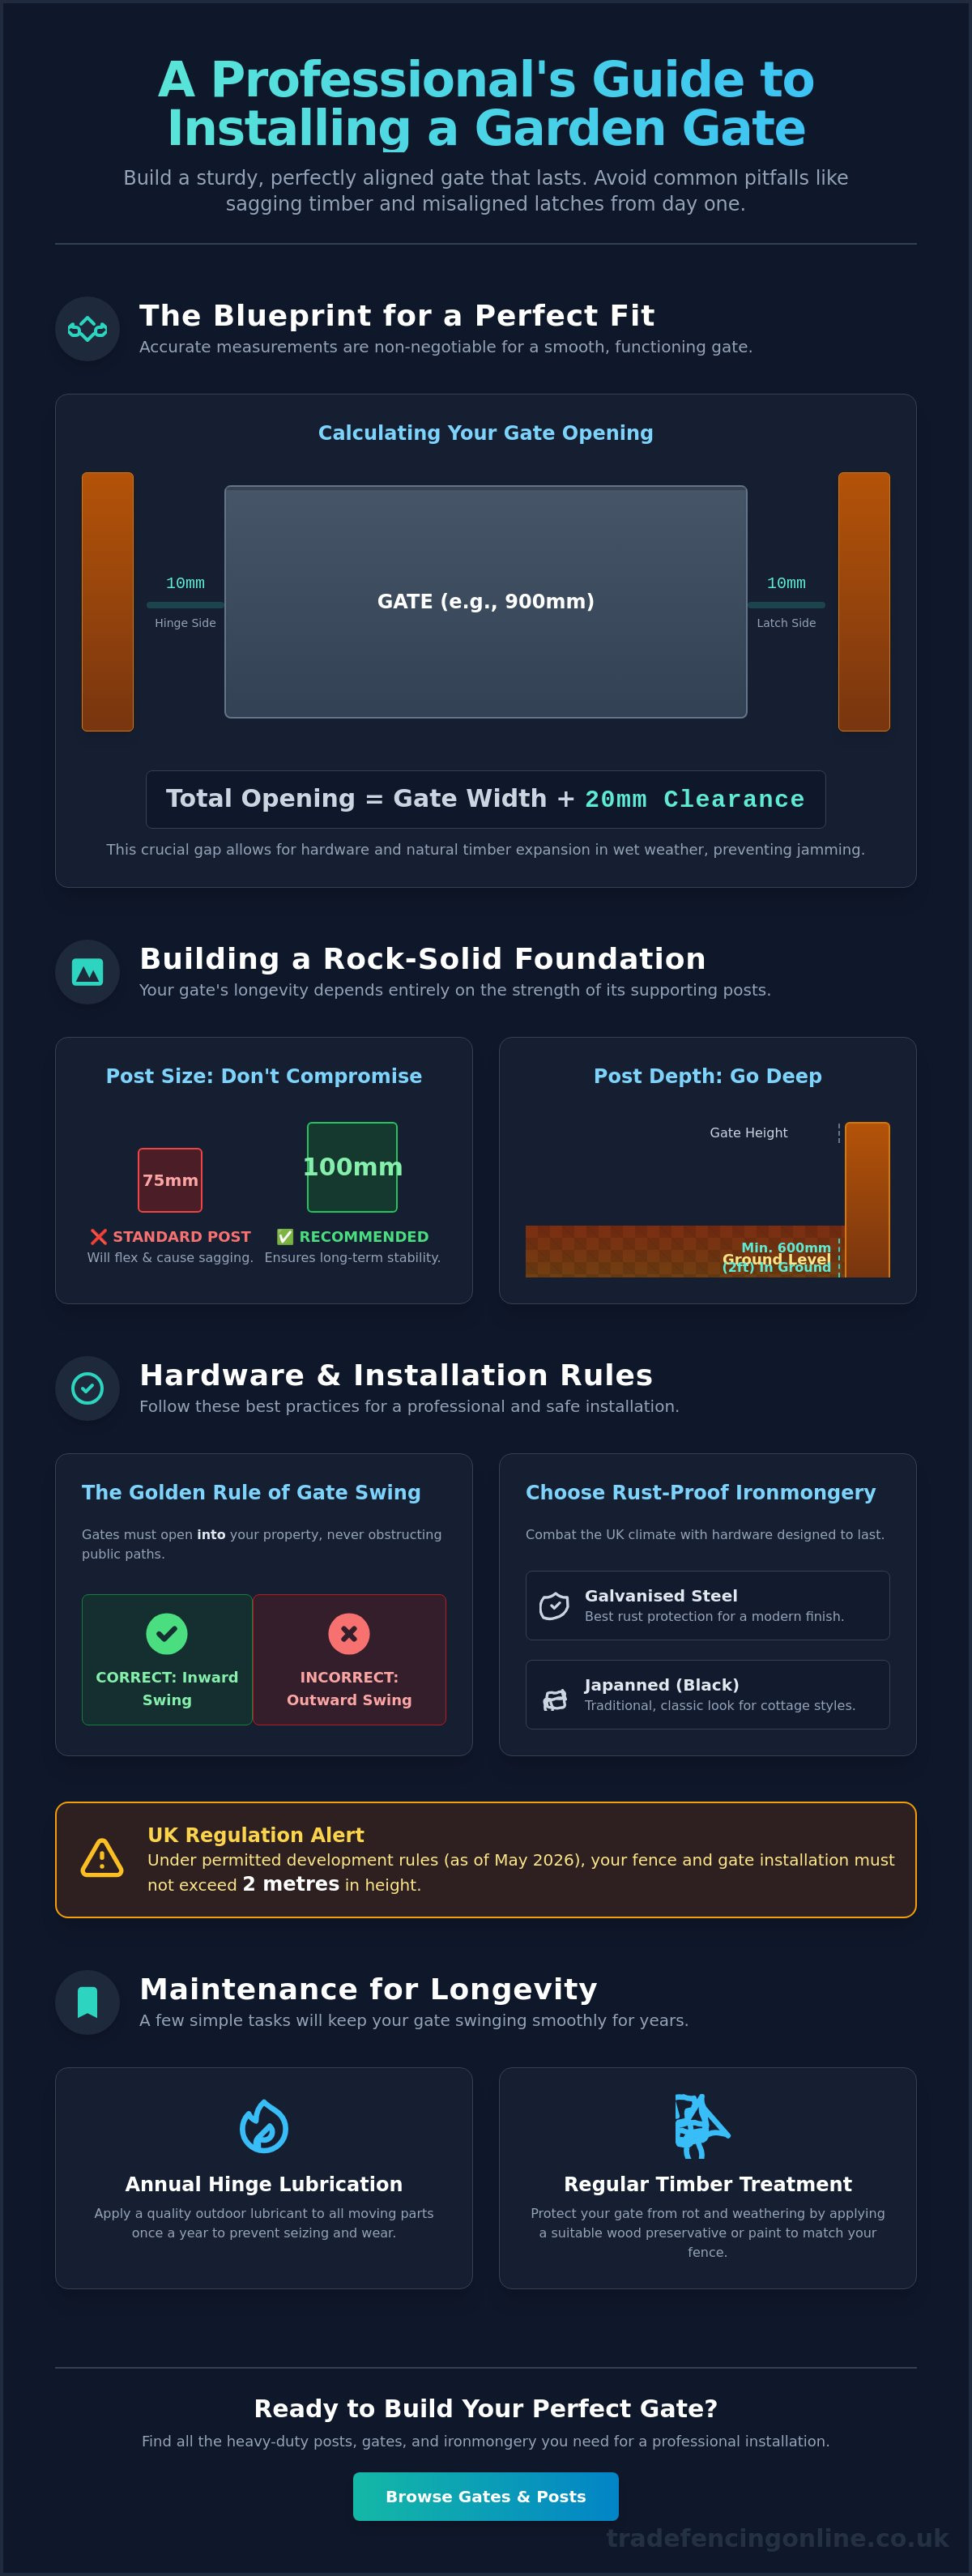
- Calculate the gate opening precisely and leave 10-20mm for clearance to ensure smooth operation throughout the seasons.
- Prioritise stability when fitting a garden gate in a fence line by selecting thicker posts and rust-resistant, galvanised ironmongery.
- Dig post holes to a minimum depth of 600mm and use string lines for perfect alignment across the entire fence line.
- Prevent timber rot and structural failure by maintaining ground clearance and attaching hinges directly to the gate's internal bracing.
- Maintain your installation with annual hinge lubrication and timber treatments that match your existing fence panels for a professional finish.
Planning Your Gate Opening Within the Fence Line
Precision is the first step. You must define the Gate Opening correctly before digging any holes. This opening is the clear distance between the inner faces of the two supporting gate posts. If you get this wrong, the gate will bind or the latch won't catch. When fitting a garden gate in a fence line, always ensure the gate is 10mm to 20mm narrower than the opening. This space allows for the hinges, the latch, and the natural expansion of the timber during wet UK winters. Timber is a reactive material. It swells in the rain and shrinks in the sun, so that small gap prevents the gate from jamming in January.
Choose your location with care. Look for level ground where possible. A gate installed on a steep slope is significantly harder to align and maintain. Ensure the area has adequate drainage. You don't want the bottom of the gate or the base of the posts sitting in standing water, as this leads to rapid rot. If you're integrating a gate into an existing run, you'll need to remove a section of the fence and potentially brace the remaining panels to maintain tension. For a new fence line, plan the gate position first and work your panels outward from that point.
Calculating the Gap and Post Spacing
Most standard UK gates are 900mm wide. To accommodate this, your opening must be approximately 920mm. This provides a 10mm gap on the hinge side and a 10mm gap for the latch. If your current run uses a standard 1.83m (6ft) fence panel, you will likely need to cut the final panel to size to make the gate fit. Use a circular saw for a clean edge and always treat the cut ends with wood preservative. This ensures the gate fits perfectly without compromising the structural integrity of the rest of the fence. Accurate measurements at this stage save hours of adjustment later.
Choosing the Right Direction of Swing
Decide which way the gate will move before you buy your ironmongery. Standard practice dictates that gates should open into your property. They should never swing out toward a public highway or pavement. This is safer for pedestrians and is often a legal requirement if the gate borders a road. There are different types of gates designed for specific security or decorative functions, but most domestic timber gates perform best when swinging level. If the ground rises behind the gate, you must set the hinges higher to provide uphill clearance. Always position the "good side" or the face of the gate to match the front of your fence line for a consistent, professional appearance.
Selecting Heavy-Duty Materials and Ironmongery
A garden gate is the only moving part of your boundary. While fence panels remain static, a gate undergoes constant mechanical stress from swinging and slamming. This movement places significant leverage on the supporting posts. You cannot use standard 75mm fence posts for this task. They will flex and eventually cause the gate to sag. For a professional result when fitting a garden gate in a fence line, you must upgrade to 100mm x 100mm timber posts or heavy-duty concrete alternatives. These provide the necessary mass to resist the weight of the gate over time.
The UK climate is notoriously hard on metal fittings. Constant rain leads to rapid corrosion if you choose low-quality hardware. Always specify galvanised or japanned ironmongery. Galvanised steel offers the best rust protection for modern gardens, while japanned black fittings provide a traditional look for cottage-style properties. Before you begin, gather your essential tools. You will need a high-quality spirit level, a post-hole digger for consistent hole diameters, and a string line to ensure the gate sits perfectly flush with the rest of the fence.
Match your gate style to your existing panels for a cohesive finish. Closeboard gates offer the most privacy and strength. Lap gates are a cost-effective choice for lighter boundaries. Picket gates work well for front gardens where visibility is preferred. If you need reliable materials delivered to your site, you can browse our full range of heavy-duty gates and posts to find the right match for your project.
Wooden vs Concrete Gate Posts
Timber 100mm posts are popular because they allow you to screw hinges directly into the wood. However, concrete posts offer superior longevity. They do not rot in the ground and provide a rock-solid foundation for high-traffic areas. When selecting your posts, ensure they are at least 2ft (600mm) longer than the height of the gate. This extra length is essential for a deep, secure set in the ground. Some installers prefer a method that makes the job much easier by laying the posts and gate out on the ground to check all clearances before any digging begins.
Essential Ironmongery Checklist
Your choice of hinge depends on the gate's weight. T-hinges are standard for most domestic gates, but heavy closeboard versions require long strap hinges. Strap hinges cover more of the gate's horizontal "brace," which prevents the wood from pulling away from the frame. For security, install a Brenton bolt that can be padlocked. A ring latch allows for easy operation from both sides. Consider adding a gate return spring; it ensures the boundary stays secure by automatically pulling the gate shut after use.
Step-by-Step: Setting the Gate Posts
Setting the foundation is the most critical phase. If your posts move, your gate fails. Start by running a string line along the entire length of your boundary. This ensures your gate posts sit perfectly flush with your existing or new panels. When fitting a garden gate in a fence line, alignment isn't just about aesthetics; it prevents the gate from catching on the posts as it swings. A straight line is the difference between a professional finish and a DIY mistake.
Dig your holes to a minimum depth of 600mm (2ft). This depth is non-negotiable for gate posts because they must resist the lateral force of a heavy, swinging door. A shallow hole will eventually result in a leaning post and a dragging gate. Aim for a hole diameter of approximately 250mm to 300mm. This provides enough space for a substantial collar of concrete around the base of the timber or concrete post. Clear out any loose soil from the bottom to prevent the post from sinking over time.
Digging and Positioning
Soil conditions vary across the UK. If you're dealing with heavy Essex clay, use a narrow spade or a dedicated post-hole digger to maintain a clean, vertical side. For stony London soil, a digging bar is essential to break through rubble or flint. Once the holes are ready, use a "spacer" piece of timber cut to your exact opening width. Place this between the posts at ground level to keep the gap consistent while you work. Ensure the post is perfectly vertical on both faces before you add any water to the mix. Use your spirit level constantly; once the concrete sets, there's no going back.
Securing with Postcrete
Efficiency matters on-site. Use high-quality fencing supplies like Postcrete for a rapid, high-strength set. Fill the hole one-third with clean water, then pour in the dry mix until it reaches the surface. Don't just leave the top flat. Use a trowel to slope the top of the concrete away from the post. This "weathering" slant directs rainwater away from the timber, preventing premature rot at the ground line. While Postcrete sets in minutes, wait at least 24 hours before hanging the weight of the gate. This allows the concrete to reach full structural strength and prevents the posts from shifting under the load.
Hanging the Gate and Fitting Hardware
Hanging the gate requires patience and precision. You must maintain a minimum of 50mm clearance from the ground. This gap prevents the bottom of the timber from absorbing moisture and rotting over time. If your garden has uneven turf or gravel, consider increasing this clearance to 75mm to avoid the gate dragging. Use temporary wooden blocks or a crowbar to hold the gate at the correct height while you work. This is a crucial step when fitting a garden gate in a fence line because it allows you to step back and check the alignment before committing to any permanent fixings.
Start by attaching your hinges to the gate itself. Look at the back of the gate for the "Z" or "X" bracing. You must drive your screws into these thicker horizontal or diagonal supports. Screwing into thin cladding will not hold the weight of the gate and will lead to structural failure. Once the hinges are secured to the gate, offer it up to the post. Fix the top hinge first with a single screw. This takes the weight and allows you to pivot the gate until it is perfectly level. Test the swing several times. If it binds or sticks, adjust the position immediately. Once you are satisfied, drive in the remaining screws for both hinges to lock the gate in place.
You can order professional-grade ironmongery and heavy-duty gates directly from our online store for fast, reliable delivery to your site.
Hinge Placement and Support
The bracing on the back of the gate is its skeleton. Always align the long arm of the strap hinge with the horizontal brace to distribute the load across the entire width of the frame. If you're working alone, a crowbar under the bottom edge is a simple way to make micro-adjustments to the height. Ensure the top of the gate is exactly level with your adjacent fence panels. This maintains a clean, professional line across your boundary and avoids an uneven, amateur look.
Fitting Latches and Bolts
Position the ring latch at a comfortable height, usually around 1 metre from the ground. This is the standard height for most UK domestic properties. Always install a gate stop on the receiving post. A gate stop is a simple strip of wood that prevents the gate from swinging through the opening, which would otherwise put immense strain on the hinges and latch mechanism. For security, use a Brenton bolt. These are compatible with heavy-duty padlocks and provide a physical deterrent against intruders. Ensure the bolt is fitted directly to the bracing for maximum resistance against force.
Maintenance and Sourcing Quality Gates in Essex
Professional installation is only the first phase. Ongoing maintenance ensures your gate continues to swing freely without dragging. Inspect your hinges and latches every twelve months. Apply a high-quality lubricant or machine oil to the moving parts to prevent metal-on-metal wear. Check the gate posts for any signs of movement or leaning, especially after heavy storms or prolonged dry spells. If you followed the foundation steps for fitting a garden gate in a fence line correctly, your posts should remain stable for years.
Sourcing your materials from a specialist supplier like Romford Fencing Ltd guarantees trade-quality durability. We provide heavy-duty timber and ironmongery designed for the UK climate. We offer fast, reliable delivery across Essex and East London. This is essential for bulky items like concrete posts and 6ft closeboard gates that are difficult to transport in domestic vehicles. We focus on providing dependable products that won't require replacement after a single season.
Protecting Your Investment
Heavy gates can occasionally suffer from "gate drop" due to natural timber settlement. You can fix this by installing a diagonal tension wire or a metal turnbuckle from the top hinge corner to the bottom latch corner. This pulls the frame back into a perfect square. Use gravel boards along your fence line to keep the bottom of the gate clear of damp soil. This simple addition prevents moisture from wicking into the end grain. If you have tanalised timber, it requires an annual clear water repellent. Untreated cedar or larch will need a UV-protective oil to maintain their natural colour and prevent silvering.
Ordering from Romford Fencing Ltd
We stock a comprehensive range of gates, fence panels, and galvanised ironmongery. You can view our full inventory online or visit our yard at 178 Crow Lane, Romford, for local collections. Our products are built to professional standards, ensuring your project lasts far longer than standard DIY store alternatives. We are your reliable partner for all fencing needs in the region. Browse our range of garden gates and ironmongery to start your project today.
Secure Your Boundary with Professional Precision
A successful installation relies on two factors: the depth of your posts and the quality of your hardware. By setting your gate posts at least 2ft deep and choosing galvanised ironmongery, you eliminate the risk of sagging and rust. Fitting a garden gate in a fence line is simple if you follow the measurements and allow for timber expansion. Accuracy during the planning phase ensures your gate remains functional through every UK season.
We are established Romford-based fencing experts ready to supply your next project. We offer trade prices to the general public, ensuring you get professional-grade materials without the professional price tag. Our team provides fast delivery across Essex and East London for all heavy gates, posts, and postmix. Order Your Trade-Quality Garden Gate and Posts for Essex Delivery today. Build a sturdy, reliable entrance that adds value and security to your property.
Frequently Asked Questions
How wide should a garden gate opening be?
A standard gate opening should be 920mm wide to accommodate a 900mm gate. This provides a 10mm gap on each side for the hinges and latch. If you are fitting a garden gate in a fence line with bespoke dimensions, always add 20mm to the gate's width for the final opening size. This clearance prevents the timber from binding against the posts during wet weather.
Do I need a planning permit to put a gate in my fence?
Planning permission is not required for gates up to 2 metres in height under UK permitted development rights as of May 2026. However, if the gate is next to a highway used by vehicles, the maximum height is 1 metre. Different rules apply to listed buildings or conservation areas. Check with your local planning authority if your property falls into these special categories.
What is the best wood for a garden gate in the UK?
Pressure-treated softwood is the most practical choice for UK gardens due to its rot resistance and cost-efficiency. It matches standard fence panels and lasts for years with minimal care. For a premium finish, choose cedar or larch. These woods contain natural oils that resist decay, though they require a higher initial investment than tanalised timber.
How much gap should I leave for a garden gate hinge?
Leave a 10mm gap on the hinge side and a 10mm gap on the latch side. This 20mm total allowance is essential for the hardware to operate without friction. It also provides a buffer for the natural expansion of the wood. Without this gap, the gate will likely jam in the winter when the timber absorbs moisture and swells.
Can I hang a heavy gate on a 3x3 fence post?
No, a 3x3 (75mm) post is insufficient for the weight and movement of a gate. You must use a 4x4 (100mm) post to provide the necessary structural support. Heavy timber gates exert significant leverage on the hinges. A thinner post will flex and eventually cause the entire fence line to lean or the gate to drag on the ground.
How do I stop my garden gate from sagging?
Ensure your gate has a "Z" or "X" brace on the back to prevent sagging. This internal framework transfers the weight of the gate back toward the hinges. If a gate already sags, you can install a metal turnbuckle or a diagonal tension wire to pull the frame back into a square shape. Always use long strap hinges that cover at least half the gate's width.
How deep should gate posts be in the ground?
Gate posts must be set at least 600mm (2ft) into the ground. This depth provides a stable anchor against the weight of the swinging gate. For taller or heavier gates, you may need to go deeper to ensure stability. Use a high-strength postmix to create a solid concrete collar around the base. This foundation is the most important part of fitting a garden gate in a fence line.
Should a garden gate open inwards or outwards?
A garden gate should always open inwards toward your property. Opening outwards across a public pavement or highway is often prohibited and can be a safety hazard for pedestrians. If your path slopes upward, you will need to set the hinges higher. This provides enough clearance for the gate to swing over the rising ground without catching on the surface.