


Planning a traditional feather edge fence? Getting the components right is the key to a strong, long-lasting structure. Yet, with industry terms like 'mortice', 'cant', and 'arris rail', it's easy to feel unsure about what to add to your basket. This confusion often leads to costly mistakes and project delays, especially when deciding on the crucial horizontal supports for your featherboards. Making the wrong choice can compromise the integrity and lifespan of your entire fence.
This no-nonsense guide cuts through the jargon. We will provide a clear definition of an arris rail, explain its unique triangular profile, and show you why it's the traditional choice for a robust closeboard fence. You will learn the critical difference between an arris rail and a cant rail, how to attach them securely using morticed posts or brackets, and how to confidently select the right size for your project. Get the essential knowledge you need to buy correctly and build with confidence.
What Exactly is an Arris Rail?
At its core, an arris rail is the horizontal support beam used in traditional closeboard fencing. It runs between fence posts, creating the essential framework to which vertical feather edge boards are fixed. Its most distinctive feature is its triangular or diamond-shaped cross-section. This shape is not just for appearance; it is a critical design element that provides superior strength and longevity. For a more detailed architectural definition of what an arris rail is, its origins lie in creating a sharp, durable edge on timber.
The Unique Triangular Profile Explained
The unique triangular profile is created by cutting a square section of timber diagonally from corner to corner. This efficient process yields two identical rails from a single piece of wood, a common size being 75mm x 75mm. The resulting angled top surface is the most important feature. It ensures rainwater runs off immediately, rather than pooling on a flat surface and causing the timber to rot over time.
Why Use an Arris Rail? Key Benefits
Using this purpose-built rail over standard rectangular timber offers clear, practical advantages for any quality fencing project:
- Superior Durability: The angled top sheds rainwater effectively, preventing moisture from soaking into the wood. This significantly reduces the risk of rot and decay, extending the life of your fence.
- Exceptional Strength: The triangular shape provides a strong, rigid framework. It offers excellent support for feather edge boards, preventing sagging and ensuring the fence remains stable for years.
- Professional Finish: It creates the classic, traditional look associated with high-quality closeboard fencing, offering a superior aesthetic compared to basic panel fences.
- Robust Construction: An arris rail is purpose-built for fencing and is far more robust and long-lasting than using simple rectangular battens as horizontal supports.
Arris Rail vs. Cant Rail: What’s the Key Difference?
When constructing a traditional closeboard or feather edge fence, selecting the correct horizontal rail is a critical decision. For many DIY fencers and professionals, the choice comes down to two primary options: the arris rail and the cant rail. While both provide essential structural support, they differ significantly in shape, installation method, and the final aesthetic of the fence. Understanding these key differences is vital to ensure you purchase the right component for a durable, long-lasting boundary.
Defining the Cant Rail
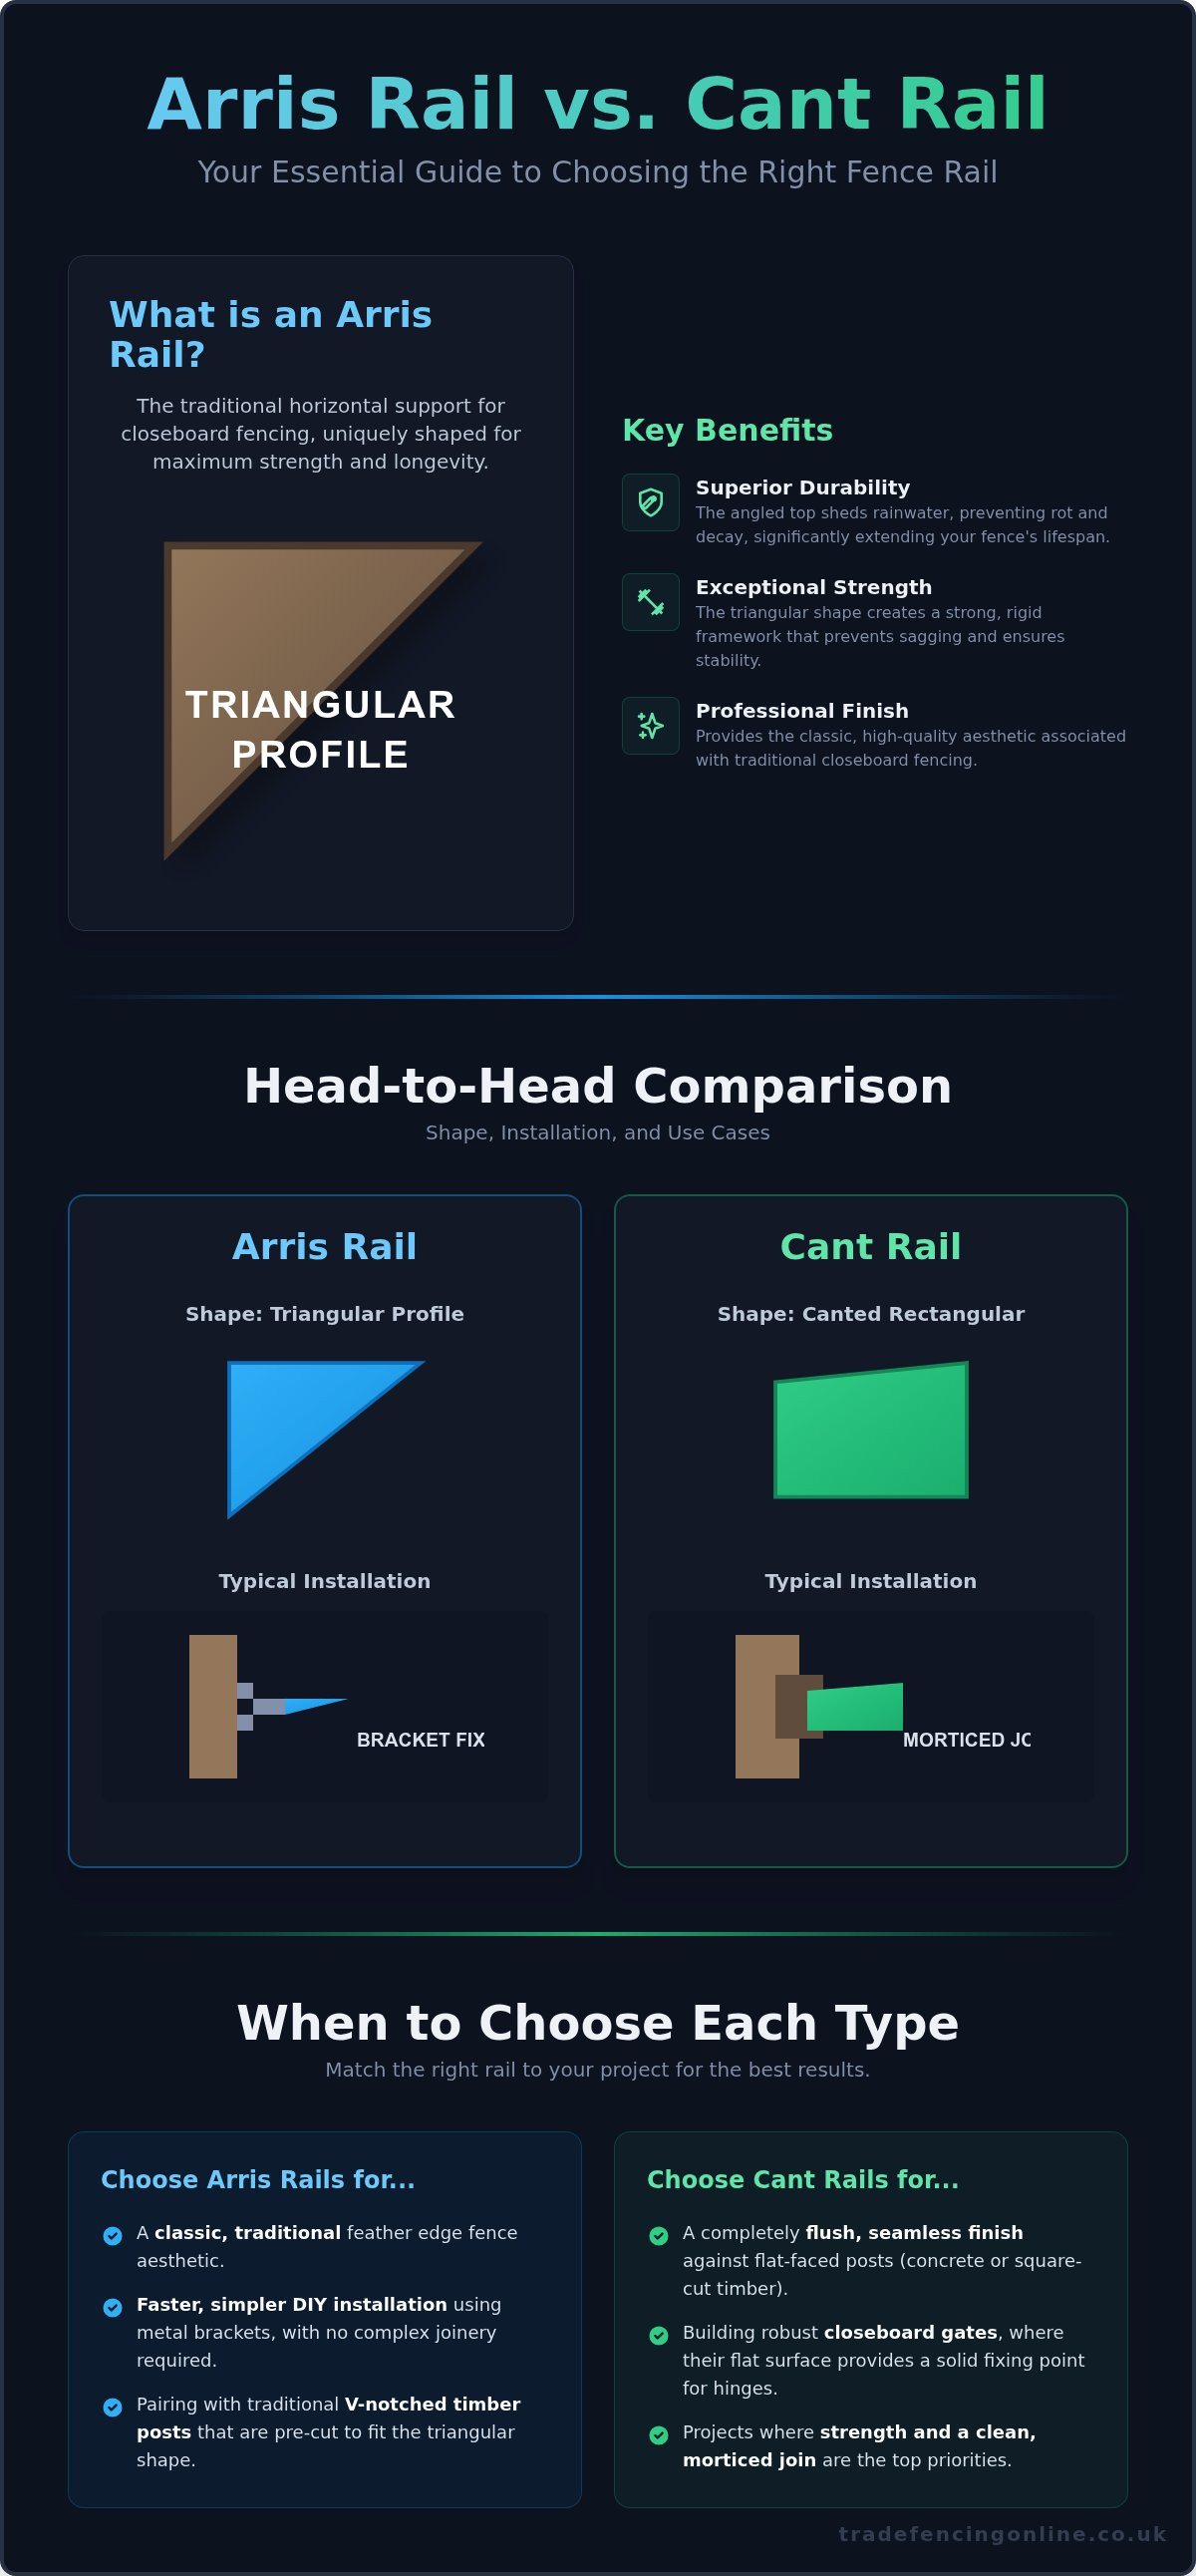
A cant rail is a rectangular timber rail featuring a sloped or ‘canted’ top edge. This angled profile serves a practical purpose: it effectively sheds rainwater away from the top of the feather edge boards. This design prevents moisture from pooling on the timber, significantly reducing the risk of rot and decay over time. Cant rails are typically installed by cutting a mortice (a rectangular slot) into the fence post, allowing the rail to sit flush for a neat and robust join.
Key Differences in Shape and Function
The most obvious difference between the two is their profile. An arris rail is triangular, traditionally cut diagonally from a square piece of timber. A cant rail, by contrast, is a solid rectangular rail with a simple chamfered top. This distinction directly influences their fitting. While both can be morticed, the arris rail is now most commonly fixed using specialised metal brackets that cup the rail. This modern approach is often faster and requires less joinery skill. For a detailed guide on the different techniques, including a step-by-step walkthrough on how to install arris rails, this resource provides excellent practical advice. Cant rails are almost exclusively designed to be morticed into posts.
| Feature | Arris Rail | Cant Rail |
|---|---|---|
| Shape | Triangular profile | Rectangular with a sloped top edge |
| Primary Use | Horizontal support for feather edge fencing | Horizontal support for feather edge fencing and gates |
| Installation | Brackets (most common) or morticed into V-notched posts | Morticed directly into posts for a flush finish |
When to Choose Each Type
Your final decision should be based on your fencing project's specific requirements, the type of posts you are using, and your desired finish.
- Choose arris rails for a classic feather edge fence build, especially if using traditional V-notched timber posts that are cut to accommodate the triangular shape.
- Opt for arris rails with brackets when you need a faster, simpler DIY installation that does not require cutting complex mortice joints.
- Select cant rails to achieve a completely flush finish against flat-faced posts, such as concrete posts or square-cut timber posts.
- Use cant rails as the top and bottom rails on closeboard gates, where their flat surfaces provide a solid and secure fixing point for hinges and boards.
How Arris Rails Form the Backbone of a Feather Edge Fence
A feather edge fence is renowned for its strength and traditional appearance, and the arris rail is the key structural component that makes this possible. These triangular rails form the horizontal framework that runs between fence posts, providing the essential support structure onto which the vertical feather edge boards are fixed. Without a correctly installed set of rails, the fence would lack rigidity and fail over time.
Building a single bay of feather edge fencing involves a clear, methodical process. First, the fence posts are securely installed. Next, the arris rails are fixed between them using arris rail brackets. Once this strong framework is in place, the gravel board is fitted at the base, and the feather edge boards are nailed vertically to the rails, overlapping to create a solid, private screen.
Creating the Framework Between Posts
Arris rails are fixed horizontally between your timber or concrete posts. They create the crucial fixing points needed to attach each vertical feather edge board. This robust framework distributes the weight of the boards evenly and provides immense strength against wind and impact. A properly constructed frame is your best defence against the fence sagging, twisting, or warping over its lifespan.
Standard Spacing and Positioning
The number of rails required depends directly on the finished height of your fence. Correct spacing is vital for stability and ensures the feather edge boards are securely supported from top to bottom. The standard industry guidelines are straightforward:
- Fences up to 1.2m (4ft) high: Use two arris rails.
- Fences over 1.2m high: Use three arris rails for superior strength.
For even support, space the rails equally apart. The bottom rail should be positioned approximately 150mm (6 inches) from the top of your gravel board.
Use with Gravel Boards
For a durable, long-lasting fence, an arris rail should always be used in combination with a gravel board. The gravel board is a timber or concrete board that sits at the bottom of the fence, preventing the feather edge boards from making direct contact with the damp ground. This protects the timber from rot and decay. The bottom arris rail is then fixed just above it, providing a secure fixing point for the boards, clear of any ground moisture.
How to Install Arris Rails: Brackets vs. Morticing
Once you have your fence posts in place, the next crucial step is securely fitting the horizontal arris rails. The strength of your entire fence depends on these connections. There are two primary methods for this job: the modern, easy way using metal brackets, and the traditional, highly-skilled method of cutting morticed joints. Your choice will depend on your posts, tools, and experience level.
Whichever method you choose, always prioritise a secure and level installation. A poorly fitted arris rail will compromise the integrity and lifespan of your closeboard fence.
Using Arris Rail Brackets (The Quick & Easy Method)
For most DIY projects, arris rail brackets are the fastest and most straightforward solution. These are robust, galvanised steel fixings that create a strong connection with minimal effort. The process is simple: the bracket is screwed directly onto the face of the fence post, and the arris rail then slots neatly into the cup and is screwed into place. This method is ideal for beginners and is the standard way to attach timber rails to solid-faced concrete posts where cutting a joint is impossible.
Creating Morticed Joints (The Traditional Method)
Morticing is the traditional technique used by professional fencers for a superior finish. This involves carefully cutting a precise rectangular slot (a mortice) into the timber fence post. The end of the rail, which is shaped into a 'tenon', fits perfectly into this slot. This creates an incredibly strong, flush joint that looks neat and professional. Because the end of the rail is protected inside the post, it is better shielded from the weather. However, this method requires skill, precision, and the right tools, and is best left to experienced installers.
What About V-Notched Posts?
As a practical compromise between the two methods, you can purchase timber posts that come with pre-cut V-notches. These machined notches are specifically shaped to accommodate the triangular profile of an arris rail, allowing it to sit securely within the post without any complex cutting on your part. This offers a stronger and tidier finish than a surface-mounted bracket but saves the time and effort of creating a full mortice joint, making it an excellent choice for a durable and efficiently built fence.
For a complete range of quality fencing components, including galvanised arris rail brackets and fixings, browse our online store today.
Choosing the Right Arris Rails and Fixings for Your Project
Selecting the correct components is crucial for building a strong, long-lasting fence. This guide cuts straight to the point, helping you choose the right arris rails, timber treatments, and fixings to ensure your project is a success from the start. Getting the basics right saves you time and money.
Material and Pressure Treatment
Most arris rails are manufactured from quality softwood, such as pine, for its strength and workability. For maximum durability in the UK climate, it is essential to only use timber that is pressure treated (also known as 'tanalised'). This industrial process forces preservatives deep into the wood, providing long-term protection against rot, fungal decay, and insect attack. Using properly treated timber is the best way to guarantee a long service life for your fence.
Standard Lengths and Sizes
Arris rails are available in several standard lengths to suit common fence bay sizes, which helps to minimise waste. We stock rails in the following typical lengths:
- 2.4 metres (approx. 8ft)
- 3.0 metres (approx. 10ft)
- 3.6 metres (approx. 12ft)
Always measure the distance between your fence posts before ordering. While rails can easily be cut to a specific size on site with a standard saw, choosing the closest length will make installation faster and more efficient.
Essential Fixings You Will Need
To properly install your rails and complete your fence, you will need the correct hardware. Using substandard fixings will compromise the entire structure. Ensure your list includes:
- Arris Rail Brackets: These provide a strong and secure connection between the rail and the fence post.
- Galvanised Nails or Screws: Use these to fix the feather edge boards or fence panels securely to the rails.
It is vital to use exterior-grade, galvanised fixings. This prevents rust, which not only looks unsightly but also weakens the connection over time. We supply all the essential ironmongery for a professional job. Shop for quality fencing supplies for your project.
Secure Your Project with the Right Arris Rails
As we've covered, the arris rail is the essential structural backbone for a traditional feather edge fence. Understanding its unique triangular profile and knowing the difference between installing with brackets or morticing into posts gives you the control to build a fence that lasts. Making the right choice from the start ensures your project has the strength and durability it needs to withstand the elements.
When you are ready to build, get the quality materials your project deserves. As a trusted supplier for both trade and public, we provide a complete range of quality, pressure-treated fencing components. From the perfect arris rail to posts, gravel boards, and fixings, we have everything you need in one place. We offer fast, reliable local delivery across Essex and East London to keep your project on schedule.
Take the next step and browse our full range of fencing supplies online. Build a fence you can be proud of.
Frequently Asked Questions
How many arris rails do I need for a 6ft fence?
For a standard 1.8m (6ft) closeboard fence, you need three arris rails per bay. This ensures maximum strength and provides proper support for the feather edge boards. The rails should be spaced evenly: one near the top, one in the middle, and one towards the bottom, just above the gravel board. Using three rails prevents the boards from warping over time and creates a durable, long-lasting fence structure. For shorter fences, two rails may be sufficient.
Can you attach arris rails to concrete fence posts?
Yes, you can securely attach arris rails to concrete posts using specialist metal brackets. These are typically two-piece bolt-on brackets that clamp around the concrete post, providing a solid fixing point without any need to drill into the post itself. This is a standard industry practice for combining the durability of concrete posts with a traditional timber fence build. Using the correct bracket ensures a strong, professional finish for your fence.
What are arris rail repair brackets used for?
Arris rail repair brackets are a cost-effective solution for fixing a fence where the end of a timber rail has rotted or broken off at the post. Instead of replacing the entire rail, the bracket sleeves over the damaged end and provides a new, solid metal tenon to fix into the post. This simple repair extends the life of your fence without the expense and labour of a full replacement, making it a quick and efficient repair method.
Do you need a gravel board when using arris rails?
While not strictly essential, using a gravel board is highly recommended for a quality, long-lasting installation. The gravel board sits at the bottom of the fence, preventing the vertical feather edge boards from making direct contact with damp ground. This significantly reduces the risk of rot and decay, protecting your investment and extending the lifespan of the entire fence. It also provides a solid, straight base for a professional and tidy finish.
What's the best way to cut an arris rail to length?
The best way to cut an arris rail is with a sharp handsaw or a circular saw for a faster, cleaner result. Due to its triangular profile, ensure the rail is held securely in a vice or on a workbench before cutting. Measure carefully and mark a straight line across the widest flat face to guide your saw. For shaping the tenoned ends that fit into morticed posts, a handsaw gives you the most control for an accurate fit.
Can I paint or stain pressure-treated arris rails?
Yes, you can paint or stain pressure-treated arris rails, but it is crucial to let the timber dry out completely first. The treatment process leaves moisture in the wood, and applying a finish too soon will cause it to peel or fail to adhere properly. Allow the rails to weather for at least several weeks until they are dry to the touch. Always use a paint or stain specifically designed for use on pressure-treated timber for the best, most durable results.