


Choosing the right boundary for your garden can seem complex. From selecting the best style of picket fence panels to worrying about wood rot and figuring out the correct posts and fixings, getting it right is essential. These questions can make a straightforward project feel overwhelming, leaving you unsure of the total cost and what to purchase.
This complete buyer's guide provides the direct answers you need. We cut through the confusion to give you practical, no-nonsense advice on selecting quality fencing. We will cover the key differences between popular styles, explain how to identify durable, pressure-treated timber, and provide a full checklist of components for a successful installation. Our goal is simple: to give you the confidence to purchase the right products for a classic, long-lasting garden boundary that meets your budget.
Key Takeaways
- Understand the main benefit of picket fence panels: they provide a classic garden boundary with a much faster and simpler installation than building from scratch.
- Discover how different picket top styles and framing options can be used to create the precise aesthetic you want for your property.
- Learn to plan your project correctly by measuring your boundary to calculate the exact number of panels, posts, and fixings required.
- Find out the essential steps for a successful installation and the simple annual maintenance needed to keep your fence in top condition for years.
What Are Picket Fence Panels & Why Choose Them?
A picket fence is a timeless style of fencing, characterised by evenly spaced vertical boards, known as 'pales', attached to horizontal rails. This classic design has deep roots in British landscaping, and you can explore the full History of the Picket Fence to understand its long-standing appeal. The primary advantage of choosing pre-assembled panels is the significant reduction in installation time and effort compared to building a fence from individual components.
Picket fences serve several key functions. They are an excellent choice for creating decorative boundaries in front and back gardens, clearly marking property lines without creating a visual barrier. Their low height makes them ideal for protecting flowerbeds from pets or foot traffic while still allowing sunlight to reach your plants. Unlike solid closeboard panels designed for privacy or trellis panels made for climbing plants, a picket fence offers a perfect balance of definition and openness.
The Appeal of a Classic Picket Fence
The picket fence is synonymous with a traditional, welcoming 'cottage garden' aesthetic. It enhances curb appeal instantly, providing a neat and attractive border for your property. The spaced-pale design allows light and air to pass through freely, preventing the 'fortress' feel that taller, solid fences can create. This makes it an ideal solution for front gardens where you want to establish a clear boundary without blocking views or casting heavy shadows.
Panels vs. Component Build: Key Differences
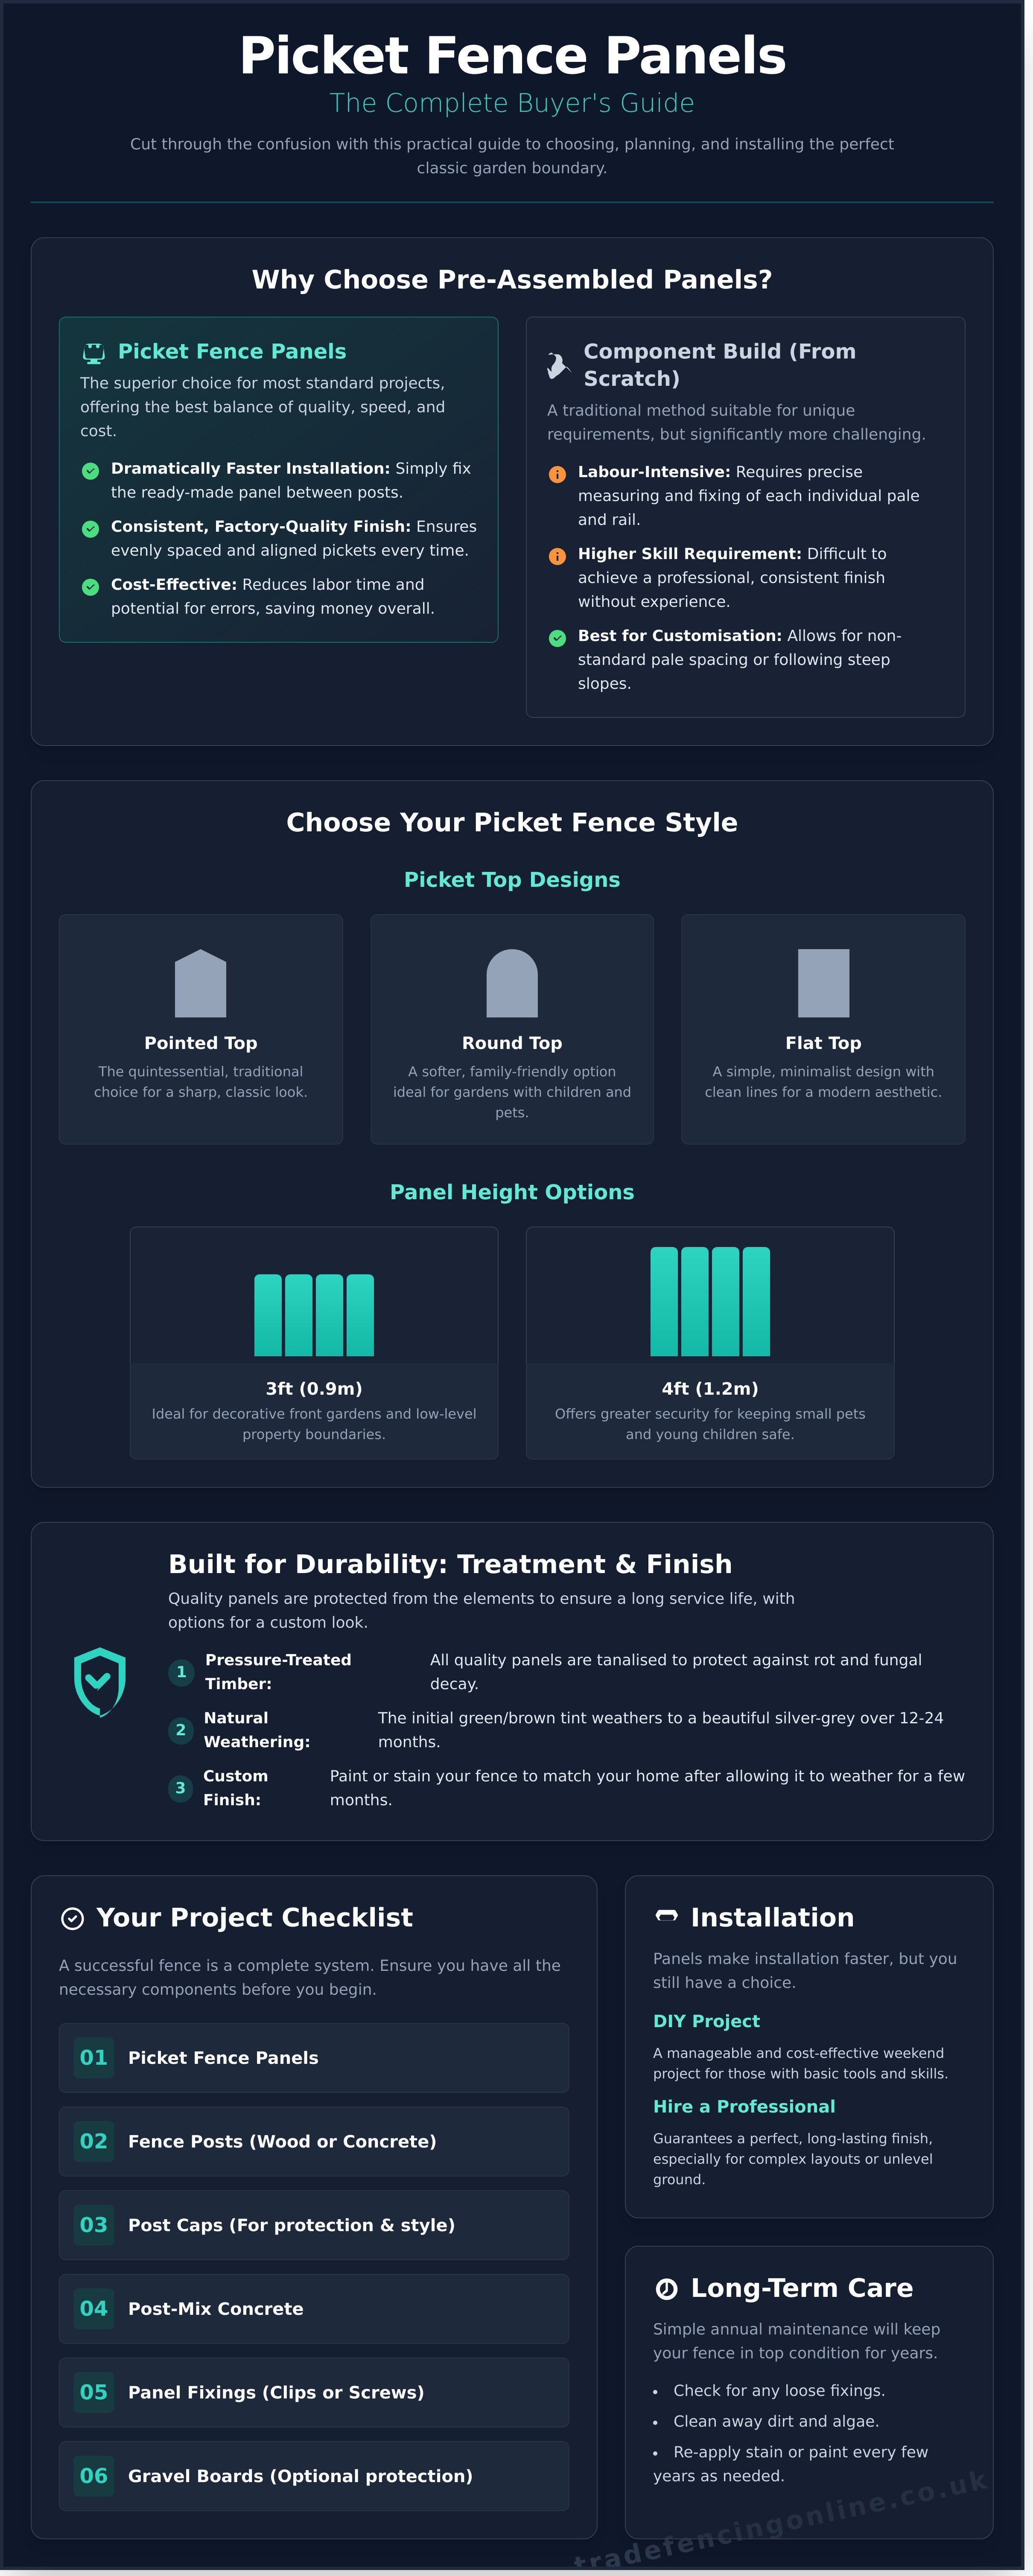
Choosing between pre-made picket fence panels and building from scratch comes down to balancing time, cost, and customisation. For the vast majority of standard projects, panels are the superior choice.
- Panels: Offer a consistent, factory-quality finish and dramatically reduce installation time. Simply fix the panel between your fence posts.
- Component Build: Building with loose pales and rails allows for greater customisation, making it easier to follow steep slopes or create non-standard pale spacing. However, this method is far more labour-intensive.
For most residential applications, panels provide the best combination of professional results, cost-effectiveness, and ease of installation.
Choosing Your Style: Picket Top Designs and Finishes
Selecting the right picket fence panels involves more than just measuring your boundary. The style of the picket top, the height of the panel, and the final finish all contribute to the overall look and function of your fence. This guide covers the key options to help you make a practical and informed choice for your project.
Picket Top Styles
The top of the picket is a defining feature that sets the tone for your boundary. Each style offers a distinct aesthetic suitable for different property types:
- Pointed Top: The quintessential, traditional choice. It provides a sharp, classic look that is always in style and offers a slight deterrent to climbers.
- Round Top: A softer, more contemporary alternative. The curved top is a popular, family-friendly option, ideal for gardens where children and pets play.
- Flat Top: For a simple and modern appearance. This minimalist design offers clean, straight lines that complement contemporary homes and garden designs.
Panel Construction and Height Options
Our picket fence panels are supplied in a standard width of 6ft (approximately 1.83m), making project planning straightforward. The primary choice you need to make is the height, which depends on the fence's purpose:
- 3ft (0.9m): An ideal height for front gardens and decorative boundaries. It clearly marks your property line without obstructing views or feeling imposing.
- 4ft (1.2m): Offers more substantial boundary definition and security. This height is effective for keeping small pets and young children safely within the garden.
Wood Treatment and Colour
All our quality timber panels are pressure-treated (tanalised) to protect against rot and fungal decay, ensuring a long service life. This treatment initially gives the wood a green or brown tint, which will naturally weather to a silver-grey over 12-24 months if left unfinished.
For a custom look, you can paint or stain your fence. We recommend allowing the panels to weather for a few months before applying any finish to ensure the preservative has fully dried. Proper finishing is as crucial for wood as correct setup is for other materials; you can find excellent general vinyl fence installation tips online that highlight the importance of getting the basics right, from posts to panels.
With the right style and finish, your new fence will provide both security and classic appeal. View our range of classic picket fence panels.
Planning Your Project: More Than Just Panels
A successful fencing installation is a complete system. While the panels create the classic look, the posts and fixings provide the essential strength and longevity for your boundary. Planning these components correctly from the start ensures a professional finish and a fence that will stand the test of time. Get the measurements right, and the rest of the project will follow smoothly.
Calculating How Many Panels and Posts You Need
Accurate measurement is the first step to a cost-effective project. Use a tape measure to find the total length of your planned fence line in metres. It is crucial to subtract the width of any gates you plan to install before you start calculating panel numbers.
- Panel Calculation: Divide the total length by the width of your chosen panel (e.g., 1.83m or 6ft). Always round this number up to ensure you have enough panels to complete the job.
- Post Calculation: You will need one post for every panel, plus one extra post to finish the run. For example, a straight line of 5 panels requires 6 posts.
We also recommend ordering one or two extra pales (the individual vertical boards). This makes any future repairs simple and guarantees a perfect match.
Choosing the Right Fence Posts
Your choice of post affects both the final look and the long-term durability of your fence. There are two primary options to consider for your picket fence panels.
- Wooden Posts: For a completely seamless and traditional appearance, treated timber posts are the ideal choice. They blend perfectly with the panels for a uniform, classic finish that enhances the natural aesthetic.
- Concrete Posts: For maximum durability and a maintenance-free solution, slotted concrete posts are unmatched. They are immune to rot and decay, providing the strongest possible foundation for your fence line.
As a rule of thumb, your fence posts should be at least 2ft (60cm) longer than the height of your panels. This extra length is essential for securing the post firmly into the ground.
Essential Fixings and Accessories
The correct ironmongery is non-negotiable for a secure and lasting installation. Using quality, purpose-built components prevents common issues like rust, rot, and instability. Ensure you have the following for your project:
- Fence Clips (U-Brackets): These are the standard, reliable method for securely attaching panels to both wooden and concrete posts.
- Exterior-Grade Screws: Always use screws specifically designed for outdoor use. Galvanised or stainless steel options will not rust and cause unsightly stains on your timber.
- Post Caps: An essential addition for wooden posts. Caps protect the vulnerable end grain on top of the post from rainwater, preventing rot and adding a smart, decorative finish.
- Postcrete: For setting posts into the ground, a rapid-setting concrete mix like Postcrete is fast, effective, and provides a solid footing.
Installation Basics: DIY or Hire a Professional?
One of the key decisions when installing a new fence is whether to tackle the job yourself or bring in a professional. Installing picket fence panels can be a rewarding DIY project for those with the right tools and a methodical approach. However, for a guaranteed professional finish, especially on difficult terrain, hiring an experienced contractor is often the most efficient choice.
The main challenges for any DIY installation are ensuring every post is perfectly vertical, level with the others, and spaced correctly. A poorly set post line will result in a weak and visually uneven fence.
Step-by-Step DIY Installation Overview
A successful DIY installation requires careful planning and execution. If you have the time and tools, follow this high-level guide for fitting your new fence.
Essential Tools:
- String line and pegs
- Tape measure
- Post-hole digger or spade
- Spirit level
- Wheelbarrow and shovel (for concrete)
- Drill and screws or a hammer and nails
- Fence clips and fixings
Installation Process:
- Mark the Fence Line: Use a string line and pegs to mark out the exact line of your fence. Measure and mark the position for each fence post, ensuring consistent spacing.
- Dig Post Holes: Excavate holes for each post. A depth of at least 2ft (600mm) is recommended for standard-height fences to ensure stability.
- Set End Posts: Place your first and last posts into their holes. Use a fast-setting concrete mix and a spirit level to ensure they are perfectly vertical before the concrete sets.
- Install Intermediate Posts: Run a tight string line between the top of your set end posts. This acts as a guide to install the remaining posts at the correct height and alignment.
- Attach Panels: Once all posts are secure, fix your picket fence panels to the posts using galvanised fence clips or screws. This is the final stage that brings your fence to life.
Tips for a Professional Finish
To avoid common pitfalls and achieve a durable, long-lasting fence, follow these expert tips. If you are installing wooden gravel boards, they must be fitted between the posts before you attach the panels. Always use a spirit level on every post and panel as you work-do not rely on your eye alone. Finally, leave a small gap of around 50mm (2 inches) between the ground and the bottom of the panel. This prevents the timber from absorbing ground moisture, which helps to prevent rot and extend the life of your fence. For a job done right, having the correct materials is essential. Get all your fencing supplies in one place.
Maintaining Your Picket Fence for a Longer Life
Our pressure-treated wooden picket fence panels are built for durability and require minimal initial maintenance. However, a simple annual care routine is a practical way to protect your investment, extend the life of your fence, and keep it looking its best. Regular upkeep prevents minor issues from becoming costly problems.
Following these straightforward steps will ensure your fence remains a strong and attractive boundary for your property for many years.
Annual Cleaning and Inspection
We recommend a thorough check of your fence each year, ideally in the spring after the worst of the winter weather has passed. This simple process involves cleaning away grime and inspecting for any potential weaknesses or damage.
- Clean the Surface: Use a stiff brush and a bucket of mild, soapy water to scrub away any algae, moss, or dirt that has built up. Avoid using high-pressure jet washers, as they can damage the surface of the timber.
- Check Fixings and Stability: Physically check that all fence posts are stable and not leaning. Ensure that all brackets, screws, and nails securing the panels to the posts are tight and free from significant rust.
- Inspect for Damage: Look closely at the base of the posts and the bottom of the panels for any signs of rot or insect damage. Pay special attention to any areas where timber is in direct contact with the ground.
Painting and Staining Your Fence
While our pressure-treated picket fence panels are protected against rot, applying a coat of paint or stain every few years offers an extra layer of weather protection and refreshes the fence's appearance. A new finish can revitalise your entire garden boundary.
- Ensure Timber is Dry: Never paint or stain damp wood. Wait for a spell of dry weather and ensure the panels are completely dry to the touch before you begin, allowing for maximum absorption.
- Use Quality Products: Choose a good quality exterior wood paint, stain, or preservative. These products are formulated to withstand UK weather conditions and protect the timber from UV damage.
- Apply Two Coats: For the best coverage and most effective protection, apply two even coats. Allow the first coat to dry completely according to the manufacturer's instructions before applying the second.
Should your annual inspection reveal significant damage that requires replacement parts, you can find a full range of quality fencing components at tradefencingonline.co.uk.
Find Your Ideal Picket Fence Panels Today
A classic picket fence offers both security and timeless style for any garden. This guide has equipped you with the essential knowledge for your project, from choosing the right picket top design to understanding the basics of installation and long-term maintenance. With a solid plan in place, you are now ready to select the right materials and build a fence that lasts.
At Romford Fencing Ltd, we are your one-stop-shop for quality fencing. As a trusted local supplier serving Essex and East London, we pride ourselves on offering superior, pressure-treated timber that stands up to the British weather. We supply a complete range of high-quality picket fence panels designed for durability and a professional finish.
Get your project underway with our fast, reliable local delivery options. Your perfect garden boundary is just a few clicks away.
Shop our full range of Picket Fence Panels online now.
Frequently Asked Questions
How far apart should fence posts be for picket fence panels?
For standard 6ft (1.83m) wide picket fence panels, fence posts should be set at 1.83m intervals from centre to centre. This precise spacing ensures the panels fit securely between the posts without any need for modification. Using U-shaped fence clips or brackets is the most effective method for attaching the panels directly to the posts. Correct post spacing is essential for a strong, stable, and professional-looking fence line that will stand the test of time.
Can you cut picket fence panels to a smaller size?
Yes, our wooden picket fence panels can be cut to fit smaller gaps. Use a hand saw or circular saw to trim the panel to the required width. After cutting, it is crucial to treat the exposed timber ends with a quality wood preservative. This step reseals the wood, protecting it from moisture ingress and preventing rot. This simple action will ensure the longevity of your fencing and maintain its structural integrity.
Are picket fences good for keeping dogs in the garden?
Picket fences are effective for containing small to medium-sized dogs that are not prone to jumping or climbing. The suitability depends on the fence height and the gap between the pales. For larger, more athletic dogs or escape artists, a taller and more solid fencing solution, such as closeboard panels, would be a more secure option. Always consider your specific dog's size, temperament, and ability before making a final decision on your fencing.
Do I need planning permission to erect a picket fence?
In the UK, you generally do not need planning permission for a fence if it meets certain height restrictions. A fence in a front garden, or one that is adjacent to a highway used by vehicles, must not exceed 1 metre in height. For back gardens, the limit is 2 metres. As most picket fences are for front gardens, they typically fall within permitted development rights. However, if your property is listed or in a conservation area, you should always check with your local council first.
What is the most common height for a front garden picket fence?
The most common height for a front garden picket fence is 3ft (approximately 0.9m). This height provides a clear and attractive boundary for your property without obstructing views or appearing imposing. It also complies with the standard 1-metre planning permission limit for fences at the front of a property. A 3ft fence offers an ideal balance between aesthetic appeal, boundary definition, and regulatory compliance for most homes in the UK.
How long does a pressure-treated picket fence last?
A quality pressure-treated picket fence can be expected to last for 10-15 years, and often longer with proper care. The pressure treatment process forces preservatives deep into the timber, providing robust protection against rot and insect attack. The ultimate lifespan will also depend on ground conditions, installation quality, and exposure to the elements. Regular maintenance, such as cleaning and applying a protective topcoat every few years, will help maximise its service life.