


Installing a fence post that is perfectly straight and secure is the foundation of any quality fencing project. Yet, common questions often cause unnecessary delays and mistakes. Should you add water to the hole before the mix? How can you be certain the post will set perfectly vertical? And how many bags of postcrete do you actually need to buy to avoid waste or a second trip to the supplier? These are critical details that determine the strength and longevity of your fence.
This straightforward guide removes all guesswork. We provide a clear, step-by-step process for using Postcrete correctly and efficiently. You will learn the exact method for achieving a rock-solid installation, ensuring your posts are secure and perfectly level every time. Follow these instructions for a professional result that guarantees your fence will stand firm for years to come. Get the job done right, the first time.
Key Takeaways
- Calculate the exact amount of Postcrete you need per hole to avoid waste and unnecessary expense.
- Follow our simple 4-step process for using postcrete to guarantee strong, level, and secure fence posts.
- Learn how to avoid the common pitfalls that lead to wobbly posts and an unprofessional finish.
- Proper preparation is essential; this fast-setting mix hardens in minutes, so you must work efficiently.
What is Postcrete and Why is it the Best Choice for Fencing?
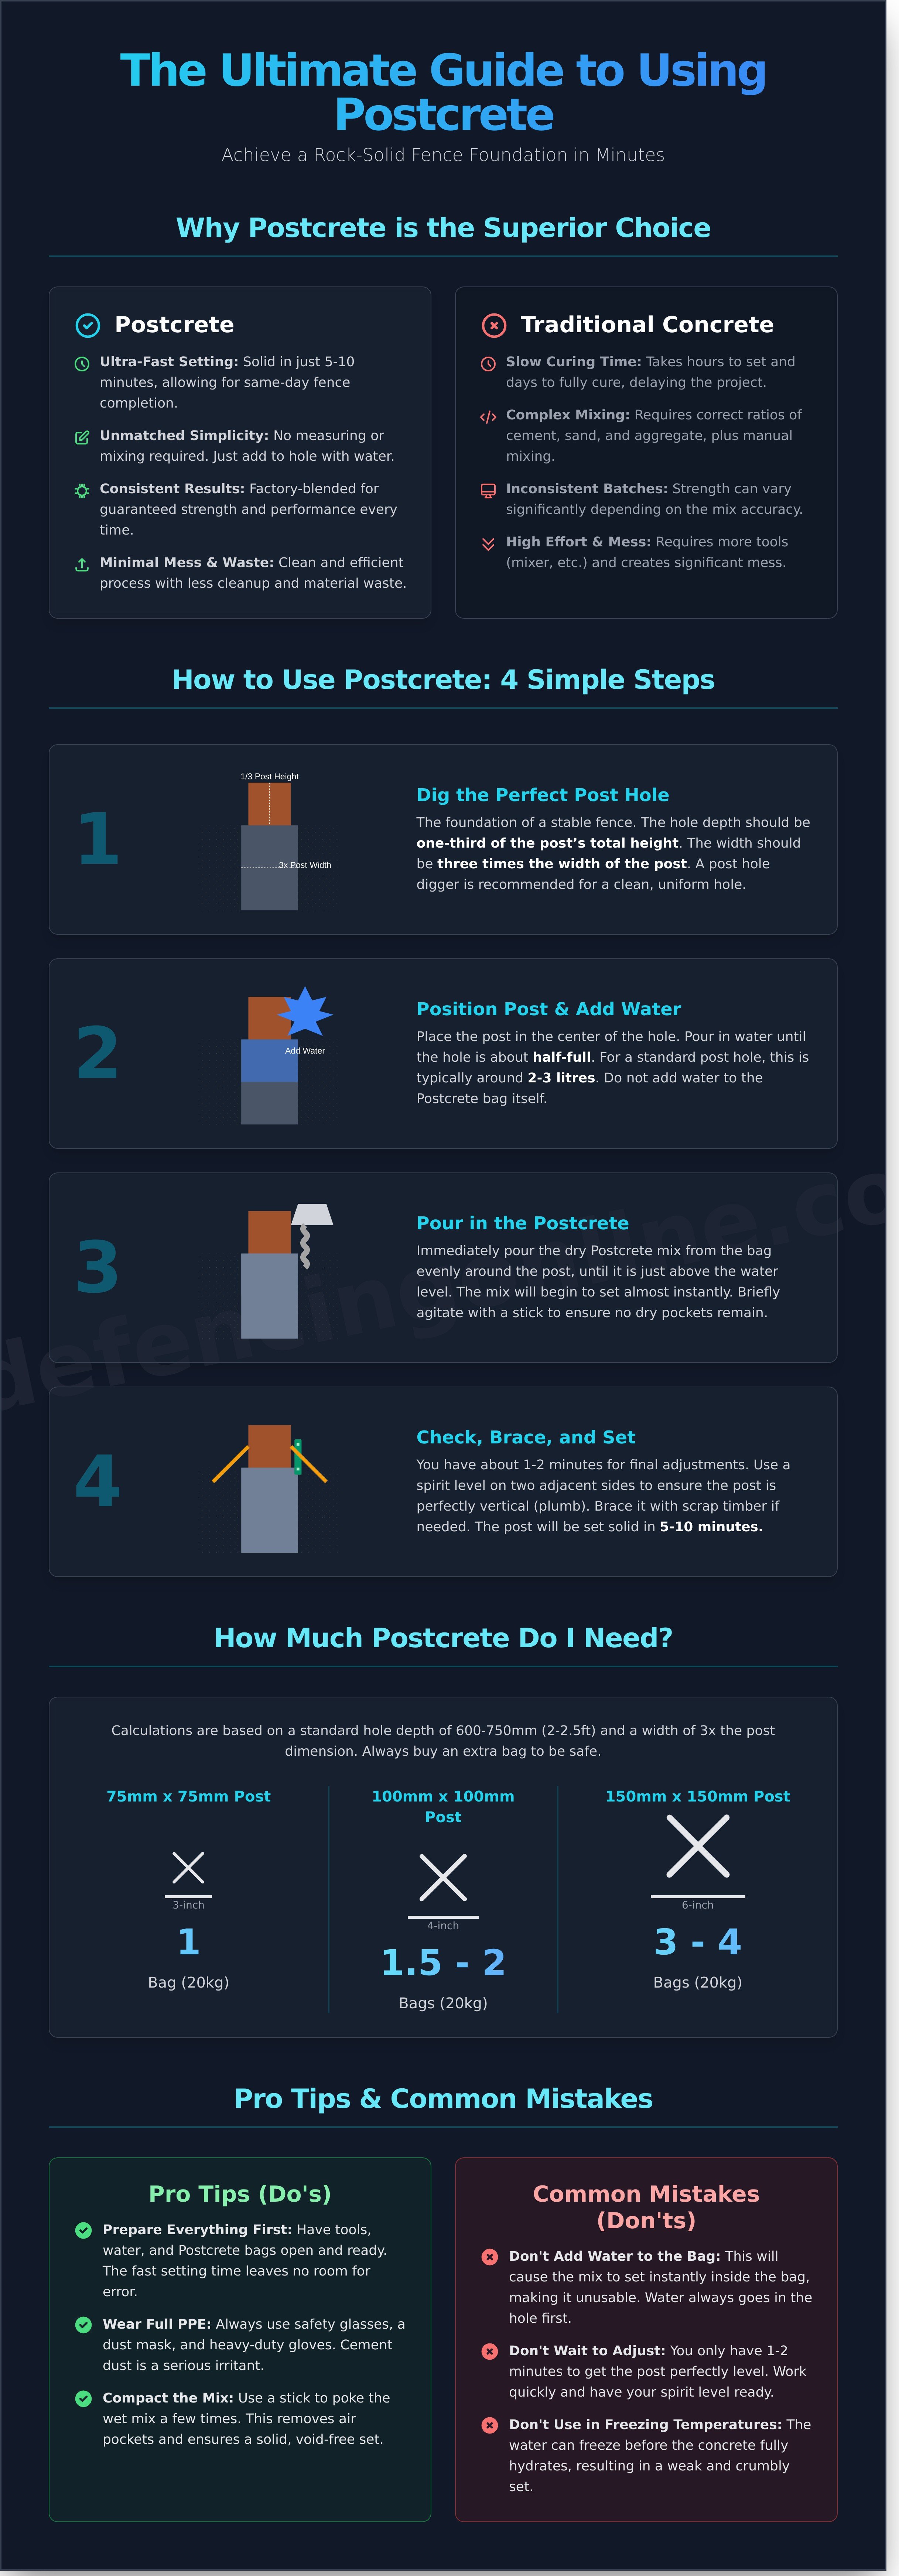
When installing a fence, gate, or even a rotary washing line, the stability of your posts is critical. Postcrete, also known as post mix, is a ready-to-use concrete blend designed specifically for this task. It consists of a factory-mixed formula of cement, sand, and special additives that accelerate the setting process. Unlike traditional concrete, which requires careful measuring and mixing, this product is engineered for maximum convenience. Simply add water to the hole, and your post will be set firm in just 5-10 minutes, making it the ideal choice for both DIY enthusiasts and professional fencers.
Postcrete vs. Traditional Concrete Mix
The primary difference is speed. A post set with postcrete is solid within minutes, whereas traditional concrete can take hours to set and days to fully cure. This product eliminates the need for measuring and mixing separate materials, saving significant time and effort. While traditional concrete offers higher compressive strength for structural applications, post mix is specifically formulated to provide the perfect balance of strength needed to secure posts against wind and ground movement. When you factor in the time saved and reduced material waste, the cost-per-post is often highly competitive, especially for smaller projects.
Key Benefits for Your Fencing Project
Choosing the right materials ensures a quality, long-lasting result. Here’s why post mix is the superior option for setting posts:
- Speed: Secure your posts in under 10 minutes. This allows you to complete your entire fencing project in a fraction of the time.
- Simplicity: The process is foolproof. There is no need to calculate ratios or mix materials. Simply pour from the bag and add water.
- Consistency: Each bag contains a reliable, factory-blended mix, guaranteeing a consistent result for every post you set.
- Minimal Mess: Forget the cement mixer, shovels, and mixing boards. This product is a clean, efficient solution that minimises cleanup.
Preparation: Tools and Materials for the Job
The main advantage of Postcrete is its rapid setting time, which allows you to complete fencing jobs quickly and efficiently. However, this speed means there is no room for error. Proper preparation is not just recommended; it is essential. Having every tool and material ready before you start ensures a smooth, professional installation. This is a key point often highlighted in any comparison with concrete; the speed of the product demands you are organised from the outset. Use the following checklist to gather everything you need for a successful job.
Essential Digging and Setting Tools
To ensure your post is secure and perfectly aligned, you will need the correct tools for digging the hole and setting the post. We recommend having the following on hand:
- Post Hole Digger or Spade: A post hole digger (or post auger) creates a clean, uniform hole ideal for round posts. A good quality spade is also effective, particularly for square holes.
- Tape Measure: Essential for verifying the hole's depth and width. Correct dimensions are critical for the stability of your fence.
- Spirit Level: Use a spirit level to guarantee your post is perfectly vertical (plumb) on two adjacent sides before and during setting.
- Scrap Timber or Supports: Have offcuts of timber ready to brace the post, holding it securely in its final position while the mix hardens.
Required Materials and Safety Gear
Alongside your tools, gather all necessary materials and personal protective equipment (PPE). Safety should always be your first priority when handling cement-based products.
- Fence Posts: Your chosen timber or concrete posts, ready for installation.
- Bags of Postcrete: The required number of bags for your project. Refer to our calculation guide to avoid running out mid-job.
- Clean Water: A bucket or watering can filled with the correct amount of water per bag, ready to pour immediately.
- Safety Equipment: This is non-negotiable. Always wear safety glasses, heavy-duty gloves, and a dust mask to protect yourself from cement dust and splashes.
How to Use Postcrete in 4 Simple Steps
Using postcrete is a fast and reliable way to secure fence posts. Follow these four steps for a professional result and a solid, long-lasting fence foundation. The process is designed for efficiency, saving you time and labour compared to traditional concrete mixing. Get it right the first time with this straightforward guide.
Step 1: Dig the Perfect Post Hole
Correct preparation is the key to a stable fence. A good rule of thumb is to make the hole depth one-third of the post’s total height. For example, a 2.4m (8ft) post requires a 0.8m deep hole. The hole’s width should be three times the width of the post. For a standard 100mm x 100mm post, dig a 300mm wide hole. In heavy clay soil, which is common across the UK, add a 50-100mm layer of gravel at the bottom to improve drainage and prevent post rot.
Step 2: Position and Brace the Post
Place your fence post in the exact centre of the hole. Use a spirit level on two adjacent sides to ensure it is perfectly plumb (vertical). This step is critical and should not be rushed. Once the post is level, secure it firmly with timber supports or offcuts screwed to the post and staked into the ground. The post must not be able to move during the next step.
Step 3: Add Water and Postcrete
This is where the speed of quick-set concrete becomes clear. Pour water directly into the hole until it is about halfway full-do not pre-mix the product in a bucket. Immediately and carefully pour the dry postcrete powder from the bag evenly around the base of the post. The powder will sink through the water, which starts the chemical reaction. You have a few minutes to make final adjustments, so check the level one last time before it begins to harden.
Step 4: Finishing and Curing Time
The mix will set hard in just 5-10 minutes. As it firms up, you can use a trowel to create a smooth, sloped surface on top that angles away from the timber. This helps to shed rainwater and protects the base of the post from standing moisture.
While the mix is hard, it is not fully cured. Follow these key timings for the best results:
- 5-10 Minutes: The mix will be set. Do not disturb the post.
- 1-2 Hours: The support braces can be carefully removed.
- 24-48 Hours: Wait for this period before attaching heavy items like fence panels or gates. This allows the concrete to gain its full structural strength.
How Much Postcrete Do I Need? A Simple Calculation Guide
One of the most common questions for any fencing project is, "How many bags of Postcrete do I need?". Calculating the correct amount is crucial for a secure, long-lasting fence. Using too little will compromise the post's stability, while over-ordering is an unnecessary expense. The quantity you need depends on the size of your fence post, the dimensions of the hole you dig, and your specific ground conditions.
Calculating Your Needs
For most standard fencing jobs using 75mm (3") or 100mm (4") posts, a reliable rule of thumb is one 20kg bag of postcrete per post. This is generally sufficient for a standard-sized hole that provides excellent support. However, you should plan to use more in certain situations:
- Gate Posts & Corner Posts: These posts handle far greater strain from weight, movement, and tension. They require a larger and deeper foundation, often needing two to three 20kg bags each to ensure they remain solid.
- Poor Ground Conditions: If your soil is particularly soft, sandy, or loose, you will need to dig a wider hole to create a stable footing. This naturally increases the volume that needs to be filled with concrete.
As a practical measure, we always recommend buying at least one extra bag for the entire project. It is far more efficient to have it on hand than to pause your work to collect more supplies.
Postcrete Usage Table (Bags per Post)
Use this table as a quick reference for common post sizes. All estimates are based on a standard 20kg bag and may vary depending on exact hole dimensions and soil type.
| Post Size | Recommended Hole (Width x Depth) | Approx. 20kg Bags Needed |
|---|---|---|
| 3" x 3" (75mm) Timber Post | 200mm x 600mm | 1 Bag |
| 4" x 4" (100mm) Timber Post | 250mm x 750mm | 1.5 Bags |
| Slotted Concrete Post | 300mm x 750mm | 2 Bags |
| Large Gate / Corner Post | 450mm x 750mm | 2-3 Bags |
Ready to get started? Ensure your project is a success with the right materials. You can buy quality Postcrete and fencing supplies online from Romford Fencing Ltd, your trusted one-stop-shop for all fencing needs.
Common Mistakes and Pro Tips for a Perfect Finish
Using quick-set concrete is straightforward, but a few common errors can lead to wobbly posts and a job that doesn't last. By avoiding these pitfalls and following professional advice, you can achieve a secure, durable finish every time. This ensures your investment in quality fencing is properly supported from the ground up.
Mistakes to Avoid When Using Postcrete
Avoid these common issues to guarantee a solid foundation for your fence posts:
- Mixing Outside the Hole: This is the most frequent error. Postcrete is formulated to be mixed directly in the post hole. Mixing it in a wheelbarrow or bucket causes it to start setting before you can pour it, resulting in a weaker bond and wasted material.
- Adding Too Much Water: Excess water creates a soupy mix that significantly reduces the final compressive strength of the concrete. Always follow the water-to-powder ratio on the bag for maximum durability. A weaker mix means a less stable post.
- Forgetting to Brace the Post: The mix sets fast, but not instantly. The post must be held perfectly plumb and stable with temporary braces while the concrete hardens. Any movement during this critical time will result in a crooked post that is impossible to fix later.
- Installing Panels Too Soon: While it may be hard in 10-15 minutes, the concrete needs time to fully cure and reach its maximum strength. We recommend waiting at least 24 hours before attaching heavy fence panels or gates to avoid putting stress on the fresh concrete.
Expert Tips for a Professional Job
Follow these pro tips for a finish that looks great and is built to last:
- Work on One Post at a Time: The rapid setting time means you have a limited window to work. Prepare one hole, set one post, and complete the pour before moving to the next. This prevents the mix from hardening before you are ready.
- Dampen Very Dry Soil: In hot weather or with very dry, porous soil, lightly wet the inside of the hole before adding the water and powder. This stops the dry ground from drawing essential moisture out of the mix too quickly, which can weaken the cure.
- Shape a Weathering Mound: Slightly overfill the hole so the concrete finishes just above ground level. Use a trowel to shape it into a small, sloping mound away from the post. This simple step helps drain rainwater away from the base of the timber, preventing rot.
- Always Read the Bag Instructions: Different brands can have slightly different instructions regarding water volume and setting times. Always read the specific guidance on the product you are using for the best results.
Achieving a professional-standard fence installation is entirely possible with the right technique. By following these guidelines, you ensure your posts are set securely for years to come. For all your other fencing needs, from panels to gravel boards, explore our full range at tradefencingonline.co.uk.
Secure Your Fencing Project with Confidence
You now have the essential knowledge to set your fence posts like a professional. The key to a solid, long-lasting fence lies in proper preparation and using the right materials. By accurately calculating your needs and following our simple step-by-step guide, you can avoid common mistakes and ensure a perfect finish. Using high-quality postcrete is the fastest and most reliable way to secure your posts, giving you a sturdy foundation in minutes, not hours.
Ready to get started? Trade Fencing Online is your one-stop-shop for all fencing materials. As a trusted supplier with consistent 5-star reviews, we provide everything you need for a quality finish. Take advantage of our fast, free local delivery options across Essex and East London to get your supplies delivered directly to your site. Order your Postcrete and fencing supplies for local delivery and get your project underway.
Build with confidence and create a fence that will stand the test of time.
Postcrete: Frequently Asked Questions
How long does Postcrete take to fully set and cure?
Postcrete achieves its initial set very quickly, typically within 5 to 10 minutes. This is fast enough to hold a fence post securely without support. However, for the concrete to reach its full compressive strength and cure completely, you should allow at least 72 hours. For heavy-duty applications or gates that will be under stress, waiting a full week is advisable before attaching anything to the post. This ensures maximum durability for your installation.
Can you use Postcrete in the rain or in cold weather?
For best results, avoid using Postcrete in heavy rain, as excess water can weaken the mix and compromise its final strength. If you must work in light rain, try to keep the hole as dry as possible. In cold weather, it is recommended to only use Postcrete when the ground temperature is above 3°C and rising. The setting process will be significantly slower in cold conditions, and freezing temperatures can permanently damage the concrete before it cures.
Is Postcrete waterproof once it has set?
Yes. Once Postcrete has fully cured, it forms a dense, solid mass that is waterproof and highly resistant to moisture from the ground. This is a key benefit, as it helps to protect the base of timber posts from rot and decay, significantly extending the life of your fence. The waterproof barrier it creates is essential for maintaining the structural integrity of the post footing over many years, ensuring your fence remains stable and secure through all seasons.
What happens if I add too much water to the Postcrete mix?
Adding too much water is a common mistake that severely weakens the final strength of the concrete. An overly wet mix will have a lower compressive strength once cured, making it more brittle and susceptible to cracking. It will also take much longer to set, increasing the risk of your post shifting out of position before the mix hardens. Always follow the manufacturer’s instructions precisely to ensure a strong, reliable, and long-lasting footing for your posts.
Can I use half a bag of Postcrete and save the rest?
We do not recommend using partial bags. The aggregate, sand, and cement within the bag can separate during transit, meaning a partial mix may not have the correct ratio of ingredients for optimal strength. Furthermore, once a bag is opened, the remaining powder will absorb moisture from the air, causing the cement to spoil and become unusable. For guaranteed performance and a professional result, always use a full bag for each application as directed.
Is Postcrete suitable for setting posts for a deck or pergola?
While this quick-set concrete is perfect for non-structural applications like fence posts, washing lines, and small signs, it is generally not recommended for load-bearing structures. Decks, pergolas, and other large structures require footings with a specified compressive strength. For these projects, a traditional, high-strength concrete mix that you mix yourself is the correct choice to ensure structural safety and compliance with building regulations. Always consult a professional for load-bearing applications.