


Why do so many garden fences begin to lean or rot after just a few seasons? Learning how to install fence posts correctly is the only way to protect your investment. Most failures happen because the foundation wasn't set right from day one. You need a fence that stands straight against the wind and stays secure for over a decade. It's frustrating to deal with panels that don't fit or posts that wobble because the holes were too shallow or the spacing was off.
This guide explains the trade-tested methods for a professional finish. We'll cover the essential 1/3 depth rule and help you decide between timber or concrete materials for your specific project. You'll learn the professional steps for digging, aligning, and securing your posts for a sturdy result. We provide the straightforward facts on hole dimensions and postmix application to ensure your fence line remains rock solid for years to come.
Key Takeaways
- Master the string line technique to ensure your fence run remains perfectly straight and aligned from the first post.
- Understand the professional methodology for how to install fence posts using the 1/3 depth rule for maximum structural stability.
- Discover why digging to a 600mm minimum depth and using Postcrete is essential for a secure, wobble-free foundation.
- Protect your investment by sloping concrete away from the base and using gravel boards to prevent timber rot.
Preparation and Setting Out Your Fence Line
Start by clearing all debris, surface vegetation, and large rocks from your boundary line. You must identify any underground obstructions, such as drainage pipes or electric cables, before you begin. Knowing how to install fence posts properly starts with a clean, safe site. Any hidden roots or concrete from old installations should be removed now to ensure your new holes are positioned exactly where they need to be. A clear path prevents delays once you start the heavy work.
Mark the position of your first post, usually against a house wall or a corner. Drive a stake into the ground and attach a string line to the end of the run. This line serves as your constant guide for a perfectly straight Fence. Keep the line taut and low to the ground to ensure every post is perfectly aligned. Even a small deviation at the start will result in a noticeable bend over a long run.
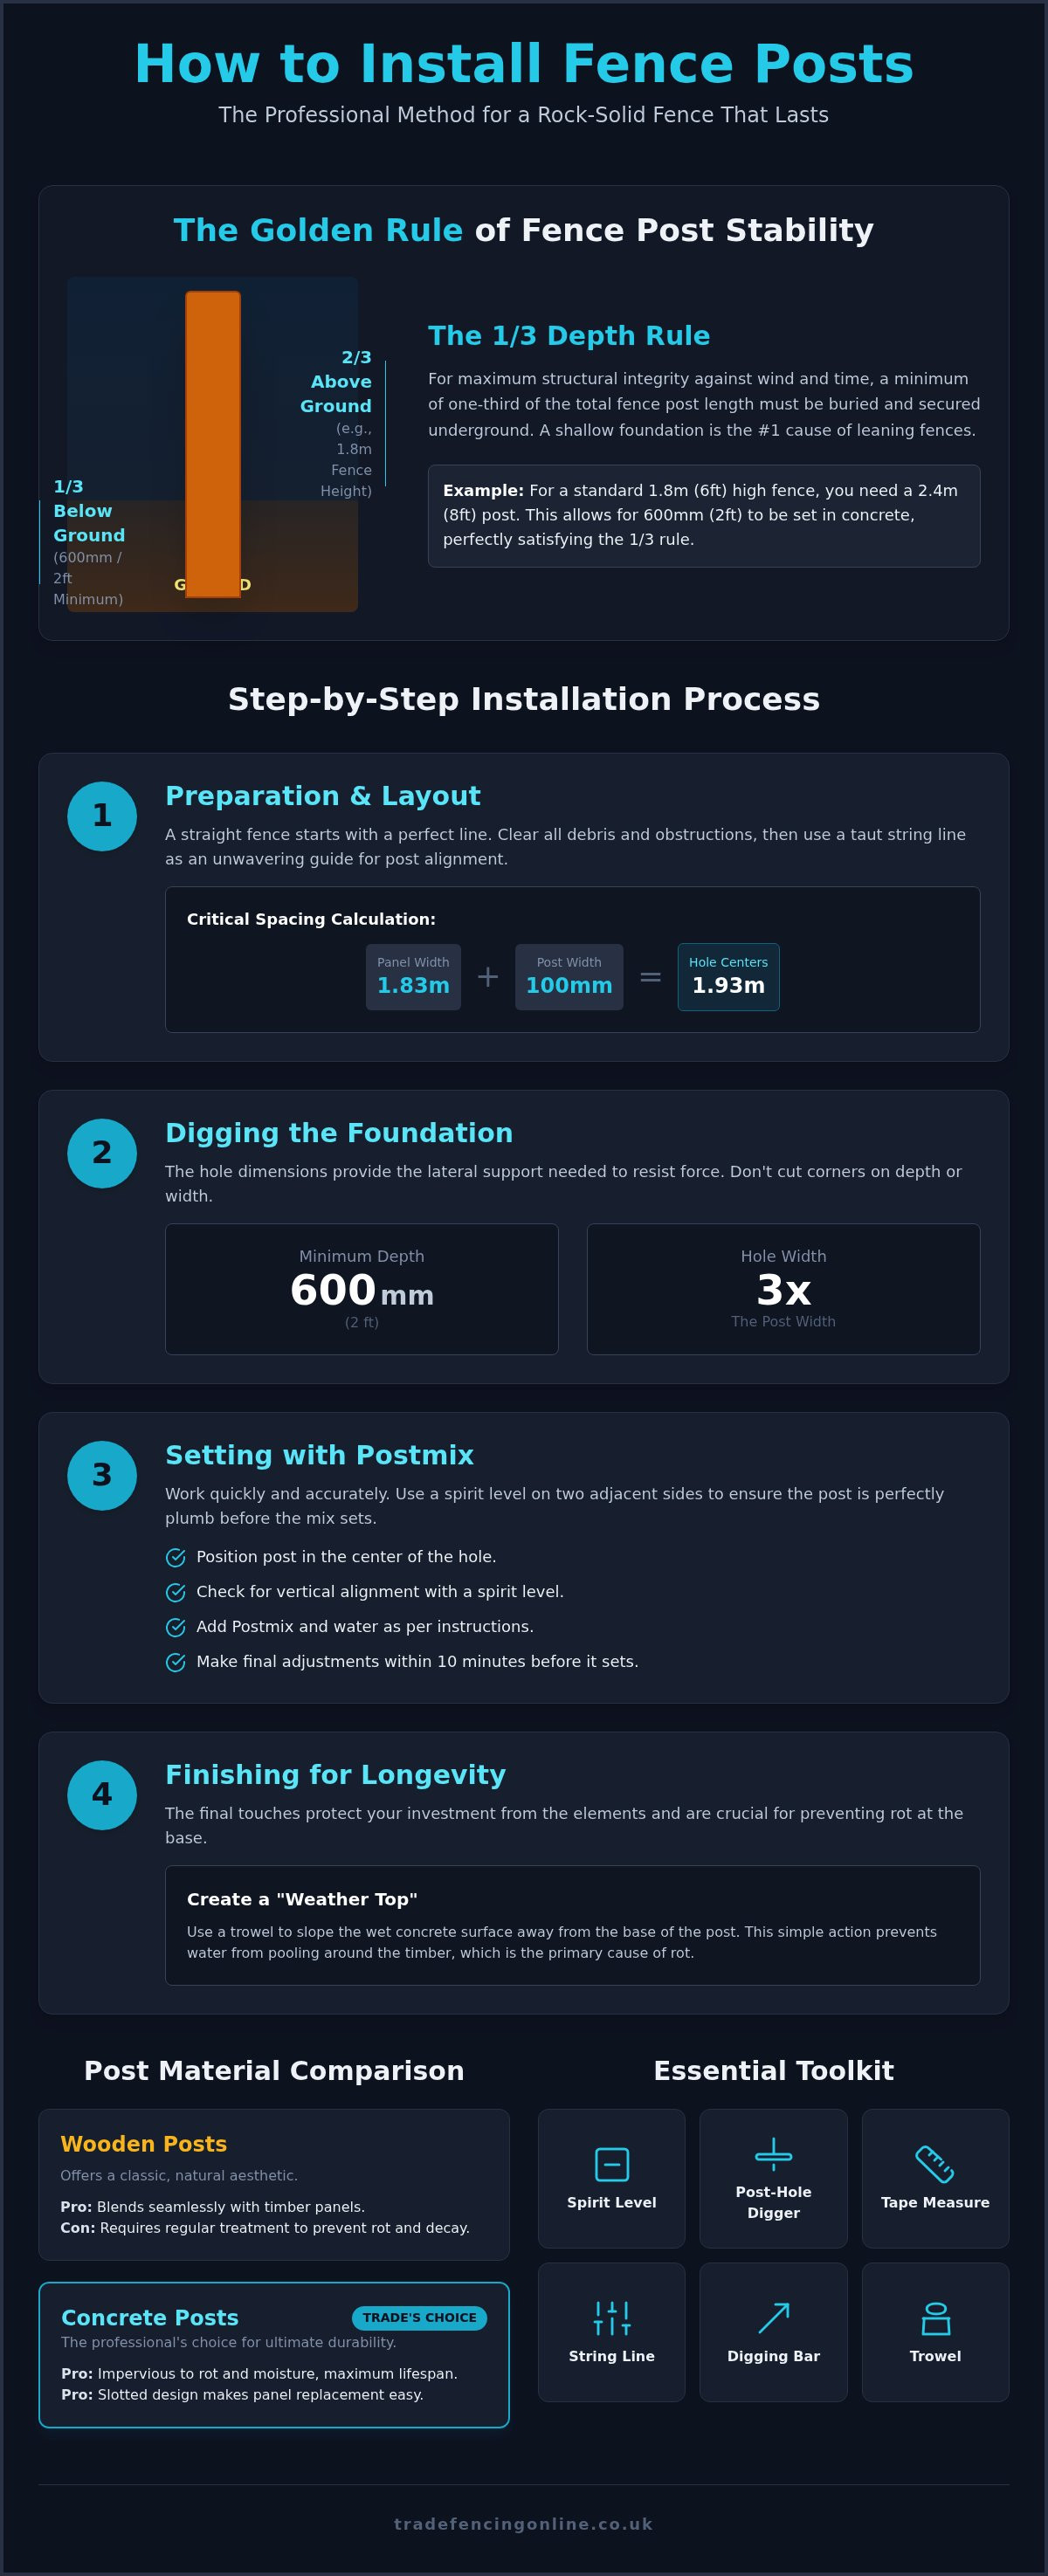
Standard UK fence panels are 1.83m (6ft) wide. Don't just measure the panels; you must account for the width of the post itself when marking your hole centers. For instance, if you're using 100mm timber posts, your centers should be marked at 1.93m. If you're using concrete slotted posts, verify the internal groove dimensions first. Getting this math wrong means your panels won't fit, forcing you to redig and reset your foundation.
Essential Tools for a Professional Post Installation
Gather your equipment before you begin to maintain momentum. You'll need high-quality tools to handle tough ground conditions and ensure precision. Having everything on hand prevents the need to leave holes open, which can lead to collapses if the weather turns. Ensure you have the following:
- A spirit level for checking vertical accuracy on two sides
- A post-hole digger (shuv-it) and a heavy-duty digging bar
- A tape measure to confirm the 1.83m standard spacing
- Sufficient postmix ready before opening any holes
GET TRADE-QUALITY FENCING SUPPLIES DELIVERED TO YOUR DOOR
SHOP NOWDigging the Holes and Setting Posts with Postcrete
Digging the foundation is the most critical stage when learning how to install fence posts. For a standard 1.8m (6ft) fence, dig your holes to a minimum depth of 600mm (2ft). This follows the essential 1/3 rule, where one-third of the post length remains underground for structural stability. A shallower hole won't provide enough leverage against high winds. Ensure the hole is three times the width of the post. This provides the lateral support needed to keep the line straight under pressure.
Position the post in the center of the hole and use a spirit level on two adjacent sides. Professional installers who know how to install fence posts efficiently often work in pairs to maintain alignment while pouring. Fill the hole with postmix and add water according to the manufacturer's instructions. Most trade-grade mixes set within 10 minutes, so work quickly to make final adjustments. You can order postmix and posts together to ensure you have the right quantities for your project.
SECURE YOUR FENCE WITH TRADE-GRADE POSTS AND POSTMIX
SHOP NOWChoosing Between Wooden and Concrete Posts
Material choice directly impacts maintenance. Wooden fence posts offer a natural look but require regular treatment to prevent rot. Alternatively, slotted concrete posts are the preferred trade choice for longevity. They are impervious to damp and allow panels to be slotted in easily for future maintenance. For a detailed lifespan comparison, refer to our Wood vs Concrete Guide before purchasing.
Finishing Touches and Protecting Your Fence
Once you've mastered the basics of how to install fence posts, the final steps determine the longevity of the entire structure. Use a trowel to slope the top of the wet concrete away from the post. This simple step prevents water from pooling at the timber base, which is the primary cause of rot. Check the alignment one final time with your spirit level before the concrete fully cures. Even slight shifts during the pouring process can throw off the entire run. Secure your panels to the posts using galvanised clips or nails to prevent rattling during high winds.
Correct post-positioning relies on more than just the holes. You must ensure the space between posts accommodates both the panel and any chosen fixings. This is where many DIY guides fail. Professionals know that the finish is just as important as the foundation. Taking ten minutes to double-check verticality and clearing excess soil from the post base ensures a professional finish that lasts. Understanding how to install fence posts correctly means looking at the project as a complete system, not just individual components.
PROTECT YOUR FENCE WITH TRADE-QUALITY GRAVEL BOARDS
SHOP NOWWhy Gravel Boards are Non-Negotiable for Trade Quality
Professional installers always include gravel boards to protect the bottom of the fence. These boards create a vital physical barrier between the timber panels and the damp soil. Without them, moisture wicks directly into the wood, leading to premature decay. Using concrete gravel boards ensures the base remains stable and rot-proof. They also provide a perfectly level surface for your closeboard fence panels. A properly installed gravel board can double the lifespan of your timber panels by keeping them dry and off the ground. This is a standard trade requirement for any long-term boundary solution.
Build a Fence That Stands the Test of Time
A secure boundary depends on precise preparation and using the right trade-grade materials. By following the 1/3 depth rule and ensuring your string line is perfectly taut, you've mastered the fundamentals of how to install fence posts for a professional result. Protecting the base with gravel boards and sloping your concrete are the final steps that prevent premature rot and keep your line straight for years. We specialize in providing high-quality concrete and timber posts trusted by Essex tradespeople for their durability and consistent finish.
Take advantage of our fast delivery across Romford and Essex to get your project moving immediately. Our supplies ensure you have the reliable foundation needed for any residential or commercial fencing job.
SHOP NOW
Frequently Asked Questions
How deep should a 6ft fence post be in the ground?
A 6ft fence post requires a minimum depth of 600mm (2ft) in the ground for maximum stability. This follows the professional 1/3 rule, where one-third of the total post length is buried to resist wind pressure. Digging to this depth is essential when learning how to install fence posts that won't lean or wobble over time.
Do I need to put gravel at the bottom of a fence post hole?
Adding 50mm to 100mm of gravel at the bottom of the hole is a trade-tested method for improving drainage. This is especially important for wooden posts to prevent water from pooling at the base and causing rot. It also provides a solid base for leveling the post before you add the postmix to secure the foundation.
Is it better to use postmix or standard concrete for fence posts?
Postmix is the preferred choice for speed and convenience compared to standard concrete. It typically sets in 10 to 15 minutes, allowing you to finish your project much faster than traditional mixes. It's pre-blended and ready to use, ensuring a reliable and professional set for every post in your run without the need for manual mixing.