


Installing a new garden gate into an existing run of fencing can feel like a high-stakes job. One wrong cut or a poorly chosen post can lead to a wobbly, insecure gate that compromises your boundary. If you are unsure about the right tools, hardware, or how to correctly install a gate in panel fencing, the project can seem daunting. The fear of ending up with a sagging gate that doesn't close properly is a common concern for many homeowners and DIY installers.
This straightforward, step-by-step guide is designed to remove the guesswork and provide you with the confidence to get the job done right. We will cover everything you need to know, from planning the location and selecting the correct posts and ironmongery to making a clean cut and hanging the gate for a perfect, smooth swing. Follow our professional instructions to avoid costly mistakes and achieve a secure, functional gate that looks like it was always meant to be there.
Key Takeaways
- Achieve a professional finish with proper planning. Learn the correct tools, materials, and measurements required before you start.
- Prevent a sagging gate by setting the posts correctly. Understand why gate posts must be stronger and deeper than standard fence posts.
- Discover the correct method for creating an opening for a gate in panel. Our guide covers installations in both new and existing fence lines.
- Master the final stage of installation. Follow simple steps for fitting hinges and latches to ensure your gate hangs perfectly and operates smoothly.
Planning Your Gate Installation: Tools, Materials & Measurements
Proper planning is 90% of the job. A successful gate installation relies on meticulous preparation long before you dig the first post hole. Ensuring you have the right materials, accurate measurements, and the correct tools will guarantee a secure, functional, and professional-looking finish for your fencing project. Get this stage right, and the physical installation becomes a straightforward process.
Choosing the Right Gate and Ironmongery
Your gate should be a seamless extension of your fence. Select a style-whether closeboard, tongue & groove, or picket-that matches your existing fence panels in both design and height. The right hardware, or ironmongery, is equally important. For a standard garden gate, tee hinges are a popular choice, while heavier gates benefit from robust band and gudgeon hinges. Always consider the gate's weight when selecting hinges to prevent sagging. To make an informed choice, you can learn about the basics of gate design and its components.
How to Measure for Your New Garden Gate
Accuracy is non-negotiable. Measure the total width of the opening where the gate will hang, from one fence run to the other. From this total, you must subtract the width of your two new gate posts (e.g., 2 x 100mm posts). Finally, allow a clearance of 10-15mm on each side for hinge and latch operation. This final figure is the exact width of the gate you need. Double-check every measurement before ordering any materials for your gate in panel setup.
Essential Tools and Materials Checklist
Having everything on hand before you start work saves time and ensures a smooth installation. Use this checklist to prepare for fitting your new gate in panel solution.
- Tools: Spade or post-hole digger, spirit level, battery-powered drill with screw bits, tape measure, and a pencil.
- Materials: Your chosen garden gate, two gate posts (timber or concrete), hinges, a latch or bolt, compatible screws, and Postcrete or a similar post-fixing concrete.
- Safety Gear: Always wear protective gloves and safety glasses when handling tools and materials.
Creating the Opening in Your Fence Line
Fitting a gate into a fence line is a straightforward process, but the approach depends on whether you are working with a new or an existing fence. For both scenarios, safety is the first priority. Before digging any post holes, you must check for underground utilities like water pipes, gas lines, or electrical cables. Contact your local utility provider or use a cable avoidance tool (CAT) to be certain the area is clear.
For a New Fence Installation
Integrating a gate during a new fence installation is the most efficient and structurally sound method. By planning ahead, you ensure a perfect fit and maximum stability. Simply leave the required gap for your chosen gate as you erect the fence panels. The gate posts should be installed at the same time as the fence posts, ensuring they are properly concreted in and aligned with the rest of the fence line. This method saves time and guarantees a professional, durable finish from the outset.
For an Existing Fence Line (Retrofitting)
Retrofitting a gate in panel form into an established fence requires careful deconstruction to avoid damaging the surrounding structure. The process involves creating a new opening by removing an existing panel. Follow these direct steps for a clean and effective removal:
- 1. Identify the Panel: Choose the fence panel you wish to replace with a gate. Ensure the location is practical for access.
- 2. Detach the Panel: Carefully unscrew or use a pry bar to remove the fixings that attach the panel to its posts. Work slowly to prevent splitting the wood on the panel or adjacent posts.
- 3. Remove the Post: One of the existing fence posts will need to be removed to make way for a sturdier gate post. This will likely require significant effort to dig out its concrete footing. Once the space is clear, you are ready for the next stage. For a clear visual of the entire process, you can watch a video on installing a gate from a trusted home improvement source.
- 4. Inspect the Area: After removing the panel and post, check the adjacent posts and panels for any signs of damage or weakness. Address any issues now before proceeding with the gate installation.
With the opening successfully created, you are now prepared to set your new gate posts and hang the gate, a crucial step in achieving a secure and functional gate in panel solution.
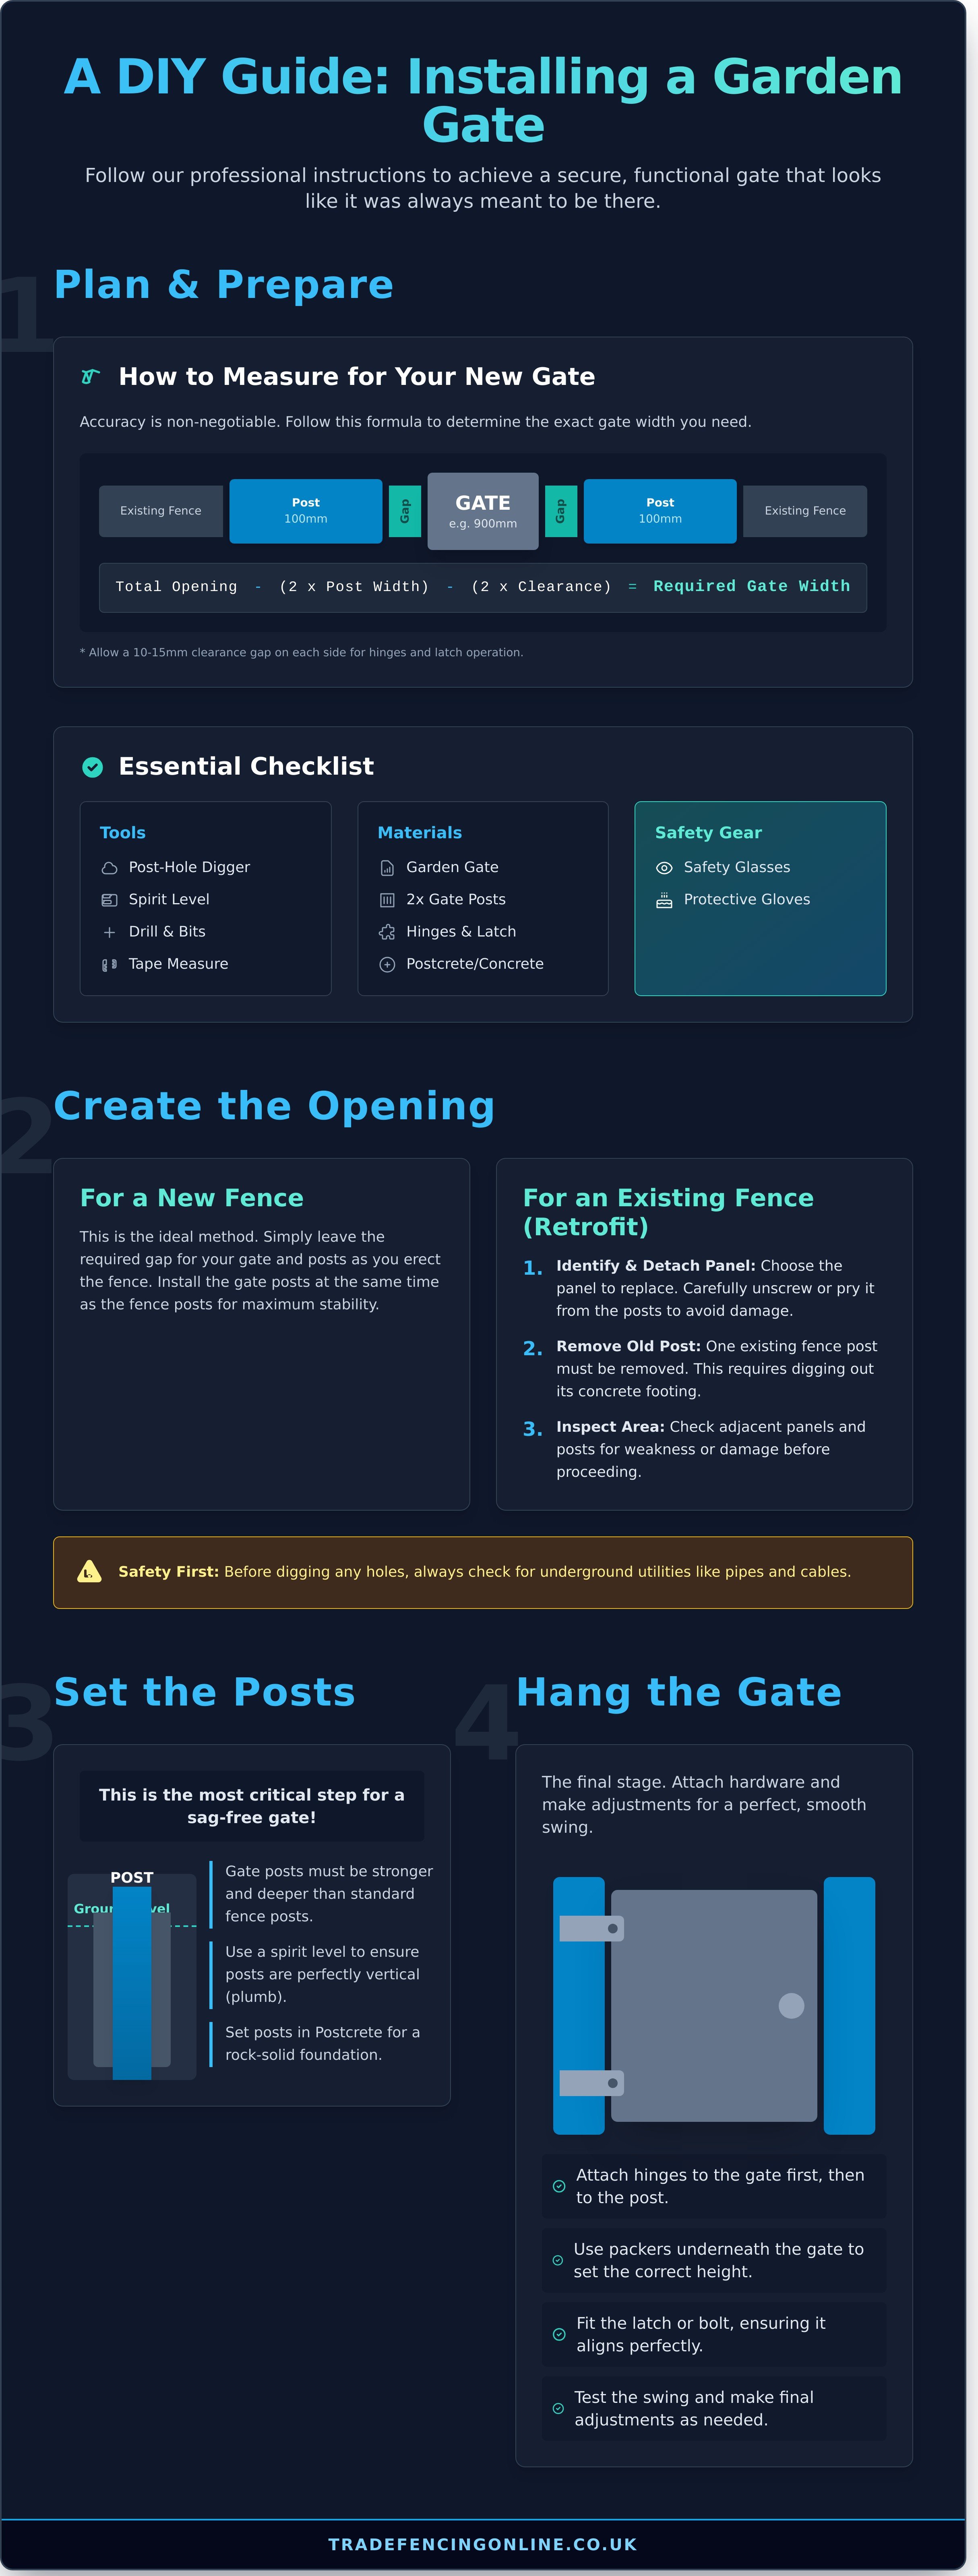
Setting the Gate Posts: The Foundation for a Sturdy Gate
Correctly setting your gate posts is the most critical step in the entire installation process. A poorly set post will inevitably lead to a sagging, misaligned gate that is difficult to open and close. This foundation ensures the long-term stability and functionality of your fence line, especially when installing a solid gate in panel solution.
Why You Need Dedicated, Stronger Gate Posts
Unlike standard fence posts that only bear a static load, gate posts handle dynamic forces. The constant swinging weight of the gate puts significant stress on its fixings. For this reason, gate posts must be stronger and more substantial. We recommend using a minimum post size of 100x100mm (4x4 inch). The hanging post carries the full weight of the gate, while the latch post must withstand the repeated impact of closing.
Digging Post Holes and Preparing for Concrete
Proper preparation of the post hole is essential for a secure fixing. Follow these key steps for a professional result:
- Depth: Dig your post holes to a minimum depth of 600mm (2ft), or one-third of the total post length. Deeper is always better for gate posts.
- Width: The hole should be approximately three times the width of the post. For a 100mm post, aim for a 300mm wide hole. This provides sufficient space for the concrete to form a strong footing.
- Drainage: Add a 50-100mm layer of gravel or broken stone to the bottom of the hole. This prevents the post from sitting in water, which helps to reduce the risk of rot over time.
- Positioning: Place your first post in the hole and carefully measure the gap for your gate, remembering to account for hinges and latch clearances.
Mixing Postcrete and Setting the Posts
Using a rapid-setting concrete mix like Postcrete provides a fast and reliable fix. Once your hole is prepared, the process is straightforward:
- Place the post into the centre of the hole. Use timber offcuts to brace it securely in position.
- Use a spirit level on two adjacent sides of the post to ensure it is perfectly vertical, or plumb. This is a vital check.
- Following the manufacturer’s instructions, add the dry Postcrete mix into the hole around the post, stopping just below ground level.
- Add the specified amount of clean water directly onto the mix. The concrete will begin to set within minutes.
- Immediately check the post with your spirit level again and make any final adjustments before the concrete hardens. Allow it to fully cure as per the product guidelines before hanging your gate.
Investing time in this stage guarantees that your new gate in panel will operate smoothly for years to come. For a full range of quality treated posts and fast-setting concrete, browse our selection at Romford Fencing Ltd.
Hanging the Gate: Fitting Hinges, Latches, and Final Adjustments
With your fence posts firmly in place, the final stage is to hang the gate and fit the necessary ironmongery. Correct installation here is essential for a smooth-swinging, secure gate that will last for years. This process is straightforward when broken down into manageable steps.
A well-hung gate not only provides easy access but also completes the professional look of your fencing project. Follow these instructions for a secure and level finish.
Positioning and Attaching the Hinges
Proper hinge placement ensures the gate's weight is distributed evenly, preventing sagging over time. Start by laying the gate panel flat on a stable surface.
- Position the Hinges: As a rule of thumb, place the top and bottom hinges approximately 15cm (6 inches) from the top and bottom edges of the gate.
- Drill Pilot Holes: Mark the screw holes and drill shallow pilot holes. This prevents the timber from splitting and makes driving the screws easier.
- Fix to the Gate: Securely attach both hinges to the gate first. Ensure the screws are long enough for a strong hold but do not poke through the other side.
Mounting the Gate to the Post
With the hinges attached to the gate, the next step is to mount it to the fence post. This requires careful alignment for a perfect swing.
Use timber off-cuts, blocks, or wedges to prop the gate up to the desired height within the frame. Aim for a consistent gap between the gate and the posts on both sides. Use a spirit level to check that the top of the gate is perfectly aligned with the adjacent fence panel. Once you are satisfied with the position, fix the other side of the hinges to the gate post. Finally, remove the blocks and gently test the gate's swing. It should move freely without catching on the post or the ground. A properly mounted gate in panel is crucial for long-term function.
Installing the Latch and Gate Stop
The final step is to fit a secure closing mechanism. The type of latch you use will depend on your security needs, but the installation process is similar for most styles.
Close the gate and mark the ideal position for your latch or ring handle on the gate. Install the main latch mechanism first, then align and fix the corresponding catch or keep onto the post. Test the closure several times to ensure it engages securely every time you close the gate. For added protection, consider fitting a gate stop to the post. This small addition prevents the gate from swinging past the closing point, which protects your hinges from damage. For a complete range of quality gate ironmongery, visit tradefencingonline.co.uk.
Your Project, Completed: Final Steps for Your Gate Installation
You now have a clear roadmap for adding a new access point to your boundary. Remember, success with installing a gate in panel fencing hinges on three key stages: precise planning and measurement, creating a rock-solid foundation with correctly set gate posts, and the careful fitting of hinges and latches for a smooth, secure closure. Getting these elements right is crucial for a gate that is both functional and durable.
The final piece of the puzzle is sourcing high-quality materials. As a trusted local supplier serving Essex and East London, Trade Fencing Online is your one-stop shop for everything you need. We keep an extensive range of fence panels, gates, and posts in stock, ensuring you can find the perfect match for your existing fence. Shop our full range of quality gates and ironmongery today and let our fast, reliable delivery service bring the materials directly to your door.
With this guide and the right supplies, you are ready to tackle your gate installation with confidence.
Frequently Asked Questions About Gates and Panels
What's the difference between a gate post and a normal fence post?
A gate post is significantly more robust than a standard fence post. It is thicker and set deeper into the ground, usually with more concrete like Postcrete. This is essential as it must bear the full weight and repeated swinging motion of the gate without moving. A standard fence post is only designed to support the static weight of a panel and withstand wind, making it unsuitable for the dynamic load of hanging a gate.
How much of a gap should I leave around a garden gate?
For a standard wooden garden gate, a total gap of 20mm to 25mm is recommended. This allows for 10mm on the hinge side and another 10-15mm on the latch side. This space accounts for the natural expansion and contraction of the wood throughout the seasons. An insufficient gap can cause the gate to stick and become difficult to open or close, particularly during damp weather. A small clearance gap at the bottom is also necessary.
Can I make a gate out of a standard fence panel?
While technically possible, we do not recommend converting a standard fence panel into a gate. Fence panels lack the necessary internal bracing to handle the stresses of regular opening and closing, which means they will quickly sag and fall apart. A purpose-built gate in panel style is constructed with a reinforced frame to ensure durability. For a lasting solution, always purchase a product specifically designed as a gate for superior strength and longevity.
How do I stop my new gate from sagging over time?
Preventing a gate from sagging starts with a solid installation. Use correctly sized, heavy-duty gate posts that are set deeply in concrete. Ensure the gate has a diagonal brace running from the bottom hinge side up to the top latch side, as this correctly transfers the weight to the post. Finally, use high-quality, adjustable hinges. These allow you to make minor corrections if any sagging occurs, keeping your gate perfectly aligned for years.
What is the best type of hinge for a heavy wooden gate?
For heavy wooden gates, adjustable hook and band hinges are the superior choice. The long "band" distributes the gate's weight across a wider section of the frame, reducing stress on the timber. The "hook" is securely fixed to the gate post. Because they are adjustable, you can easily correct any minor sagging that may develop over time by simply turning a nut. This ensures your gate remains perfectly aligned and functional.
How do I treat the wood on a new gate to protect it from rot?
Most quality gates are supplied pressure-treated (tanalised) for initial protection against rot and insect attack. For maximum lifespan, we recommend applying a quality wood preservative or exterior wood oil within the first few months of installation. You should then re-apply this treatment annually. This creates a waterproof barrier, preventing moisture from seeping into the timber. Pay special attention to the end grain at the top and bottom of the gate, as this is where water penetration is most likely.