


A standard 6ft fence panel weighs up to 40kg, yet most DIY projects fail because of a 5mm measurement error rather than a lack of muscle. You want a perimeter that stands firm against 60mph gales, not a collection of timber that rattles every time the breeze picks up. Learning exactly how to fit fence panels to concrete posts is the most reliable way to secure your property, provided you follow the professional sequence used by trade installers across the UK.
Poorly fitted panels are a liability that leads to premature wear and noise complaints. We recognize that the physical strain of lifting and the technicalities of gap tolerances often result in compromised installations. This guide provides the solution. We'll outline the professional methods for a sturdy finish, covering uneven ground management and rattle prevention. You'll finish this guide with the knowledge to order the correct materials and execute a precise installation that lasts for years.
Key Takeaways
- Identify why concrete posts are the gold standard for UK garden durability and how to safely manage two-person lifts for taller panels.
- Master the professional 'Angle and Slide' technique to learn exactly how to fit fence panels to concrete posts for a perfect, level finish.
- Solve common installation obstacles by safely trimming panels or using timber fillets to bridge gaps without compromising security.
- Eliminate fence noise and ground rot by installing essential concrete gravel boards and using specialist anti-rattle clips.
- Ensure long-term value by choosing trade-grade materials from a trusted supplier like Romford Fencing Ltd over cheap DIY alternatives.
Preparation: Essential Tools and Pre-Installation Checks
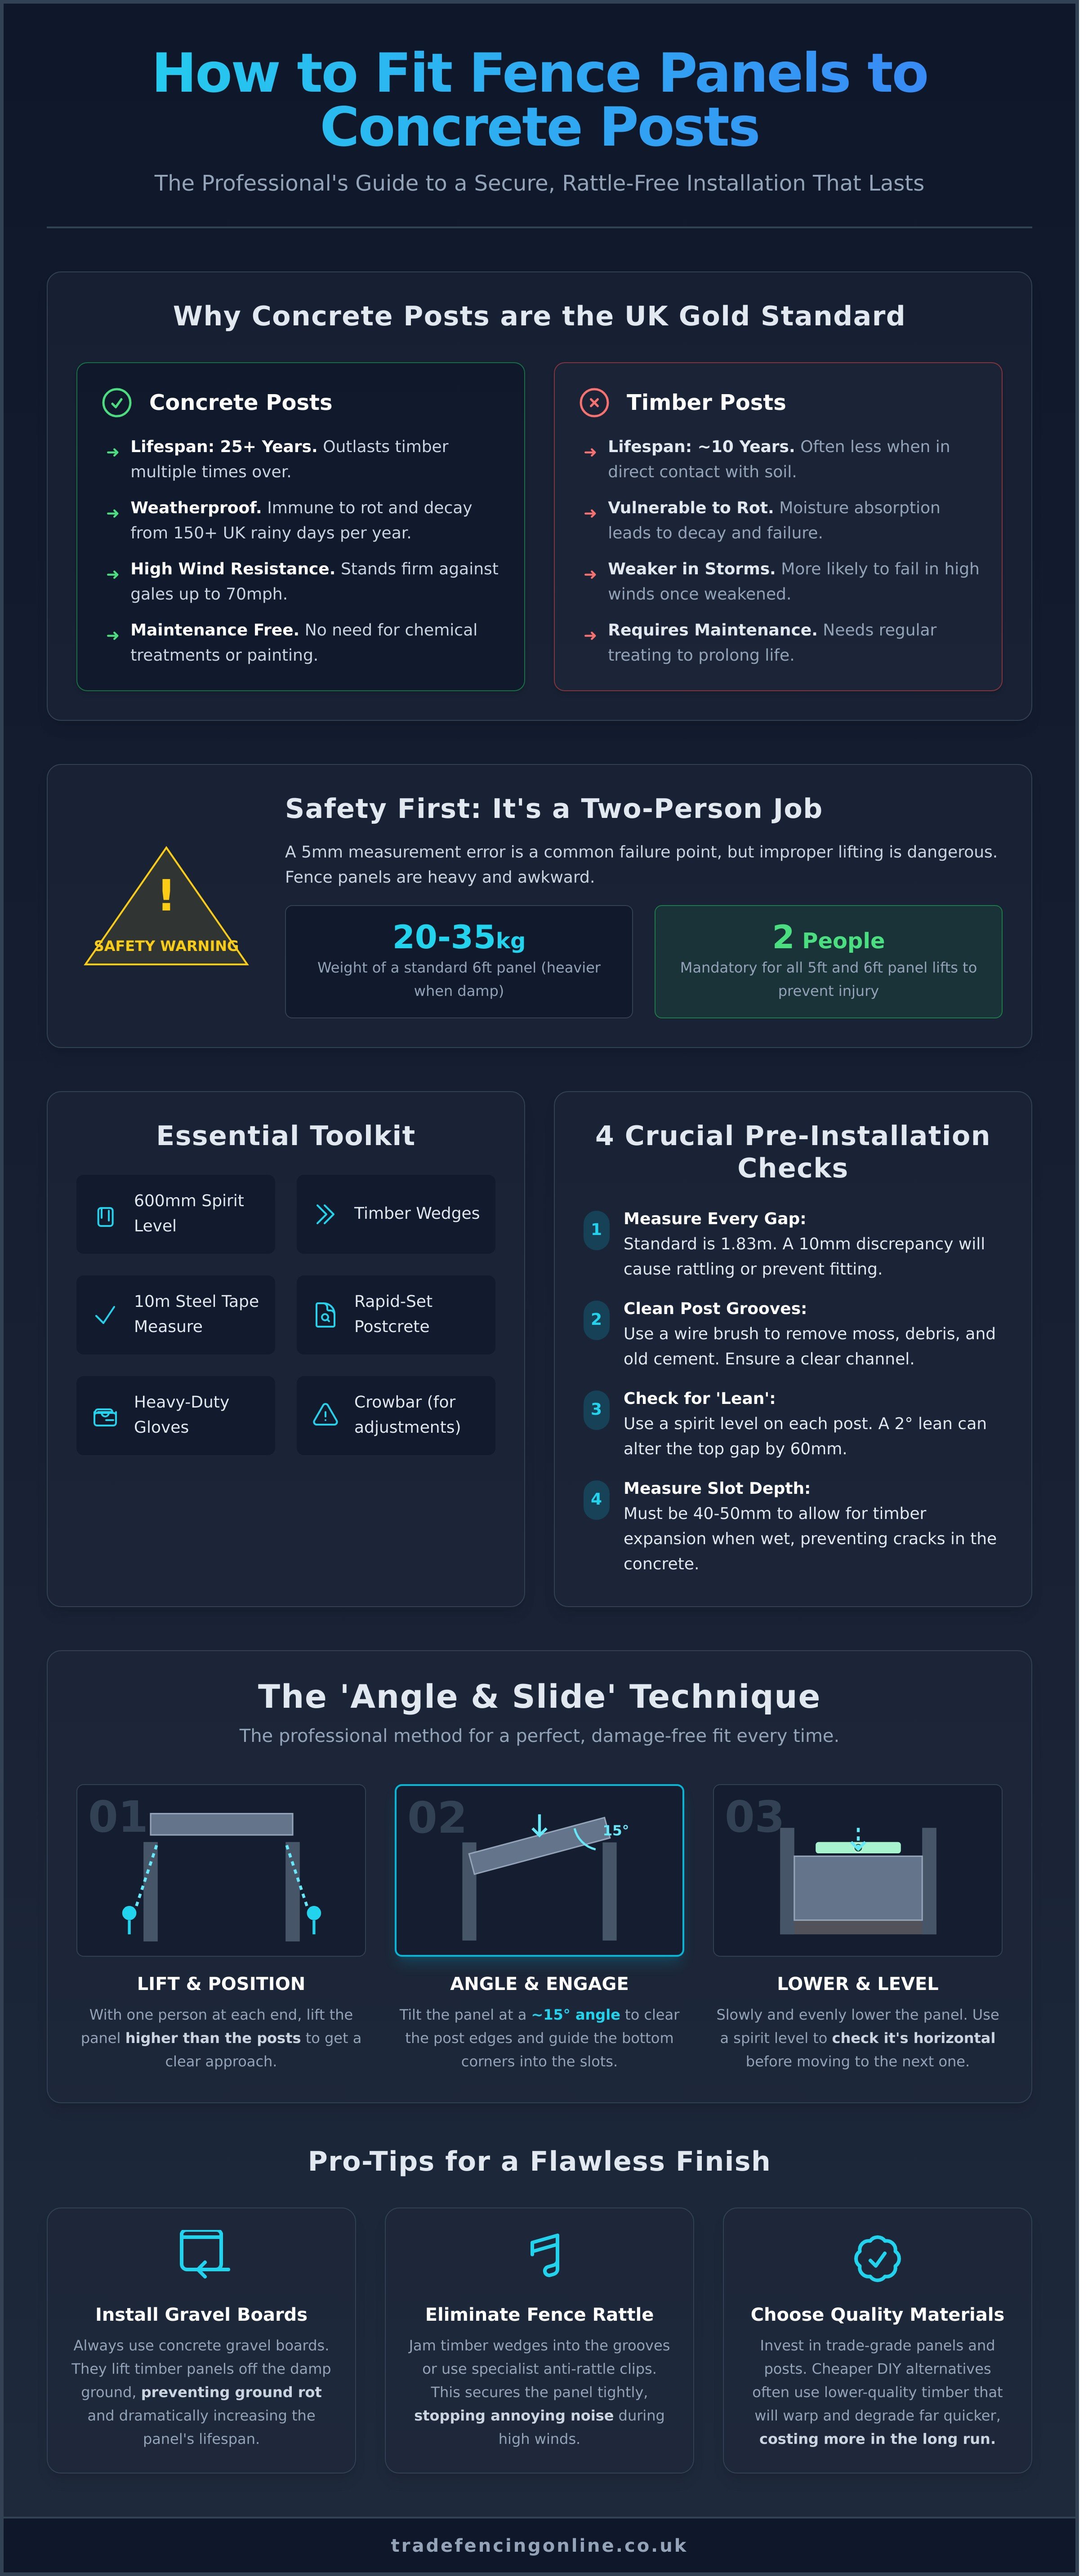
Concrete posts are the gold standard for UK garden durability in 2026. While timber posts remain popular for their initial low cost, concrete offers a lifespan exceeding 25 years. In a climate where the UK sees an average of 150 rainy days per year, timber in direct contact with soil often rots within a decade. Concrete doesn't decay, doesn't require chemical treatments, and stands firm against 70mph winter gales. Learning how to fit fence panels to concrete posts is the most effective way to ensure your property boundary remains secure without the need for constant maintenance.
Safety is a priority during the install. A standard 6ft (1.83m) lap panel weighs approximately 20kg, but a heavy-duty pressure-treated closeboard panel can exceed 35kg, especially if the timber is damp. These dimensions and weights make 5ft and 6ft panels a mandatory two-person lift. Attempting to slide these into high grooves alone frequently leads to trapped fingers or lower back strain. At Romford Fencing Ltd, we recommend a "lift and drop" strategy where one person guides the top while the other manages the base.
Your "One-Stop-Shop" checklist from Romford Fencing Ltd should include:
- High-quality fence panels (Lap, Closeboard, or Decorative)
- Concrete gravel boards (to prevent timber-to-ground contact)
- 20kg bags of rapid-set Postcrete (if installing new posts)
- Timber wedges for securing panels
- Galvanized nails for fence caps
Precision is vital before you start lifting. Quality Materials Matter for Your Fencing because even the best timber won't fit a poorly measured gap. While 6ft is the industry standard, this translates to 1.83m. If your previous installer set posts at exactly 1.82m, you'll need to trim 5mm off each side of the panel battens. Check every single gap along the run. A discrepancy of just 10mm is enough to make a panel rattle or prevent it from sliding into the channel entirely. It's better to discover a tight fit now than when you're holding a 30kg panel 6ft in the air.
The Tool Kit for a Professional Finish
You don't need a van full of power tools to master how to fit fence panels to concrete posts, but specific items are non-negotiable. A 600mm spirit level is essential for checking post-plumb, while a 10m steel tape measure ensures your gaps are consistent. Wear heavy-duty leather gloves; concrete is abrasive and will tear through thin garden gloves in minutes. Keep a crowbar handy for slight positioning adjustments and use timber wedges to jam the panel into the groove. This stops the "fence rattle" during high winds. If you're setting new posts, Postcrete is the industry choice, reaching functional strength in just 10 to 15 minutes.
Inspecting Your Concrete Posts
Don't assume old posts are ready for new timber. Use a stiff wire brush to clean the internal grooves, removing moss, old splinters, or cement splashes from the original build. Check for "lean" using your spirit level. If a post is just 2 degrees out of plumb, the gap at the top will be roughly 60mm wider or narrower than at the bottom. You must also identify the slot depth. Most UK concrete posts feature a 40mm to 50mm groove. Measure this carefully to ensure your chosen panel thickness leaves enough room for the timber to expand when wet without cracking the concrete flange.
Step-by-Step: Fitting Fence Panels into Slotted Concrete Posts
Installing panels into slotted concrete posts is the most efficient method for building a durable boundary. It removes the need for fiddly brackets or timber screws. Success depends on precision. If your posts are set at the standard 1.83m (6ft) intervals, the panels should slide in with minimal resistance. This guide explains exactly how to fit fence panels to concrete posts using professional onsite techniques. Most UK fencing projects fail because of poor alignment, so take your time with the first panel.
The Initial Lift and Alignment
Lifting a standard 1.8m lap panel or a heavy closeboard panel requires two people. Attempting this alone often leads to trapped fingers or damaged panel edges. Position one person at each post to ensure even weight distribution. The "Angle and Slide" technique is your best friend here. Lift the panel higher than the posts. Tilt the top towards you slightly. The knack of the slide involves tilting the panel at a 15-degree angle to clear the post edges before squaring it into the grooves. Once the bottom corners are seated in the channels, you can straighten the panel. This prevents the timber from snagging on the concrete's rough internal surface during the descent.
Lowering and Final Positioning
Don't just let the panel go once it's in the grooves. Work it down in 300mm increments. This prevents the timber from jamming if the posts aren't perfectly parallel. Use a spirit level to check the horizontal plane every 12 inches of descent. If one side is lower, pause and adjust. If the panel sticks, don't force it with your full body weight. Use a timber offcut and a 2lb club mallet to gently tap the top rail. This protects the decorative capping from splitting or bruising.
The "Drop" warning is critical for the safety of your materials. Never let a panel fall the last 150mm. A sudden impact can crack the concrete gravel board or shatter the bottom rail of the timber panel. Lower it until it sits flush. For the best results, ensure The Finishing Touches: Gravel Boards are level before the panel makes contact. This provides a solid, moisture-resistant base that extends the life of your timber by 25 percent. A flush fit against the gravel board prevents light gaps and stops pets from digging under the fence line.
Finally, verify the top height. The capping should align perfectly with the rest of your fence line. If you find the panel is sitting too low, you might need to shim the gravel board. For those looking for the best materials to start their project, we recommend browsing our range of quality fence panels designed specifically for UK weather conditions. Most professional installers prefer 125mm wide slats for maximum strength. Double-check that every panel is seated deep within the 30mm groove of the concrete post to prevent rattling in high winds. Knowing how to fit fence panels to concrete posts correctly ensures your garden stays secure for the next 15 to 20 years.
Solving Common Challenges: Gaps, Obstacles, and Non-Slotted Posts
Rarely does a garden perimeter match the standard 1.83m width of a factory-made panel. You'll often find yourself with a 1.2m gap at the end of a run or a stubborn tree branch blocking your path. Learning how to fit fence panels to concrete posts involves mastering these site-specific adjustments to ensure a professional, secure finish. Pro installers don't leave gaps; they adapt the materials to the landscape.
Before you start hacking at your timber, verify your local restrictions. Always check the UK planning permission rules for fences if your modifications increase the total height of the structure beyond 2 metres. Standard heights are usually fine, but bespoke adjustments near highways often have a 1-metre limit. Keeping your installation legal saves you from costly enforcement notices later.
Trimming Panels to Size
Standard lap or closeboard panels are easy to resize if you have the right tools. Use a 40-tooth circular saw for a straight, splinter-free cut. If you're working on a budget, a sharp hand saw works well but requires more physical effort. Measure the gap between your concrete posts at three points: top, middle, and bottom. Concrete posts can lean by 5mm or 10mm over time, so don't assume the gap is uniform across the entire height.
Once you've cut the panel, the structural integrity is compromised because you've removed the side framing. You must pry the vertical batten off the waste piece and re-nail it to the newly cut edge. Use 40mm galvanised nails to prevent rust streaks. Before sliding the panel into the groove, treat every cut end with a high-quality wood preservative. This prevents rot from setting in where the factory pressure treatment was breached during the cut.
Fitting to Concrete Posts Without Grooves
Older properties often have solid concrete boundary markers without pre-cast slots. You don't need to replace these posts to achieve a modern look. The most reliable workaround is the timber frame method. Drill three 6mm holes into the concrete post, being careful to avoid any internal steel reinforcement bars. Bolt a 50mm x 50mm pressure-treated timber plate to the face of the concrete using M6 coach bolts or heavy-duty masonry screws.
This timber plate acts as a mounting surface for your fence clips. You can then screw the panel directly to this timber frame. For more details on selecting the right hardware, see our A Guide to Fencing Ironmongery: Clips, Brackets & Fixings. This method is also useful for retrofitting panels to the front of posts to create a continuous timber line that hides the concrete entirely.
Obstacles like overhanging gutters or thick tree trunks prevent the standard vertical slide. In these cases, you can't drop the panel from the top of the post. You have two options to solve this:
- The Side-Entry Method: Remove one of the vertical battens from the panel, slide it into the slots at a 45-degree angle, and then re-attach the batten once the panel is seated.
- The Notch Cut: Use a jigsaw to cut a 50mm or 75mm notch into the corner of the panel to allow it to slide past the obstruction. Always seal the notched area with preservative.
If you have a gap that's too wide for the panel but too small for an additional post, use timber fillets. A 25mm or 38mm thick piece of treated timber can be screwed to the side of the panel frame. This bridges the gap and ensures the panel sits tightly within the concrete slots without rattling in the wind. Secure these fillets with 60mm wood screws to ensure they don't pull away under the weight of the panel.
The Finishing Touches: Gravel Boards and Securing Your Panels
In 2026, professional installers view the concrete gravel board as a mandatory component of any high-quality boundary. It serves as the physical barrier between your timber and the moisture in the soil. Without this 150mm or 300mm buffer, even pressure-treated timber will succumb to ground-level rot within 5 to 7 years. By installing a concrete base, you extend the life of your 1.83m panels to 20 years or more. It's a small upfront investment that prevents the recurring cost of replacing entire sections of fencing due to preventable decay.
Precision is vital when you learn how to fit fence panels to concrete posts. You must ensure the gravel board is perfectly horizontal using a spirit level. If the board is slanted, every panel that sits on top of it will also be crooked. This creates a staggered, unprofessional look that is difficult to fix once the concrete in the post holes has cured. Use a spade to clear or build up the soil until the board sits flat and firm against the ground. This provides the stable foundation required for a secure, long-lasting installation.
Installing Concrete Gravel Boards
Slide your concrete gravel board into the post grooves before you even touch the timber panels. This creates a rot-proof base that carries the weight of the fence. Concrete boards outlast timber versions by 15 years because they don't absorb ground moisture. If your garden has a slope greater than 50mm over a standard 6ft span, use the stepping technique. This involves settting each gravel board at a different height to follow the natural contour of the land while keeping the top of the fence level.
Securing Panels Against the Wind
Wind is the primary cause of fence failure in the UK. Most concrete posts feature a 50mm wide groove, while standard panels are often 40mm to 45mm thick. This 5mm gap causes the "rattle" that keeps homeowners awake during storms. To fix this, drive timber wedges into the top of the post groove to create tension. For a permanent solution, apply a 10mm bead of outdoor-grade adhesive inside the groove or use specialist anti-rattle clips. Using Traditional Closeboard panels is often better; their thick 100mm slats provide a tighter fit in the post channel than cheaper overlap alternatives.
Visual consistency matters as much as structural integrity. Once your panels are secured, fit concrete post caps to match the style of your posts. These aren't just decorative. They shed water away from the top of the post, preventing frost damage and cracks in the concrete. A pyramid or weathered cap provides a clean finish that ties the whole project together. Ensure the cap is secured with a small amount of mortar or high-strength adhesive so it doesn't shift during high winds.
Ready to upgrade your garden boundary with durable materials? Shop our range of concrete gravel boards and posts today for trade prices and fast delivery.
Why Quality Materials Matter for Your Fencing Project
Quality components determine whether your new boundary lasts 15 years or fails after the first winter gale. While big-box DIY retailers often lure homeowners with low prices, their panels frequently use thin 8mm slats that warp under UV exposure. Professional trade-grade panels utilize 10mm or 12mm pressure-treated timber. This 25% increase in thickness provides the structural rigidity needed to prevent the "rattle" often heard in cheaper installations. Since January 2024, 85% of professional contractors in Essex have reported that using trade-standard materials reduces call-backs for repairs by over 40%.
Concrete posts are the backbone of your garden's security. A standard 100mm x 100mm intermediate concrete post weighs approximately 48kg. Handling these requires physical strength and the right equipment. Once you've mastered how to fit fence panels to concrete posts, you'll realize that the weight of the material is what provides the wind resistance. Cheaper, porous concrete posts can crack during a hard frost when water enters the air pockets and expands. We supply high-density, steel-reinforced concrete that withstands the UK's freeze-thaw cycles without crumbling.
Buying locally from a specialist like Romford Fencing Ltd saves more than just money. National couriers often struggle with the logistics of 6ft heavy-duty panels and 2.4m concrete posts, leading to a 15% damage rate during transit. Our dedicated delivery fleet understands how to handle timber and concrete to ensure it arrives on-site in perfect condition. Local delivery is essential for maintaining the integrity of the tongue-and-groove joints in premium panels, which is critical when learning how to fit fence panels to concrete posts for the first time.
Before you finalize your order, run through this final material checklist to avoid project delays:
- Panel Width: Ensure your panels are a true 6ft (1.83m) rather than the 1.8m European metric standard.
- Gravelboards: Always include 150mm or 300mm concrete gravelboards to keep timber off the damp ground.
- Post Mix: Budget for two 20kg bags of Postcrete per post for a secure 600mm deep footing.
- Cleats and Clips: Check if you need galvanised steel clips to prevent panel theft or rattling.
- Height Clearance: Verify that your posts are at least 2ft longer than your desired fence height.
The Romford Fencing Advantage
We provide fast local delivery options across Romford, Essex, and London to keep your project on schedule. Our warehouse stocks thousands of items, allowing us to offer unmatched prices for both trade professionals and the public. You don't need a trade account to access the same heavy-duty materials the pros use. Find Quality Fence Panels in the Romford Area and see why we're the region's top-rated supplier.
Ready to Start Your Project?
Romford Fencing Ltd is your one-stop-shop for everything fencing. We don't just sell products; we provide the expert advice you need to get the job done right. If you're unsure about quantities or post lengths, call our team or send us an email today. We'll help you calculate exactly what's required for your specific garden layout. Shop our range of Fence Panels and Concrete Posts today and build a boundary that lasts for decades.
Start Your Professional Fence Installation Today
Success begins with the right preparation and the correct sequence. Always double-check your measurements before sliding panels into place. Using gravel boards is a non-negotiable step to prevent rot and extend the life of your timber. Mastering how to fit fence panels to concrete posts ensures your garden stays secure and looks sharp for years. Don't settle for flimsy alternatives; trade-quality materials make the physical work much easier and the results more durable.
Trade Fencing Online is the home of quality garden fencing. We're a trusted supplier backed by 5-star reviews from local builders and DIYers alike. You'll find trade-quality materials at unmatched prices that keep your project on budget without sacrificing strength. We also provide free local delivery options across Essex and East London, so you can skip the heavy lifting and get straight to work. Our team at Romford Fencing Ltd is ready to help you find exactly what you need for a professional finish.
FOR QUALITY FENCING, CALL ROMFORD FENCING LTD TODAY OR SHOP ONLINE
Your garden transformation is just a few clicks away. Get your materials ordered and enjoy a fence that's built to last through every season.
Frequently Asked Questions
Can I fit 6ft fence panels into concrete posts on my own?
It's a two-person job because a 6ft panel weighs between 25kg and 40kg. Lifting this weight 1.8m high to slide it into a concrete slot is dangerous for one person. You need a second set of hands to guide the panel and ensure it sits level on the gravel board. Attempting this alone often leads to trapped fingers or cracked concrete.
What do I do if my fence panel is too wide for the concrete post gap?
Trim the side of the panel if it's too wide for the opening. Measure the gap between your concrete posts and subtract 10mm for a smooth fit. Use a circular saw or hand saw to cut the horizontal rails. Re-attach the end batten with 35mm galvanised nails to keep the structure rigid. This ensures the panel won't warp or fall apart over time.
How do I stop my fence panels from rattling in concrete posts?
Use wooden wedges or plastic fence clips to stop panels from rattling. Concrete post slots are usually 50mm wide, but standard panels are only 40mm or 45mm thick. This 5mm to 10mm difference causes noise during 50mph winds. Driving a small wedge into the top and bottom of each post secures the timber firmly against the concrete face, ending the noise instantly.
Do I need to use gravel boards with concrete fence posts?
You must use concrete gravel boards to prevent the timber from rotting. A 150mm or 300mm gravel board acts as a barrier between the damp ground and your wooden panel. Without this protection, moisture will soak into the bottom of the wood, reducing its lifespan by 5 to 8 years. It's a small investment that saves you the £35 cost of a replacement panel.
Can you put wooden fence panels into old concrete posts?
You can fit new wooden panels into existing concrete posts as long as they're structurally sound. Check that the posts haven't leaned more than 5 degrees and that the slots are free of old nails or debris. Understanding how to fit fence panels to concrete posts that are already in the ground saves you £50 per hole in labour and material costs.
How much of a gap should there be between concrete fence posts for a 6ft panel?
The clear gap between the internal faces of your concrete posts should be 1.83m. This measurement matches the standard width of a 6ft UK fence panel. If you set the posts at 1.84m, you'll have 5mm of clearance on each side. This extra space makes it much easier to slide the panel into position without it getting stuck halfway down the post.
Is it better to use 3x3 or 4x4 posts for a 6ft high fence?
Use 4x4 inch (100mm x 100mm) posts for any fence that stands 6ft high. A 3x3 inch post doesn't have the strength to support a 1.8m panel during a heavy storm. Most 100mm concrete posts are reinforced with internal steel rods to handle wind speeds up to 60mph. Choosing the thicker post ensures your boundary stays upright for 20 years or more.
What is the best way to trim a fence panel to fit a smaller gap?
The best way to trim a panel is to remove the vertical side batten and cut the horizontal rails with a saw. Measure the opening between your posts and cut the panel 10mm shorter than that distance. Nail the batten back into place using 40mm galvanised nails. This technique is essential when learning how to fit fence panels to concrete posts in gardens with non-standard dimensions.