


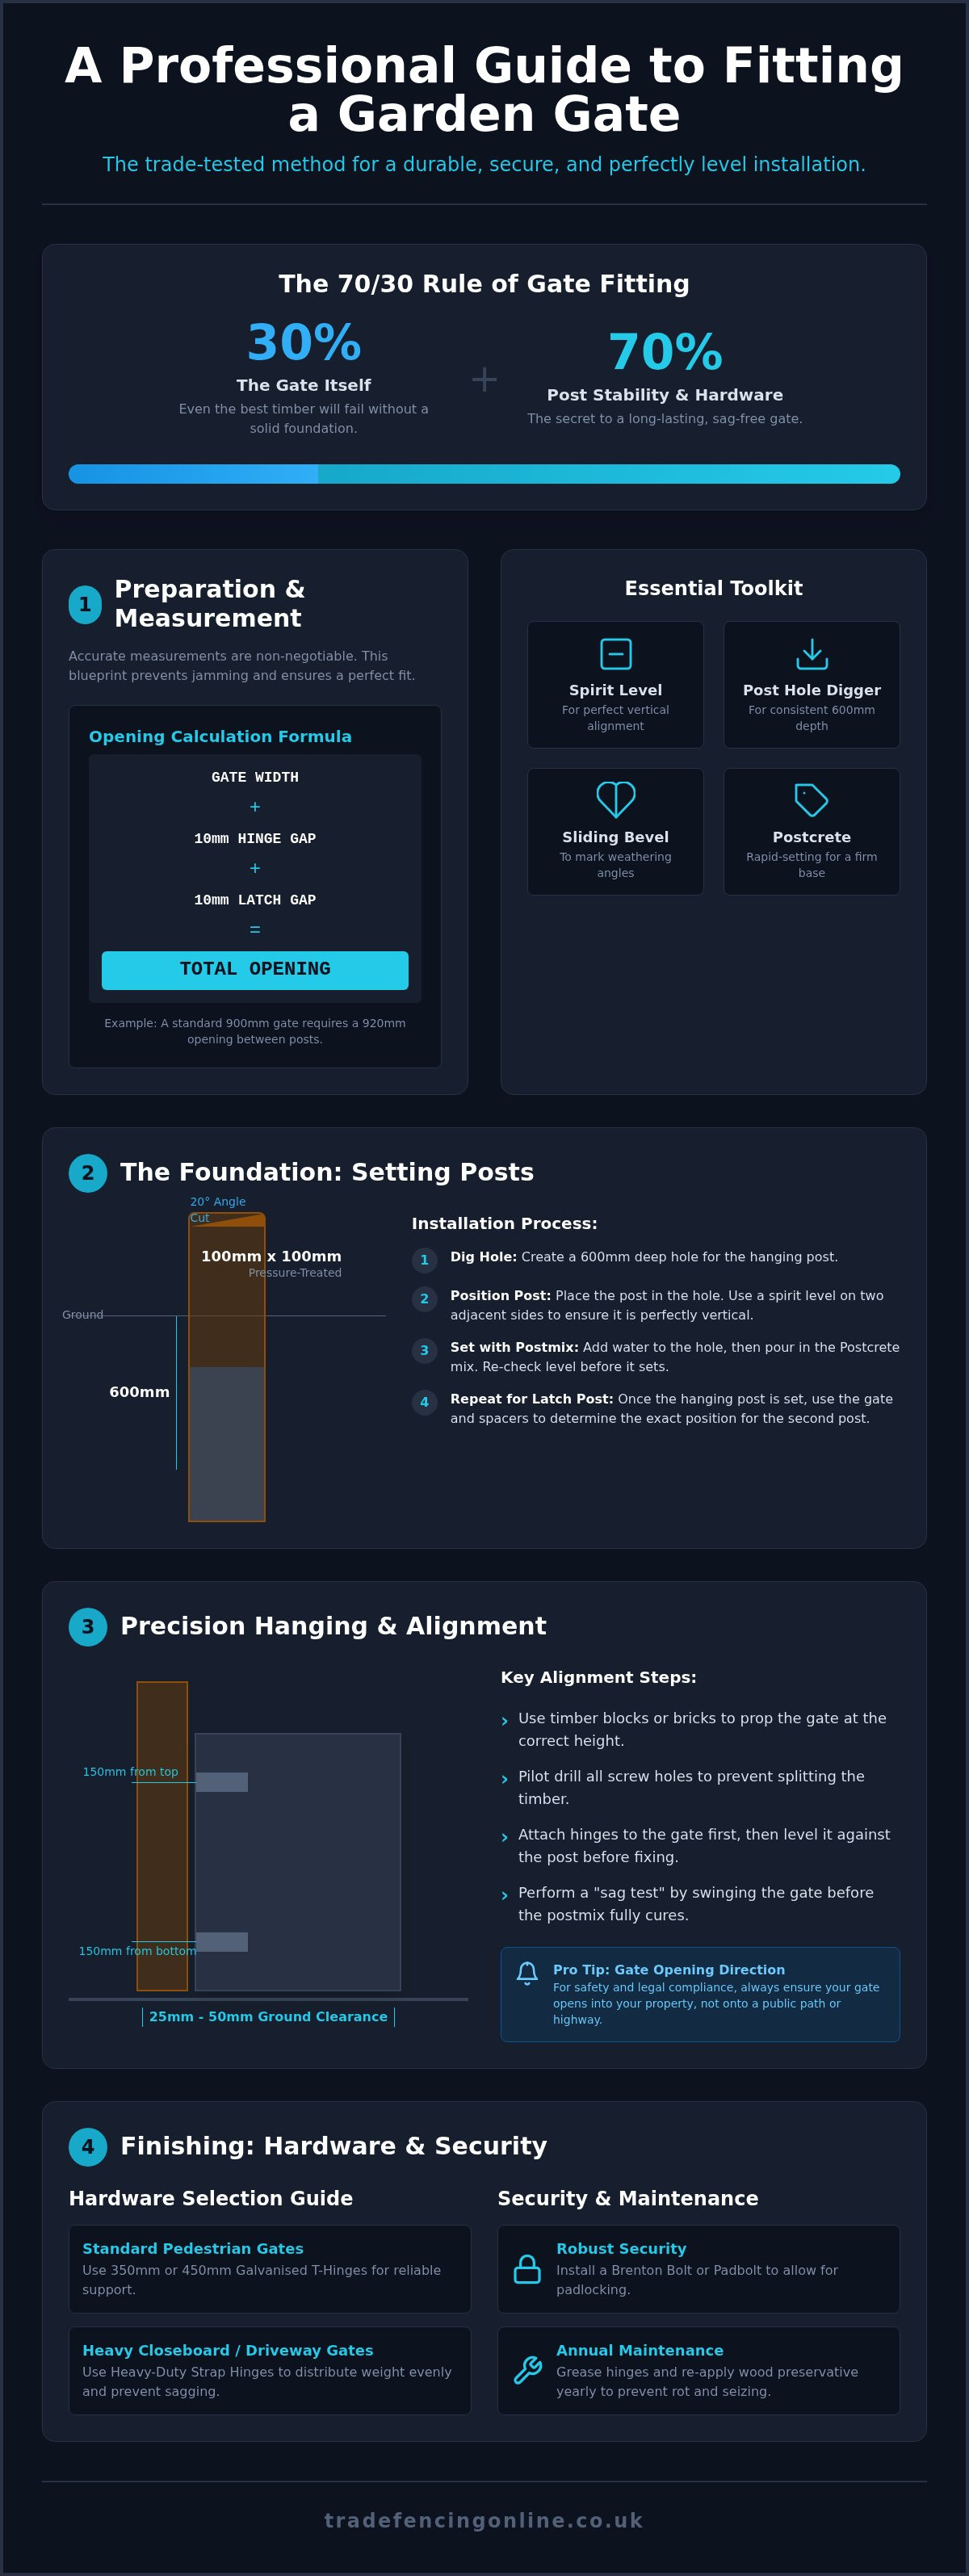
Professional gate fitting is 30% about the gate and 70% about post stability and ironmongery precision. If you don't get the foundation right, even the most expensive timber will eventually sag or scrape against the ground. Learning how to fit a garden gate properly ensures your property remains secure and looks sharp for years. We understand the frustration of rotting post bases or hinges that never seem to align. You need a reliable solution that works the first time without constant maintenance.
This guide provides trade-tested instructions to help you master the art of hanging a durable, secure gate. You'll learn the exact measurements required for smooth clearance and why 100mm posts are non-negotiable for structural support. We'll cover everything from timber protection to choosing heavy-duty galvanised hardware that survives the British winter. Follow these steps to achieve a perfectly level, professional finish that adds genuine value to your property.
Whether you are sourcing materials locally or looking for expert inspiration, Bracknell Fencing and Gates provides premium solutions that ensure your project meets professional standards from the start.
Key Takeaways
- Learn how to accurately measure your opening while accounting for post width and hinge gaps to avoid common fitting errors.
- Master the trade-tested process of how to fit a garden gate using postmix and spirit levels for a perfectly vertical, professional foundation.
- Identify the right ironmongery for your gate type, including the specific placement rules for hinges to prevent sagging over time.
- Explore essential security upgrades like Brenton bolts and padbolts to ensure your new gate provides maximum protection for your property.
Preparation and Tools: Setting the Foundations for Your Gate
Successful installation starts with a tape measure. You must account for the gate width, the posts, and a 10mm gap on either side for hinges and latches. For a standard 900mm gate, your total opening between posts should be exactly 920mm. This clearance prevents the timber from jamming during wet weather when wood naturally expands. Understanding how to fit a garden gate requires professional-grade tools for a lasting result.
Gather these essentials before you start:
- Spirit level: Used to ensure vertical alignment on both planes.
- Post hole digger: For digging consistent 600mm deep holes.
- Sliding bevel: To mark accurate weathering angles on post tops.
- Postcrete: High-quality, rapid-setting bags for a firm foundation.
Selecting Trade-Quality Gate Posts and Timber
Pressure-treated timber is non-negotiable for longevity in the UK. Untreated wood will rot at the ground line within a few seasons. For standard pedestrian gates, 100mm x 100mm posts provide the necessary structural support. Standard 75mm fence posts are insufficient; they will likely bow under the constant weight of a swinging gate.
Weather your posts by using a sliding bevel to cut a 20-degree angle at the top. This runoff prevents water from sitting on the end grain and causing premature decay. Always ensure at least 600mm of the post is secured below ground level in concrete. This depth is critical to resist the leverage forces of the gate's weight and wind resistance.
Step-by-Step Installation: Hanging and Levelling Your Gate
Start by setting your hanging post. Dig a hole 600mm deep and position the post. You must use a spirit level on two adjacent sides to guarantee it's perfectly vertical. Once aligned, fill the hole with water and add your postmix. If you're managing heavy timber, our local Essex delivery ensures your posts arrive exactly where you need them. Professional installers know that a leaning post makes learning how to fit a garden gate impossible.
Position your hinges strategically. The top hinge should be roughly 150mm from the top of the gate, with the bottom hinge 150mm from the base. When choosing pedestrian gates, ensure they open into your property rather than over a public highway. Maintain a ground clearance between 25mm and 50mm. A smaller gap looks neater but risks catching on uneven ground or frost-heaved soil during the colder months.
Mastering Hinge Alignment and Clearance
Always pilot drill your screw holes. This simple step prevents the timber from splitting, which is a common cause of hinge failure. Use timber blocks or bricks as spacers to prop the gate at the correct height while you work. This allows you to focus on levelling the gate before securing the hinges to the post. Before the concrete sets completely, perform a sag test by swinging the gate. If it drops or catches, you still have a few minutes to make minor adjustments to the post's position. This is a vital part of knowing how to fit a garden gate that lasts.
Finishing Touches: Ironmongery and Long-Term Maintenance
Selecting the final hardware is the last critical step in learning how to fit a garden gate for long-term performance. You must match the ironmongery to the gate's weight and intended use. Standard pedestrian gates typically require 350mm or 450mm T-hinges. For heavier closeboard or driveway gates, use heavy-duty strap hinges to prevent the timber from pulling away from the post. This ensures the weight is distributed evenly across the horizontal rails.
Security is a primary concern for side access. Install a Brenton bolt or a heavy-duty padbolt to allow for padlocking. These provide a robust physical barrier that standard ring latches cannot match. Annual maintenance is vital. Grease your hinges every 12 months and re-apply a high-quality wood preservative to the end grain and post tops to stop rot before it starts. Consistent care prevents the hardware from seizing during the winter months.
Choosing High-Quality Ironmongery for Security
Galvanised steel is the industry standard for Essex and East London properties. The salt-heavy coastal air quickly corrodes cheaper japanned finishes, leading to rust streaks and seized hinges. When installing your ring latch, align the strike plate carefully. A professional finish requires a smooth click close without having to lift the gate. Conduct a final inspection to ensure all screws are flush with the metalwork. This prevents snagging on clothing and ensures the gate swing remains unobstructed. High-quality ironmongery is the difference between a gate that lasts two years and one that lasts twenty.
Secure Your Property with Professional Gate Installation
Mastering how to fit a garden gate is simple when you prioritise structural stability and use the right components. You've learned that 600mm post depths and pressure-treated timber are essential for long-term durability in the British climate. Precise hinge alignment and correct ground clearance prevent the common frustrations of sagging and catching. Using trade-grade galvanised hardware ensures your installation remains secure and rust-free for years.
We provide trade-quality gates and ironmongery at competitive prices for the general public. Our team offers fast local delivery throughout Romford, Essex, and East London to help you complete your project efficiently. Trust our established expertise to supply the reliable, professional-grade foundations your garden needs.
Start your project today and enjoy a professional finish that enhances your home's security and kerb appeal.
Frequently Asked Questions
How deep should gate posts be in the ground?
Gate posts must be set at least 600mm (2ft) deep into the ground. This depth is essential to provide enough leverage to support the constant weight of the gate. Understanding how to fit a garden gate starts with a firm foundation using rapid-setting postmix. For larger driveway gates, you may need to increase this depth to ensure the posts don't lean.
Which way should a garden gate open, in or out?
Your garden gate should always open inwards towards your property. It's a standard safety practice to ensure the gate never obstructs public pavements or highways. Opening into the garden also protects the hinges from external weather and potential intruders. Always check your specific property boundaries before setting your hanging post to ensure a clear inward swing path.
Do I need a gravel board under my garden gate?
You don't need a gravel board directly beneath the gate, as it requires a clearance gap to swing freely. Most professional installations aim for a 25mm to 50mm gap between the gate and the ground. However, always use gravel boards for the surrounding fence panels. This prevents the timber from touching damp soil and significantly extends the life of your boundary.
How much gap should I leave for garden gate hinges?
Leave a total clearance of 20mm to 25mm across the entire opening width. When learning how to fit a garden gate, factor in a 10mm gap for the hinges and at least 10mm for the latch side. This spacing is vital for the natural expansion of wood during the winter. It ensures your gate opens smoothly without jamming against the posts.