


A trellis that isn't secured with professional trade fixings is essentially a sail waiting for the next 50mph UK gale to rip your fence panel apart. Many homeowners struggle with flimsy setups that rattle in the wind or, worse, cause the main structure to lean and fail. Knowing how to attach trellis to a fence panel correctly is the difference between a professional, long-lasting garden feature and a costly repair job next spring.
It's a common concern that adding height might damage your existing timber or look untidy. You want increased privacy and a sturdy frame for your ivy or clematis without compromising the strength of your fence. This guide provides the exact steps to achieve a level, trade-standard finish using secure brackets and the right ironmongery. We'll walk through the specific tools you need and the best methods to ensure your trellis stays upright and secure through every season.
Key Takeaways
- Identify your specific fence type and take precise measurements to ensure a flush, professional finish for any trellis installation.
- Discover the most secure trade methods for how to attach trellis to a fence panel to increase garden privacy and height efficiently.
- Learn how to create a 'stand-off' gap when fixing trellis to the face of a panel to promote healthy plant growth and air circulation.
- Understand essential UK planning laws, including the 2-metre height rule and how trellis additions impact your legal fence limits.
- Recognise the long-term value of trade-quality timber over budget alternatives and the benefits of local delivery in Romford and Essex.
Preparation: Tools and Materials for Trellis Installation
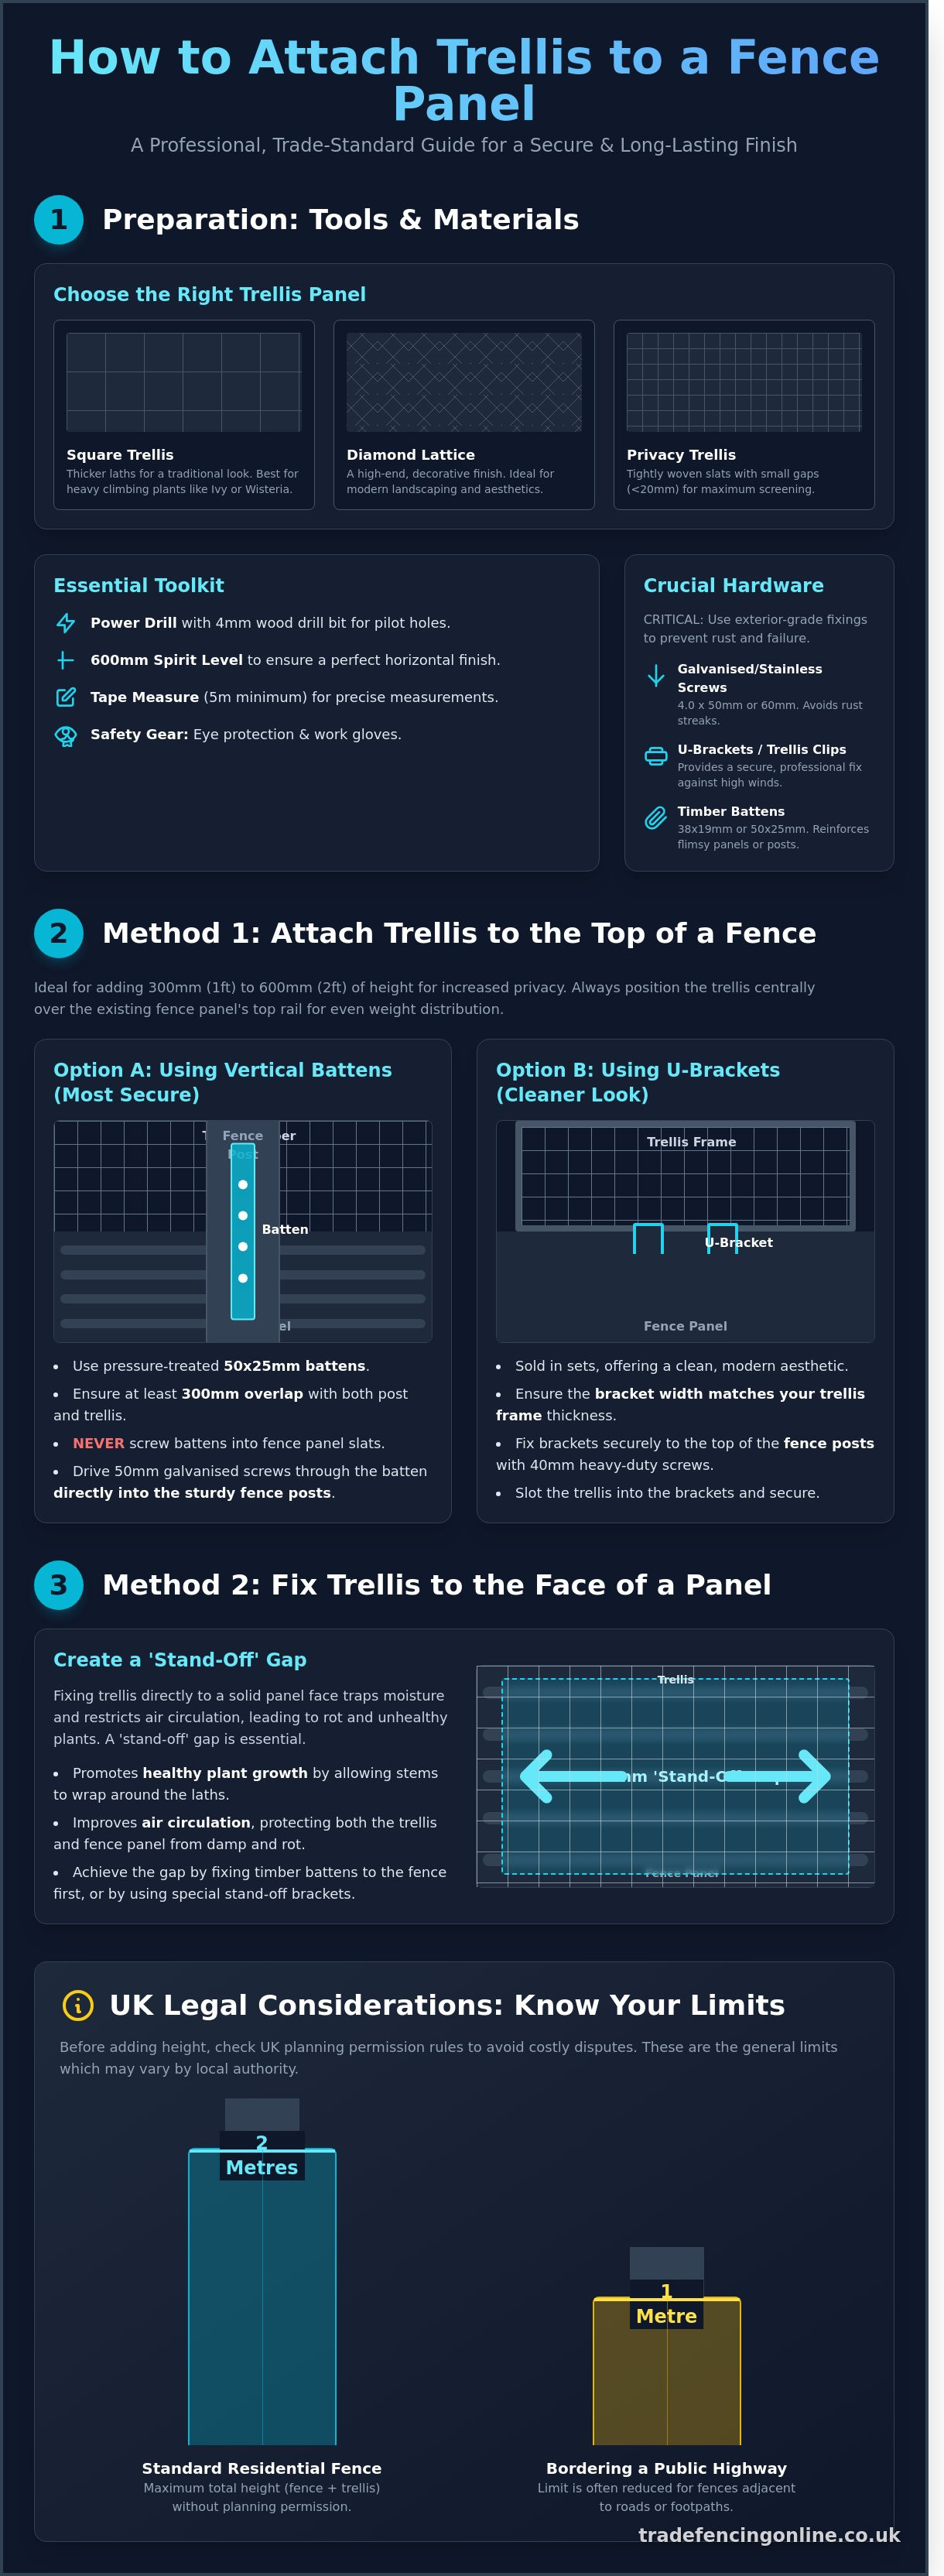
Successful installation begins with a clear understanding of your existing boundary. You must first identify your fence type. Traditional closeboard fencing features vertical overlapping feathers, providing a sturdy base for direct fixing. Standard lap panels use thinner horizontal slats and usually require more careful positioning of fixings to hit the internal frame. Measuring your panels is the next critical step. Most UK garden fence panels are 1.83m (6ft) wide. Your trellis must match this width exactly to ensure a flush, professional finish. A mismatch of even 10mm makes the job harder and looks untidy.
Understanding What is a Trellis? helps you select the right style for your specific garden goals. It's an open framework designed to support climbing plants or provide decorative screening. When you're learning how to attach trellis to a fence panel, your choice of material and pattern dictates the longevity of the project. Square trellis is the standard choice for heavy climbers like Ivy or Wisteria. Diamond lattice offers a decorative, contemporary aesthetic often seen in urban renovations. Privacy trellis features smaller gaps, typically less than 20mm, to block lines of sight from neighbours.
Choosing the Right Trellis Panel
- Square trellis: Built with thicker laths. It's the best option for heavy climbing plants and traditional British garden looks.
- Diamond lattice: Provides a high-end, decorative finish. It's ideal for modern landscaping where aesthetics matter as much as function.
- Privacy trellis: Features tightly woven slats. Use this if your primary goal is screening or increasing the height of a low fence without blocking all light.
Essential Hardware Checklist
Don't settle for standard interior screws. They will rust and leave ugly black streaks on your timber within one winter season. Always buy stainless steel or galvanised wood screws, ideally 4.0 x 50mm or 60mm depending on the thickness of your trellis frame. You'll also need U-brackets or specific trellis clips. These metal fixings provide a secure, professional fix that won't wobble in high winds. If your fence panel is older or feels flimsy, purchase 38mm x 19mm timber battens. These act as vertical supports to reinforce the structure before you learn how to attach trellis to a fence panel.
Gather your toolkit before you start the work. You'll need the following items:
- Power drill and a 4mm wood drill bit for pilot holes.
- 600mm spirit level to ensure the trellis is perfectly horizontal.
- Tape measure (5m minimum).
- Safety gear including work gloves and eye protection.
- Step ladder if you're working on 1.8m panels.
Method 1: How to Attach Trellis to the Top of a Fence
Trellis toppers are a smart, cost-effective way to increase garden privacy. Adding a 1ft (300mm) or 2ft (600mm) trellis to an existing 5ft panel provides extra screening for a fraction of the £600+ cost of replacing an entire fence run. When you learn how to attach trellis to a fence panel, the priority is structural integrity. Always position the trellis centrally over the top rail of the fence panel to ensure the weight is distributed evenly across the existing framework. This prevents the panel from leaning or sagging under the weight of climbing plants like Clematis or Honeysuckle.
Learning how to attach trellis to a fence panel correctly also involves legal awareness. You must follow UK planning permission rules regarding height. In most residential areas, a fence and trellis combination cannot exceed 2 metres in height without formal approval from your local authority. If your property borders a public highway, this limit often drops to 1 metre. Always check your local restrictions before starting the installation.
Using Vertical Battens for Support
Timber battens provide the most rigid fix for toppers. Use pressure-treated timber battens, typically 50mm x 25mm, to ensure they survive the British weather without rotting. Cut two battens to a length that allows for at least 300mm of overlap with both the trellis frame and the existing fence post. This overlap is vital for stability during high winds.
Don't screw the battens into the thin slats of the fence panel; they lack the strength to hold the weight. Instead, drive 50mm galvanised screws through the batten and directly into the sturdy fence posts. Once the battens are fixed to the posts, attach the trellis to the top section of the timber using 35mm exterior wood screws. This method creates a seamless, professional finish that won't rattle or shift.
Installing with Trellis Brackets
Steel U-brackets offer a cleaner aesthetic than timber battens. These are usually sold in sets of four and are designed to grip the trellis frame securely. Fix the galvanised brackets to the top of your fence posts using 40mm heavy-duty screws. Ensure the bracket width matches your trellis frame; most standard UK frames are 32mm or 38mm wide.
Slide the trellis panel into the open channel of the brackets. Use a spirit level to check the horizontal alignment before you drive the final fixings. Once level, secure the panel by driving screws through the pre-drilled holes in the bracket sides. This method is ideal for our range of quality trellis panels, providing a secure fit with minimal visible hardware. Check all fixings are tight to prevent wind damage during winter storms.
Method 2: Fixing Trellis to the Face of a Fence Panel
Fixing trellis to the face of a panel is the most effective way to create a living green wall. This method provides a dedicated frame for climbers like Clematis, Ivy, or Jasmine without compromising the fence structure. You must avoid screwing directly into the thin fence slats. These slats are often only 8mm to 10mm thick. They'll split or rot quickly if they're forced to carry the weight of a growing plant. Always aim your fixings for the structural framework of the panel to ensure a long-lasting installation.
Creating a Plant-Friendly Gap
Plants need room to twine and breathe. Don't fix the trellis flush against the fence timber. Use 25mm timber spacers or "cleats" between the fence and the trellis. This 25mm gap is the standard for UK gardens. It allows stems to wrap around the battens naturally. It also prevents moisture from becoming trapped between the two layers of wood. Trapped damp can rot a standard dip-treated panel in less than 48 months. Following RHS guidance on trellis installation ensures your climbers have enough airflow to prevent common fungal issues like powdery mildew.
- Use 25mm x 25mm pressure-treated timber offcuts as spacers.
- Position spacers at each corner and every 600mm along the rails.
- Ensure the spacers are level to prevent the trellis from bowing.
Securing for Heavy Climbing Plants
Mature plants like Wisteria or climbing roses add significant weight to a fence. A single mature vine can weigh over 18kg after a heavy UK rainstorm. When you're planning how to attach trellis to a fence panel for these heavy loads, you must locate the horizontal arris rails. These are the thick timber supports running across the back of closeboard or overlap panels. They provide the only secure anchor point for heavy-duty fixings.
Always use 50mm or 60mm galvanised screws to resist rust. Standard zinc-plated screws will often fail within 24 months due to the moisture held by the foliage. Drill 3mm or 3.5mm pilot holes into the arris rails before driving the screws home. This prevents the structural timber from splitting. For a standard 6ft panel, use at least six fixing points to distribute the weight evenly. This professional approach keeps the trellis secure even during high winds or peak growing seasons.
Legal Considerations and Best Practices in the UK
Before you learn how to attach trellis to a fence panel, you must understand the legal limits governing UK gardens. Planning regulations are strict about boundary heights. Most homeowners don't realise that a trellis is legally considered part of the fence. If your fence is already 2 metres high, adding a trellis on top will likely require formal planning permission from your local council. This 2-metre rule applies to rear gardens, while front gardens near a highway are usually restricted to just 1 metre in height.
Planning Permission and Fence Height
UK planning laws limit rear boundary structures to a maximum of 2 metres without a permit. If you add a 600mm trellis to a standard 1.8-metre (6ft) panel, your total height reaches 2.4 metres. This puts you in breach of Permitted Development rights. Always consult your neighbours before you start work. Boundary disputes can be expensive; a simple conversation prevents a potential £1,000 legal bill or a council enforcement notice requiring you to tear the installation down.
Weatherproofing Your Installation
The UK climate, especially in exposed areas like Essex, presents a challenge for garden structures. A trellis acts like a sail during 50mph winter gusts. This extra wind load puts immense pressure on your fence posts and gravel boards. If your posts aren't buried at least 600mm deep in concrete, the added height of a trellis could cause the entire fence to collapse during a storm. Efficiency is key here; use the right materials from the start to avoid double the work later.
- Treat Cut Ends: Whenever you drill or cut timber, you break the factory seal. Apply a high-quality wood preservative to these spots immediately to prevent rot.
- Check Fixings Annually: Metal expands and contracts. Check your screws every 12 months for signs of rust or loosening.
- Choose the Right Screws: Use galvanised or stainless steel fixings. Standard black or bright zinc screws will corrode within 18 months in the damp British air.
Following these steps ensures your garden remains both legal and safe. If you need durable timber that can withstand the elements, you can buy quality trellis and fence panels directly from our online store for fast local delivery. Knowing how to attach trellis to a fence panel correctly means your investment will stay upright for its full 15-year expected lifespan.
Sourcing Quality Trellis and Fencing in Romford and Essex
Success when learning how to attach trellis to a fence panel depends largely on the quality of your timber. Budget supermarket trellis often uses thin, 5mm slats that warp or snap within 12 months. In contrast, trade-quality trellis from Romford Fencing Ltd features 10mm to 12mm pressure-treated slats. This professional grade timber is designed to withstand the wet British climate, offering a lifespan of up to 15 years compared to the 5 years expected from untreated alternatives. We provide the same high-spec materials to local Essex contractors that we offer to our DIY customers.
Buying bulky items like 6ft fence panels or heavy trellis toppers is a logistical challenge. Our local delivery service covers Romford, Hornchurch, and the wider Essex area, removing the need for you to hire a van or risk damaging your car. We operate from our central Romford depot, ensuring that your order arrives in peak condition, ready for installation. Using the right materials makes the process of how to attach trellis to a fence panel much faster and ensures the structure remains secure during high winds. Our range of ironmongery includes black powder-coated hinges and galvanised brackets that resist rust for over 10 years, preventing the unsightly rust streaks often seen with cheaper fixings.
Why Choose Trade Fencing Online?
- Direct Delivery: We ship directly from our Romford depot to your door across Essex and East London.
- Durable Timber: All our wood is pressure-treated to UC3 or UC4 standards, preventing rot and fungal decay for over a decade.
- Expert Knowledge: Our team has over 25 years of experience in the local fencing industry, helping you choose the right gauge of trellis for your specific garden layout.
Ordering Your Fencing Supplies
It's simple to get started. Browse our full range of trellis panels, fence toppers, and gravelboards online. You'll find everything you need in one place, including the decorative ironmongery required for a professional finish. Select your items, choose your preferred delivery slot, and we'll handle the rest. We stock a wide range of galvanised U-brackets and heavy-duty screws that are essential for a secure fit. FOR QUALITY FENCING, CALL ROMFORD FENCING LTD TODAY OR EMAIL OUR TEAM to discuss your project requirements.
Upgrade Your Garden Privacy and Style
Mastering how to attach trellis to a fence panel is a fast, effective way to add height and security to your boundary. Whether you fix a topper to the top rail or mount a decorative screen to the face, always use 40mm galvanised screws to prevent rust. Ensure your final structure stays within the standard 2-metre UK height limit to remain compliant with local planning regulations. Using pressure-treated timber is essential for durability, providing a 15-year life expectancy against rot in the damp British climate.
Trade Fencing Online is your one-stop-shop for everything fencing. We're a trusted Romford supplier with over 150 5-star trade reviews from Essex contractors. Our inventory features heavy-duty, pressure-treated timber that outperforms standard DIY store alternatives. We provide free local delivery options across Essex and East London, ensuring your materials arrive on-site exactly when you need them. Don't settle for flimsy panels when professional-grade supplies are available at trade prices.
Shop our range of high-quality Trellis Panels and Toppers
Start your garden transformation today and create a secure, private outdoor space you'll enjoy all year round.
Frequently Asked Questions
Do I need planning permission to add a trellis to my 6ft fence?
You usually need planning permission if the total height of your fence and trellis exceeds 2 metres from ground level. A standard 6ft fence stands at approximately 1.83 metres; adding even a 300mm trellis takes the structure over the legal limit for most UK residential properties. Always check with your local planning office before installation to avoid receiving a formal removal order.
Can I attach a trellis to a fence I don't own?
You cannot legally attach a trellis to a fence you don't own without the owner's explicit consent. Doing so constitutes criminal damage or trespass under UK law. If the fence belongs to your neighbour, the best solution is to install your own posts 50mm inside your boundary line. This allows you to follow our guide on how to attach trellis to a fence panel without causing a legal dispute.
What size screws should I use for fixing trellis to a fence?
Use 40mm or 50mm galvanised wood screws to fix the trellis securely to the timber. These specific lengths ensure the screw penetrates the trellis frame and enters the structural rail of the fence panel without protruding through the other side. Always choose weather-resistant 4.0mm gauge screws to prevent rust streaks from appearing on your timber after 12 months of exposure.
How do I stop my trellis from rattling in the wind?
Stop trellis rattling by using 25mm galvanised U-clips or by adding rubber washers between the trellis frame and the fence panel. Rattling typically occurs because of a 3mm gap that allows movement during 40mph wind gusts. Ensure you have at least 4 solid points of contact on a standard 6ft wide panel. Tightening all fixings creates a rigid structure that remains silent in stormy weather.
Is it better to fix trellis to the posts or the panel?
It's better to fix the trellis directly to the fence posts for maximum stability. Posts provide a solid 75mm or 100mm timber foundation that won't sag under the weight of heavy climbing plants like Wisteria. Fixing only to the panel slats often leads to timber splitting or bowing over time. Use 60mm screws to angle the trellis frame into the post for a professional finish.
Can you attach a trellis to a concrete fence post?
You can attach a trellis to a concrete post using specialised galvanised trellis clips that slot into the existing post groove. Alternatively, drill 6mm holes into the concrete with a masonry bit and use wall plugs with 50mm screws. Clips are the preferred choice for 95% of trade installers because they don't risk cracking the concrete or compromising the structural integrity of the post.
How do I maintain a wooden trellis to prevent rot?
Maintain your trellis by applying a high-quality timber preservative every 24 months. Most UK trellis is pressure-treated, but an additional coat of wax-based stain prevents moisture ingress and UV fading. Focus on the end grain where 80% of rot typically begins. Ensure the bottom of the trellis sits at least 50mm above the gravel board to prevent rising damp from the soil.
What is the difference between a trellis and a fence topper?
A trellis is a standalone frame used for plants, while a fence topper is specifically manufactured with a bottom groove to sit directly on a panel. Toppers usually come in 300mm or 600mm heights and feature a heavy-duty frame for better wind resistance. Knowing how to attach trellis to a fence panel gives you more customisation options for height compared to using standard pre-made toppers.