


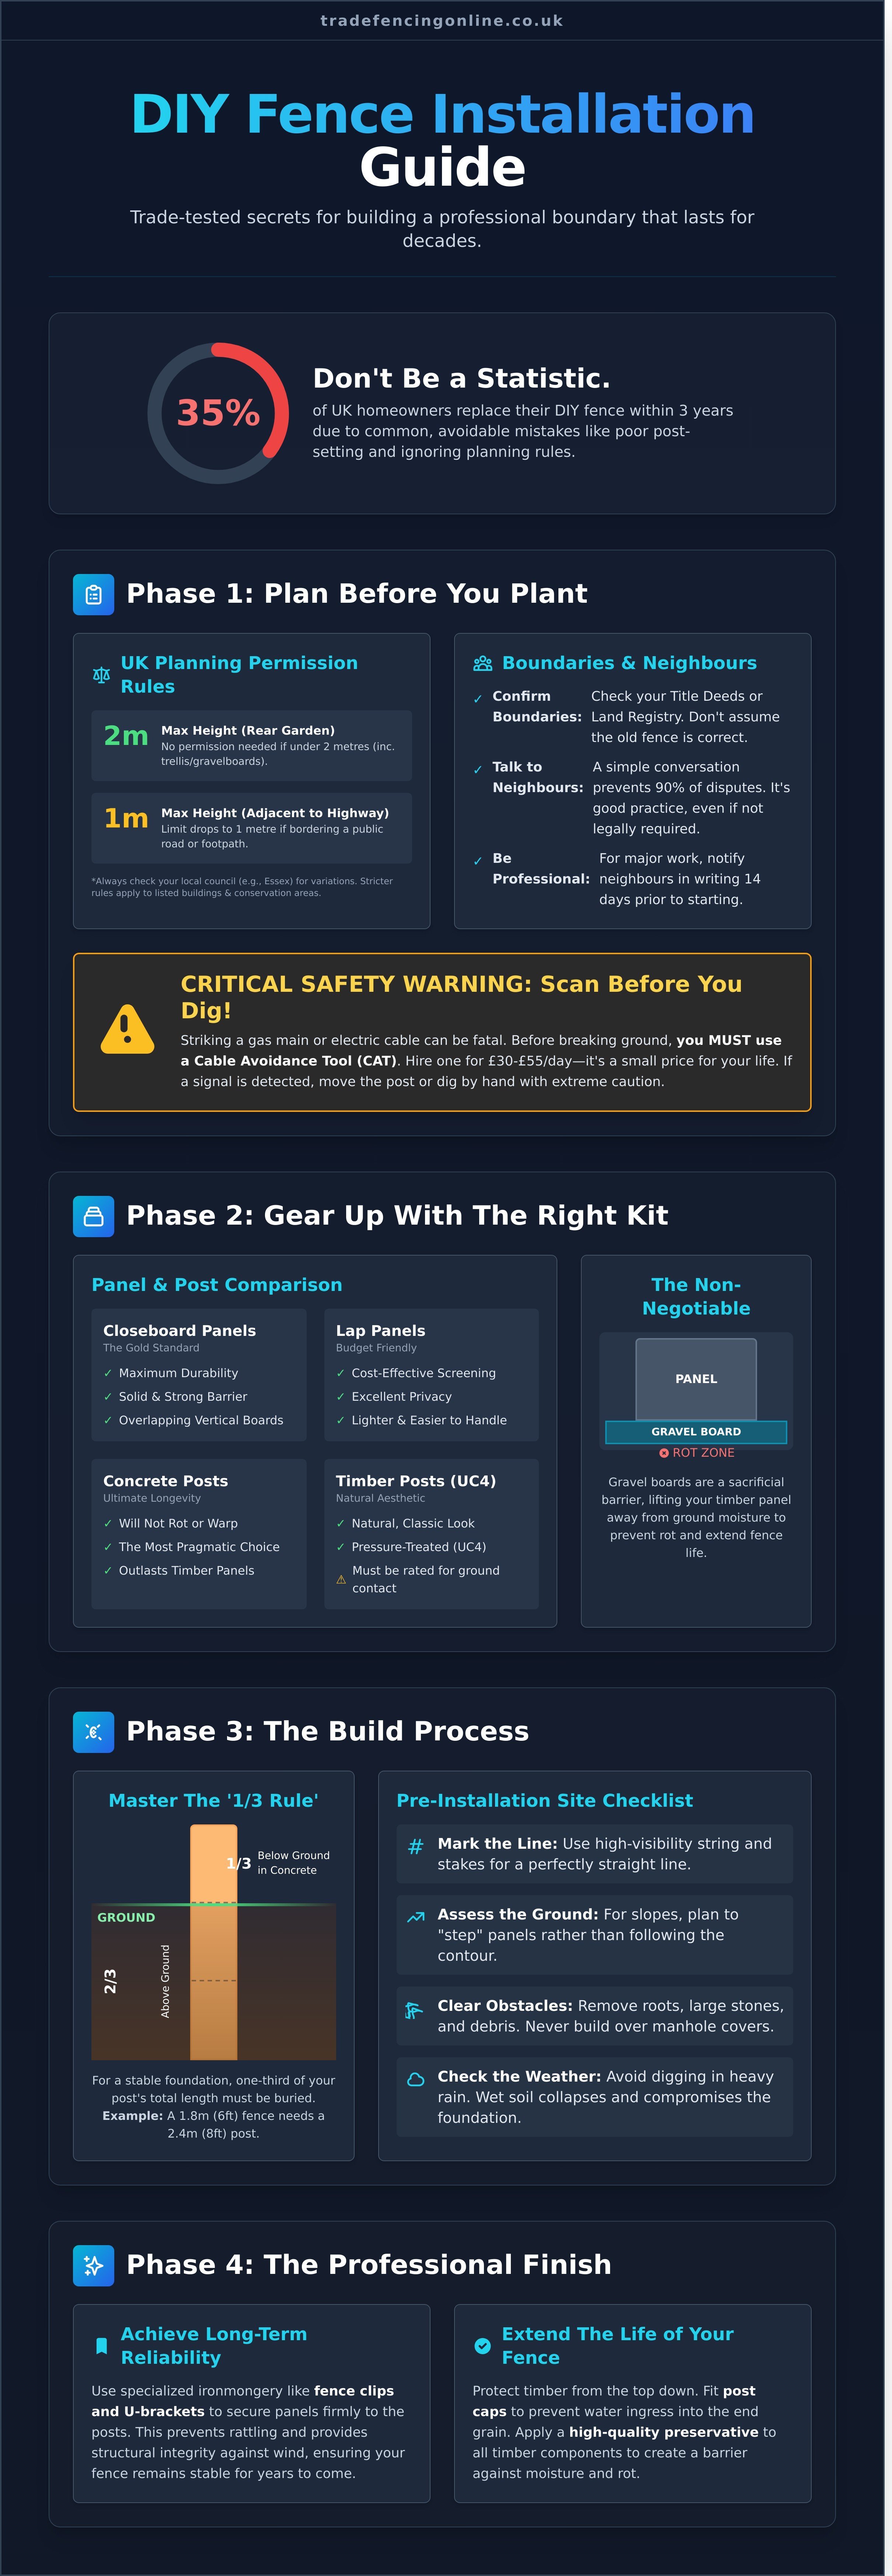
Did you know that 35% of UK homeowners end up replacing a DIY fence within three years because of poor post-setting or ignored planning rules? A garden boundary isn't just a fence; it's a structural asset that adds significant value when installed correctly. You want a straight, sturdy result that won't blow over in the first winter gale. This DIY fence installation guide provides the trade-tested secrets you need to build a professional boundary that lasts for decades.
We agree that the fear of hitting a utility cable or struggling with a 1:10 slope on your lawn is a major hurdle. You need a reliable plan that covers the technical details without any fluff. Our guide ensures you master the art of fence installation, from choosing the right gravelboards to fitting panels like a pro. We'll walk you through the 2-metre legal height limits, exact material lists, and how to secure free local delivery so you can start your project with confidence today.
Key Takeaways
- Understand UK planning laws and the 2-metre height rule to ensure your garden boundary meets all local Essex council requirements.
- Select the best materials for your project by comparing trade-quality Closeboard and Lap panels with durable concrete or timber posts.
- Master the '1/3 rule' for digging post holes with our comprehensive DIY fence installation guide to guarantee a stable foundation in any soil.
- Achieve a professional finish using specialized ironmongery and fence clips to secure panels firmly for long-term reliability.
- Extend the life of your fence by applying post caps and high-quality preservatives to protect against water ingress and rot.
Planning and Legal Requirements for UK Fencing
Before you pick up a spade, you need to understand the legal framework. Most UK homeowners follow the 1990 Town and Country Planning General Permitted Development Order. This law states that you don't need planning permission for a rear garden fence if it's under 2 metres tall. If your property borders a highway or a public footpath, the height limit drops to 1 metre. It's a common mistake to assume these rules are universal. In Essex, councils like Epping Forest or Havering often enforce specific variations for front garden heights. Check your local authority website before you spend a penny on materials. This DIY fence installation guide helps you avoid costly mistakes that lead to enforcement notices.
Boundary disputes are expensive and stall your project indefinitely. Check your Title Deeds or the Land Registry records to confirm exactly where your property ends. Never assume the existing fence sits on the correct line. If you're following a DIY fence installation guide, accuracy starts at the boundary. Talk to your neighbours early. While you don't legally have to notify them about a 2-metre fence entirely on your land, it prevents 90% of local friction. For a comprehensive overview of fencing types and the history of land boundaries, consult industry resources to ensure your project stays compliant and professional.
Safety is your primary concern during the dig. You must use a Cable Avoidance Tool (CAT) before breaking ground. Striking a high-voltage electric cable or a gas main is often fatal. You can hire a CAT tool for roughly £30 to £55 per day from most local tool hire shops. It's a small price for your safety. Scan the entire area where you plan to dig post holes. If the tool detects a signal, move your post position or dig by hand with extreme caution. Don't take risks with underground services that aren't marked on your site plans.
Do You Need Planning Permission?
You need permission if the fence exceeds 2 metres in height. This measurement includes any trellis toppers or gravelboards. If your home is a listed building or sits within a conservation area in East London, such as the Wanstead Grove or Romford Market areas, stricter rules apply. You might need permission for any change to the boundary whatsoever. Notify neighbours in writing at least 14 days before work begins. This is about being professional and avoiding 2024 legal fees or council disputes.
The Pre-Installation Safety Checklist
Success depends on your preparation. Follow these steps to ensure your site is ready for the first post:
- Mark the line: Use high-visibility string and timber stakes. Ensure the line is straight and taut along the entire length.
- Assess the ground: Look for slopes. A 15cm drop over 2 metres requires "stepping" your panels rather than following the contour.
- Clear obstacles: Remove tree roots, large stones, or debris. Check for manhole covers; never build a permanent fence over one because utility companies require 24/7 access.
- Check the weather: Avoid digging in heavy rain. Wet soil collapses easily, making it impossible to set posts firmly in Post Mix.
Once you've cleared the site and confirmed your legal standing, you're ready to start the physical work. A well-planned project is a fast project. Don't rush the legal checks; a mistake here could mean tearing down your new fence next month. Stick to the 2-metre rule and keep your neighbours informed to ensure a smooth installation process from start to finish.
Essential Tools and Materials Checklist
Success starts with the right gear. This DIY fence installation guide focuses on trade-quality components that stand up to British weather. Don't settle for flimsy alternatives; professional-grade materials ensure your boundary stays secure for decades.
Your choice of panel defines the look and strength of the perimeter. Traditional Closeboard panels are the gold standard for durability. They use thick, vertical feather-edge boards that overlap to create a solid barrier. If you're working on a tighter budget, Lap panels offer a cost-effective screening solution. While lighter, they still provide excellent privacy for standard residential gardens.
The foundation of your fence rests on the posts. Concrete posts are the pragmatic choice for longevity. They don't rot, they don't warp, and they'll likely outlast the panels themselves. If you prefer the natural look of timber, ensure you buy pressure-treated UC4 rated posts. These are specifically treated for ground contact. Always check the official UK planning rules for fences before you commit to a height. Most rear garden boundaries are limited to 2 metres without specific permission.
Gravel boards are non-negotiable for a professional finish. These 150mm high boards sit between the ground and your panel. They act as a sacrificial barrier against moisture. Timber panels rot quickly if they touch damp soil; a gravel board prevents this contact and extends the life of your fence by 5 to 7 years. For the hardware, use galvanised arris rail brackets and U-clips to prevent rust streaks. Quality ironmongery is the difference between a gate that sags and one that swings perfectly for years.
Fencing Materials You Will Need
Standard UK fence panels are 1.83m (6ft) wide. To calculate your needs, measure the total length of the run in metres and divide by 1.83. Always round up and add one extra post for the end of the run. For stability, budget for 1.5 to 2 bags of Postcrete per post. This fast-setting mix secures a 600mm deep post in under 10 minutes. For a full breakdown of quantities, you can view our full range of trade-quality supplies and access an Essential Fencing Supplies Project Checklist from Romford Fencing Ltd.
The DIY Tool Kit
You can't dig accurate 600mm deep holes with a standard garden spade. Use a heavy-duty post hole digger or a "shuv-it" to keep the holes narrow and deep. This saves on Postcrete and provides a tighter fit. A string line is vital; stretch it tight across the entire run to ensure your fence doesn't wander.
Accuracy requires a 1200mm spirit level. Don't guess the vertical alignment. For trimming panels to fit odd gaps, a circular saw provides a much cleaner edge than a hand saw. Keep a heavy-duty drill on hand for driving 100mm wood screws through the rails. Safety is paramount on any site. Always wear thick leather gloves to handle rough-sawn timber and use safety goggles when cutting or drilling. Sturdy boots with steel toe caps protect you from heavy concrete posts and falling tools.
Setting the Foundation: Digging and Post Installation
The foundation determines if your fence stands for 15 years or leans after the first winter storm. You must follow the 1/3 rule for stability. This means at least one-third of the total post length should be underground. For a standard 1.8m (6ft) fence, dig your holes to a minimum depth of 600mm. This depth provides enough leverage to resist wind loads and prevents the post from lifting during a hard frost. Ensure you check the UK planning permission rules for fences before you start; most residential boundaries allow a maximum height of 2m without a permit.
Working with Essex clay requires specific tactics. Clay is heavy and retains water, which can lead to timber rot if not managed. Use a heavy-duty steel digging bar to break the compacted soil before using a manual digger. To improve drainage, pour 50mm of 20mm shingle into the base of every hole. This prevents the bottom of the post from sitting in a pool of water. This DIY fence installation guide recommends using Postcrete for a fast, reliable set. It's a ready-to-use blend that requires no pre-mixing. Simply fill the hole one-third with water, add the powder, and it sets in roughly 10 minutes. Use 1.5 to 2 bags per post for a secure 600mm deep foundation.
Always position your first "master" post with absolute precision. This is usually the post fixed to the house wall or the one at the highest point of the garden. Every subsequent panel and post relies on this first measurement. If the master post is out of plumb by even 5mm, that error will multiply across the entire run, leaving you with a crooked finish.
Digging and Levelling
Use a scissor-action post hole digger to create narrow, vertical holes. This tool is more efficient than a spade because it removes soil without widening the top of the hole, saving you money on concrete. Once the post is in the hole, check it with a three-way post level. It's not enough to guess. Secure the post using two timber braces screwed into the sides and pegged into the ground. These braces keep the post perfectly vertical while the Postcrete cures. Never rely on holding the post by hand; even a slight gust of wind will ruin the alignment before the concrete hardens.
Installing Gravel Boards
Gravel boards are the most important part of your foundation. They act as a barrier between the damp soil and your fence panels, preventing the wood from soaking up moisture. When using concrete slotted posts, simply slide the concrete gravel board into the grooves before the next post is fully set. If you're using timber posts, you'll need 150mm wooden gravel boards. Secure these to the face of the posts using small timber blocks called cleats. This keeps the main panels at least 150mm off the ground, significantly extending their lifespan. Following this DIY fence installation guide ensures your materials don't rot prematurely, protecting your investment for the long term.
Erecting Fence Panels and Ironmongery
Once your posts are securely set, you can begin the most visible phase of this DIY fence installation guide. The method for securing panels varies based on your choice of post material. If you've installed concrete H-posts, the process is a simple matter of lifting and sliding. You slot the gravel board into the grooves first, followed by the fence panel. This system relies on gravity and the precision of your post spacing. Ensure the panel sits level. If it rattles, use small wooden wedges or specialized fence strips to tighten the fit within the concrete channel.
Timber posts require mechanical fixings. You shouldn't just nail through the side of the panel into the post. This creates a weak point and makes future repairs difficult. Instead, use galvanized fence clips or L-brackets. These metal components provide a sturdy housing for the panel. Secure three clips to each post at equal intervals using 40mm exterior-grade screws. This distribution of weight prevents the panel from sagging or warping over time. It also allows for easier removal if you need to treat the wood or replace a damaged section later.
Professional installers always leave a 50mm gap between the ground and the bottom of the gravel board. This isn't just for drainage. This gap serves as a "hedgehog highway," allowing local wildlife to pass through gardens safely. According to recent ecological data from 2023, creating these small 13cm gaps is vital for the survival of UK hedgehog populations in suburban areas. It’s a small adjustment that makes a massive environmental difference without compromising your security.
Sloping gardens present a specific challenge. Don't try to follow the angle of the ground with your panels. This looks unprofessional and weakens the structure. Use the "step" method instead. Keep every panel perfectly horizontal and drop the height of each subsequent section to match the terrain. You'll need longer posts to account for the height difference at the lower end of the slope. A standard 150mm step is usually sufficient for most UK garden gradients. If the gap under the stepped panel is too large, you can stack multiple gravel boards or use bespoke timber infills to close the space.
Fitting Panels to Wooden Posts
Precision is key when fixing to timber. Always use 75mm stainless steel screws or hot-dipped galvanized nails. Standard steel fixings will react with the tannins in the wood, leading to unsightly black streaks within 12 months. Start by checking the top line of the panel with a 1200mm spirit level. If your posts aren't perfectly aligned, the top line will look jagged. If you're still deciding on the best materials for your project, check our comparison of Closeboard vs Lap Panel Fencing: Which is Best? to ensure you choose the right weight and style for your garden.
Installing Gates and Trellis
A garden gate requires heavy-duty ironmongery to withstand constant use. For a standard 900mm wide gate, use 450mm T-hinges to distribute the weight across the horizontal braces. Fix a Brenton bolt for security and a ring latch for easy access. If you want to increase privacy without the "closed-in" feel of a 2-metre solid wall, add a 300mm trellis topper. These toppers attach to the top of your existing panels using simple wooden battens. They provide an extra 30cm of height while allowing light to pass through and offering a structure for climbing plants like clematis or ivy.
Get everything you need for a professional finish at Romford Fencing Ltd. We provide the highest quality components for your next project.
Shop our full range of Ironmongery and Fence Panels todayFinishing Touches and Waste Disposal
Your DIY fence installation guide isn't complete until you've secured the structure against the British weather. Once the panels are in place, focus on the post tops. Exposed end-grain acts like a straw, sucking moisture directly into the heart of the timber. Fit 100mm square post caps to every wooden post. These simple components shed rainwater and can extend the life of your posts by up to 5 years. Secure them with two galvanised nails to prevent warping in the summer heat.
Apply a high-quality wood preservative or spirit-based stain immediately after installation. Even if your timber is pressure-treated, an extra layer of protection prevents UV rays from bleaching the wood grey. A 5-litre tin of professional-grade fencelife typically covers 30 square metres. Use a medium-sized masonry brush to work the liquid into the grain; don't rely on sprayers for the initial coat as they often miss deep crevices.
Managing the debris from your project is the next hurdle. A standard 30-metre garden fence replacement creates roughly 600kg of waste, including old panels and heavy concrete "feet." For Essex residents, hiring a 4-yard skip is the most efficient choice. Expect to pay between £190 and £230 for a local skip hire in areas like Hornchurch or Upminster. If you have a suitable vehicle, Havering's recycling centres at Gerpins Lane accept domestic wood waste; check their current booking requirements to avoid a wasted trip.
It's also common for outdoor work to lead to dirt and dust being tracked inside. Once the new fence is up, you might want to refresh your home's interior. As an example of the type of specialist help available, The Rutland Cleaning Company offers professional services for carpets, upholstery, and hard floors, which can be ideal for a post-project deep clean.
Maintenance for Longevity
Set a recurring date every April to inspect your boundary. Winter gales often loosen fixings or cause panels to rattle. Tighten any loose screws and check the base of wooden posts for signs of soft rot. If you've used concrete posts and gravel boards, clean them with a stiff brush and warm soapy water. Removing moss and algae prevents the concrete from becoming porous over time. Re-treat all timber surfaces every 2 to 3 years to maintain the structural integrity of the wood.
Local Delivery and Support
Choosing a local Romford supplier offers distinct advantages over national big-box retailers. National chains often stock "dip-treated" timber which offers inferior protection compared to the pressure-treated products we supply. We provide trade-quality materials that are built to last in local soil conditions. Our team understands the specific requirements of Essex and East London gardens; we don't just sell products, we provide the expertise to ensure your project succeeds.
We offer free local delivery options across Essex and East London for bulk orders, saving you the hassle of transporting 1.8m panels in a standard car. You'll get your materials delivered directly to your driveway at a scheduled time. For competitive pricing and expert advice on your next project, FOR QUALITY FENCING, CALL ROMFORD FENCING LTD TODAY. Our yard is stocked with everything from traditional closeboard to modern decorative panels, ready for immediate dispatch.
Build Your Professional Boundary Today
Successful fencing relies on preparation and the right components. This DIY fence installation guide confirms that a 600mm post depth and high-quality gravelboards are essential for a long-lasting boundary in 2026. Don't skip the legal checks; ensure your panels comply with UK height restrictions to avoid costly adjustments later. We're a 5-star rated local supplier providing trade-quality materials at unmatched prices. We offer free local delivery options across Essex, making it easier to get your heavy timber and ironmongery on-site without extra fees. Our stock is built for the trade, meaning you get professional durability for your own garden. You've got the plan and the technical steps to succeed. Now, ensure your hard work lasts by using materials that stand up to the elements.
Order Your Trade-Quality Fencing Supplies for Local Delivery
Grab your tools and start your project today. You'll have a secure, professional garden boundary in no time.
Frequently Asked Questions
How deep should I dig my fence post holes?
You must dig your fence post holes to a depth of at least 600mm for a standard 1.8m high fence. A reliable rule of thumb is to bury one third of the total post length in the ground to ensure stability against high winds. If you're using 2.4m posts to support a 1.8m panel, that 600mm depth provides the necessary foundation. Proper depth prevents the fence from leaning or collapsing during winter storms.
Can I put up a fence on my own or do I need help?
You can install a fence alone, but having a second person reduces the installation time by 50% and improves safety. Handling 1.8m wide panels and heavy concrete posts is difficult and carries a risk of injury if you're working solo. This DIY fence installation guide recommends a two-person team for lifting and leveling. One person holds the post plumb while the other pours the Postcrete to ensure a professional, straight finish.
How many bags of Postcrete do I need per fence post?
Use 1.5 to 2 bags of 20kg Postcrete for every standard fence post you install. A hole 200mm wide and 600mm deep typically requires 40kg of product to fill it to the correct level. If your ground is particularly soft or the hole is wider than 200mm, you'll need 2.5 bags to ensure the post remains secure. Always keep 10% extra stock on hand so you don't run out mid-project.
Do I need a gravel board for my DIY fence?
You should always use a gravel board to protect your wooden panels from direct ground moisture. These boards create a 150mm barrier between the soil and the bottom of the timber, preventing wood rot and fungal decay. Using a concrete gravel board can increase the lifespan of your fence by up to 10 years. It's a small upfront investment that saves you the cost of replacing entire panels prematurely.
What is the maximum legal height for a garden fence in the UK?
The maximum legal height for a rear garden fence in the UK is 2 metres without needing planning permission. If your fence is next to a highway or a public footpath, the legal limit drops to 1 metre. These regulations fall under Class A of the General Permitted Development Order 1995. Check with your local council if you live in a conservation area, as 15% of UK authorities have stricter local bylaws.
How do I install a fence on a slope or uneven ground?
Use the stepping method to install your fence on a slope or uneven ground. This involves keeping each panel perfectly horizontal and creating a step at the post to follow the natural incline of the land. You'll need longer posts for the downhill side to maintain the 600mm burial depth. This DIY fence installation guide suggests filling the triangular gaps at the bottom with bespoke gravel boards to maintain security.
Should I use wooden or concrete fence posts for a DIY project?
Concrete posts are the best choice for long term durability because they don't rot or require annual maintenance. A standard 2.4m concrete post weighs approximately 45kg, which makes it harder to lift than timber but it lasts 20 years longer. Wooden posts are lighter and easier for a solo DIYer to handle during installation. However, timber posts typically require replacement every 8 to 12 years due to ground level decay.
How do I dispose of my old wooden fence panels in Essex?
Take your old panels to a local Essex County Council Recycling Centre, such as the sites in Romford or Brentwood. Most centres accept treated timber for free from local residents, though you should check specific site limits on vehicle size before traveling. If you're clearing more than 10 panels at once, hiring a 6-yard skip for around £220 is often the most efficient way to manage the waste quickly.